The first time I made a red velvet cake, I was 16 and trying to impress my grandma for her birthday. I’d seen it in a glossy Southern cookbook, all bold and bright, with cream cheese frosting swirled like a cloud. It was a little crooked and slightly underbaked — but her smile said it was perfect.
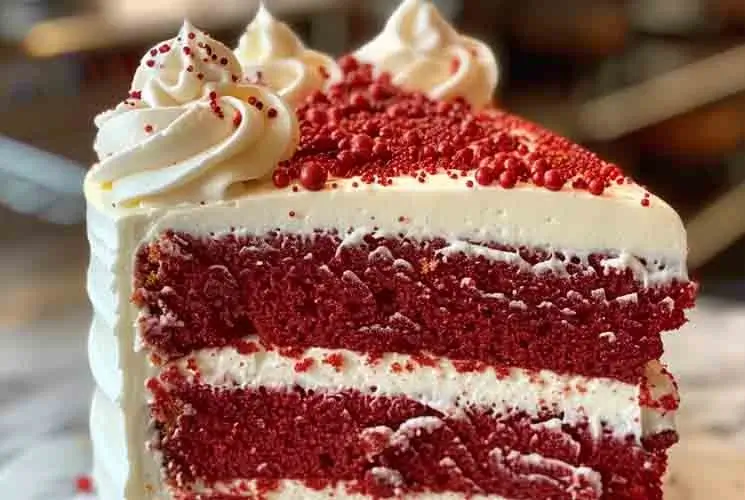
Red velvet cake isn’t just beautiful. It’s tender, rich, slightly tangy, and unbelievably moist. This iconic dessert has roots in American baking traditions and remains a favorite for birthdays, weddings, Valentine’s Day — and honestly, any day that needs a little love.
In this guide, I’ll walk you through everything you need to know: what makes a red velvet cake truly velvet, key ingredients, my personal favorite recipe, the best frosting pairings, and pro tips for flawless results. Let’s dive into the magic of red velvet.
What Is Red Velvet Cake? (And Why It’s Not Just Chocolate Cake)
Despite its dramatic look, red velvet cake is often misunderstood. Many people assume it’s just a chocolate cake dyed red — but it’s more nuanced than that.
Red velvet cake is a mildly chocolate-flavored cake with a smooth, velvety texture and a slightly tangy bite thanks to ingredients like buttermilk and vinegar. It’s often described as having a “hint of cocoa” rather than being fully chocolate-forward.
Historically, red velvet originated in the early 20th century, with some attributing its rise to the famous Waldorf-Astoria hotel in New York. Others say it became popular during WWII, when bakers used beets or food dye to mask limited cocoa supplies.
The “velvet” part refers to its soft, tender crumb — much finer than traditional butter cakes. This texture comes from the acidic combination of vinegar and buttermilk reacting with baking soda and cocoa powder. That combo not only affects flavor but plays a key role in the cake’s signature reddish hue.
In short: Red velvet cake is a unique hybrid of vanilla, cocoa, and tang — and it deserves its own spotlight.
Key Ingredients That Make Red Velvet Cake Special
The ingredients in red velvet cake are simple — but it’s the balance that matters. Here’s what gives it that unforgettable flavor and texture:
-
All-purpose flour: Creates the structure
-
Cocoa powder (natural, not Dutch-processed): Just a small amount for subtle flavor
-
Baking soda: Works with vinegar to give lift
-
Buttermilk: Adds tang and tenderness
-
Vinegar (white or apple cider): Reacts with cocoa and leavening agents for texture and color
-
Granulated sugar: Sweetens and balances the acidity
-
Vegetable oil (or butter): Oil gives a super moist crumb, but some use butter for flavor
-
Eggs: Help bind and add richness
-
Red food coloring: Gives the vibrant hue (use gel for better results with less dye)
-
Vanilla extract: Rounds out the flavor profile
Pro Tip: Want to go natural? You can substitute red food dye with beet powder or pomegranate juice — though the final color will be more muted.
Together, these ingredients create a cake that’s soft, flavorful, and distinct. It’s not too sweet. Not too chocolaty. Just… right.
Personal Favorite Red Velvet Cake Recipe
Over the years, I’ve tested dozens of red velvet recipes — from heirloom cookbooks to Pinterest trends. But this one? It’s my forever go-to. Moist. Rich. Foolproof.
Why I love this version:
-
Uses oil instead of butter for a super tender crumb
-
Balanced tang from buttermilk and vinegar
-
Just enough cocoa for depth without overpowering
-
Gorgeous color without going overboard on dye
Ingredients Overview
-
All-purpose flour
-
Cocoa powder
-
Baking soda
-
Salt
-
Sugar
-
Eggs
-
Buttermilk
-
Oil
-
Vinegar
-
Vanilla
-
Red food coloring
It bakes beautifully into two or three even layers — perfect for frosting and stacking. And the flavor? It’s light, smooth, and melts in your mouth. If I close my eyes while eating it, I’m back in my childhood kitchen, covered in red batter and beaming with pride.
The Best Frosting for Red Velvet Cake (And Why It’s Cream Cheese)
You really can’t talk about red velvet cake without talking about its best friend: cream cheese frosting. The tang of the cream cheese plays off the slight acidity of the cake in a way that’s just… perfect.
Why cream cheese frosting works:
-
It’s smooth, rich, and slightly tangy
-
It complements the mild cocoa and vanilla flavors
-
It pipes well and holds its shape when chilled
That said, cream cheese frosting can be finicky. Here’s how to get it right:
-
Use full-fat block cream cheese — not the spreadable kind in tubs
-
Room temperature ingredients help prevent lumps
-
Don’t overbeat, or it can become runny
-
Chill for 10–15 minutes before frosting the cake for neater layers
Alternative frostings:
-
Ermine frosting (cooked flour buttercream): The original pairing from early recipes
-
Whipped cream cheese frosting: Lighter, fluffier — great for summer
-
Vanilla buttercream: A solid backup, especially if you want something firmer for decorating
Personal note: I once tried adding a touch of lemon zest to my cream cheese frosting. The result? Bright, balanced, and unexpectedly elegant. Highly recommend for spring birthdays!
Baking Tips for Perfect Red Velvet Cake Every Time
Even experienced bakers can struggle with red velvet — it’s a sensitive cake. But with a few tricks, you can get flawless layers every time.
Essential Tips:
-
Use room temperature ingredients – helps everything mix evenly
Advertisement -
Don’t overmix the batter – stir until just combined
-
Sift your dry ingredients – ensures a soft, lump-free texture
-
Use cake strips – wrap around pans for flat, even layers
-
Grease + line cake pans – use parchment circles to prevent sticking
-
Preheat your oven fully – red velvet is delicate and needs consistent heat
-
Don’t overbake! – check with a toothpick at 28–32 mins for 8-inch layers
Bonus Tip:
Rest the cake layers before frosting. I often bake them the day before, wrap in plastic, and refrigerate. This makes them easier to handle and less likely to crumble.
Baking red velvet is part science, part love. Don’t rush it. Take your time and enjoy the process — red batter splatters and all!
How to Assemble and Decorate a Red Velvet Cake
Once your cake layers are cool and your frosting is ready, it’s time to build your masterpiece. This part is just as rewarding as baking — and often the most fun.
Step-by-step tips:
-
Level your layers with a serrated knife if needed for flat stacking.
-
Add a generous dollop of cream cheese frosting between each layer.
-
Crumb coat the outside: a thin layer of frosting that locks in crumbs. Chill for 15–30 minutes.
-
Apply your final thick coat of frosting. Smooth with an offset spatula or keep it rustic with swirls.
-
Decorate: Use red velvet crumbs, white chocolate shavings, or fresh raspberries for flair.
Personal touch: I love adding a “naked cake” finish for a rustic look — especially for brunch parties or small weddings. It gives a homemade, charming vibe that always gets compliments.
Red Velvet Cake Variations Worth Trying
If you’ve fallen in love with red velvet cake (how could you not?), there are so many ways to remix it.
Fun Variations:
-
Red Velvet Cupcakes – Classic and portable. Great for parties and bake sales.
-
Mini Bundt Red Velvet Cakes – Elegant single-serve desserts.
-
Red Velvet Cheesecake Cake – Layer it with a creamy cheesecake center.
-
Red Velvet Cake Pops – Mix crumbs with frosting, roll, dip, decorate.
-
Gluten-Free or Vegan Versions – Use almond flour, flax eggs, or vegan cream cheese. Still delicious!
These variations keep the core flavors while offering new textures, shapes, and presentation styles. Bonus: they freeze well too!
Tip: When adapting red velvet to new forms (like cookies or pancakes), keep the cocoa + acidity balance intact so the flavor stays true.
Storage, Freezing, and Make-Ahead Tips
Red velvet cake stores well — and can even taste better the next day as the flavors meld.
Storage Tips:
-
Room Temp: Unfrosted cake layers can sit covered at room temp for up to 2 days.
-
Refrigerated: Frosted cakes should be kept in the fridge, tightly covered. Let them sit out for 30 minutes before serving to soften.
-
Freezing:
-
Wrap unfrosted layers tightly in plastic + foil. Freeze up to 2 months.
-
Frosted slices? Flash freeze, then store in an airtight container.
-
Make-Ahead Tip: Bake the cake layers a day or two in advance. They’ll be easier to stack and frost cold!
Common Mistakes and How to Fix Them
Even seasoned bakers can hit a few bumps. Here’s how to avoid — or fix — common red velvet mishaps.
Problem: Cake is dry
Why: Overbaking, too much flour, or overmixing
Fix: Use a scale to measure flour, mix just until combined, and check doneness early.
Problem: Cake isn’t red enough
Why: Used Dutch-processed cocoa, not enough food coloring
Fix: Use natural cocoa + gel-based red food coloring for best results
Problem: Cake sank in the middle
Why: Underbaked, overmixed, or oven too hot
Fix: Use an oven thermometer; bake until toothpick comes out clean
Problem: Frosting is too soft
Why: Overmixed or cream cheese was too warm
Fix: Chill before using and don’t overbeat — just mix until smooth and fluffy
Truth bomb: Sometimes mistakes happen. Don’t let them stop you. A slightly imperfect red velvet cake is still a delicious red velvet cake!
FAQs About Red Velvet Cake
Is red velvet just chocolate cake with red food coloring?
Not quite. While it does include cocoa powder, red velvet cake has less chocolate than a traditional chocolate cake and includes vinegar + buttermilk for that distinct tang.
What makes red velvet cake red naturally?
The original reddish hue came from the reaction of natural cocoa powder with acidic ingredients. Today, food coloring (gel or liquid) is often added for a more vivid red.
Can I make red velvet cake without food coloring?
Yes! It will be more brownish-red, but you can use beet juice or beet powder for a natural alternative.
Is red velvet cake supposed to taste like chocolate?
Not really. It has a hint of cocoa but leans more toward a sweet, buttery vanilla flavor with a slight tang.
Can I use Dutch-processed cocoa powder?
It’s not recommended. Dutch-process is less acidic and won’t react the same way with vinegar/baking soda — which can affect texture and color.
Can I make red velvet cake ahead of time?
Absolutely. You can bake the layers in advance, refrigerate them, or freeze them — then frost the day of serving.
More Velvet Recipes You’ll Love
If you’re smitten with red velvet, don’t stop there. These velvet-inspired desserts take the rich, moist texture you love and give it new, colorful twists:
-
Black Velvet Cake Recipe – A dramatic, dark twist made with dark cocoa and rich flavor. Perfect for Halloween or chocolate lovers.
-
Red Velvet Cheesecake – The best of both worlds: tender red velvet cake layered with creamy cheesecake. A showstopper dessert.
-
Purple Velvet Cake Recipe – Vibrant and whimsical with a mild cocoa flavor — a fun pick for birthdays or spring parties.
-
Red Velvet Cake Recipe – Missed the classic? Go back and get the full recipe for the moist, velvety red masterpiece.
Each of these velvet cakes brings its own flair — whether you’re going for bold, elegant, or just plain delicious.

Red Velvet Cake Recipe
Equipment
- Mixing bowls
- Hand mixer or stand mixer
- Measuring cups and spoons
- Rubber spatula
- Cake pans (2×8-inch)
- Parchment paper
- Cooling rack
- Serrated knife (for leveling)
- Offset spatula (for frosting)
Ingredients
Cake:
- 2½ cups all-purpose flour
- 2 tablespoons natural cocoa powder
- 1 teaspoon baking soda
- ½ teaspoon salt
- 1½ cups granulated sugar
- 1 cup vegetable oil
- 2 large eggs room temperature
- 1 cup buttermilk room temperature
- 2 teaspoons vanilla extract
- 1 tablespoon white vinegar
- 2 tablespoons red food coloring gel preferred
Cream Cheese Frosting:
- 8 oz full-fat cream cheese softened
- ½ cup unsalted butter softened
- 3½ cups powdered sugar
- 2 teaspoons vanilla extract
- Pinch of salt
Instructions
- Preheat your oven to 350°F (175°C). Grease and line two 8-inch cake pans with parchment paper.
- Sift together flour, cocoa powder, baking soda, and salt. Set aside.
- In a large bowl, whisk sugar and oil until combined. Add eggs one at a time, mixing well after each.
- Stir in buttermilk, vanilla, vinegar, and food coloring until fully blended.
- Gradually add dry ingredients to wet ingredients. Mix until just combined (do not overmix).
- Divide batter evenly between pans. Bake for 28–32 minutes or until a toothpick inserted in the center comes out clean.
- Let cakes cool in the pans for 10 minutes, then transfer to wire racks to cool completely.
- While cakes cool, make the frosting: Beat cream cheese and butter until smooth. Add powdered sugar gradually, then vanilla and salt. Mix until fluffy.
- Assemble and frost the cake. Level the layers if needed. Spread frosting between layers, then coat the outside. Decorate as desired.
Notes
- Use gel-based food coloring for more vibrant color without affecting the texture.
- For a more traditional version, try Ermine frosting instead of cream cheese.
- Cake layers can be made ahead and stored in the fridge (up to 2 days) or freezer (up to 2 months).
Nutrition
Final Thoughts – Why Red Velvet Cake Is Always a Good Idea
Red velvet cake is a celebration in every slice — rich, bold, and full of personality. Whether it’s your first time baking one or your 50th, it never fails to impress.
More than just a dessert, red velvet is a little nostalgic, a little indulgent, and always worth the effort. It’s the kind of cake that brings people together — for birthdays, holidays, or just because.
If you try my version, I’d love to hear how it goes. Did you make it for a special occasion? Did your kids lick the bowl clean? Let’s keep the velvet love going — one slice at a time.