When the weather warms up or you’re craving something sweet without firing up the oven, a No Bake Pineapple Dream Dessert is pure magic. This retro-inspired treat brings tropical vibes and a cool, creamy finish that’s perfect for lazy afternoons, summer BBQs, or holiday potlucks.
With its melt-in-your-mouth layers and irresistible pineapple tang, this dessert has made a big comeback thanks to Pinterest, TikTok, and food nostalgia trends. It’s light, refreshing, and ridiculously easy to make—even if you’re short on time or baking skills.
What makes it shine? The effortless prep and dreamy flavor combo: a crumbly graham cracker crust, fluffy pineapple-cream cheese layer, and cloud-like whipped topping. It’s no wonder it’s a staple in Southern cookbooks, family reunions, and church dessert tables.
Whether you’re hosting or just need a sweet escape from the heat, this no-bake wonder will quickly become your go-to.
What Is No Bake Pineapple Dream Dessert?
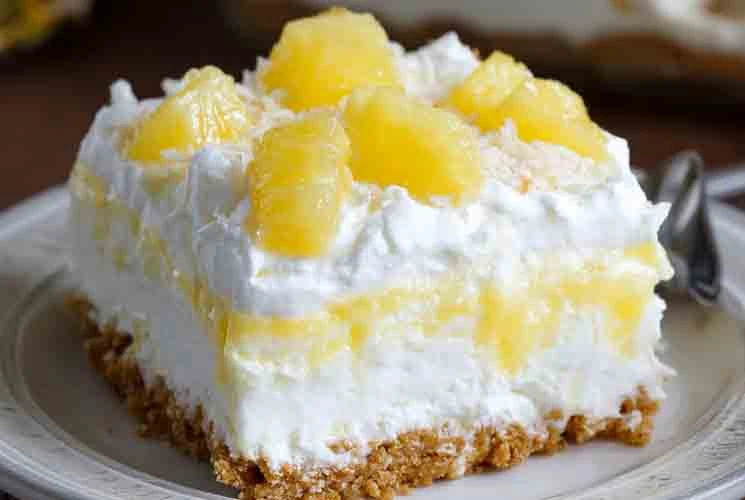
At its heart, No Bake Pineapple Dream Dessert is a simple layered dessert that combines sweet, creamy, and tangy elements into a single chilled delight. You start with a buttery graham cracker crust, which provides a firm base with a slightly crunchy texture. On top of that sits the rich, whipped filling—made from cream cheese, powdered sugar, crushed pineapple, and whipped topping. Everything comes together with zero oven time and a whole lot of old-fashioned charm.
This dessert is also known by names like pineapple delight or pineapple dessert squares, depending on who’s making it. It’s a classic “church cookbook” or “grandma’s recipe box” gem—passed down and reinvented by generations of home cooks.
The dreamy, melt-in-your-mouth texture is what makes it unforgettable. It’s sweet without being overpowering and has that nostalgic feel of creamy pineapple bars from your childhood. And the best part? It tastes even better after chilling overnight.
Why This No Bake Pineapple Dessert Is So Loved
If you need a reason to make No Bake Pineapple Dream Dessert, we’ll give you five:
-
No oven required—great for hot days
-
Quick to make—prep takes 15–20 minutes tops
-
Perfect for any occasion—from Easter brunch to backyard BBQs
-
Make-ahead friendly—even better the next day
-
Universally loved—from picky kids to nostalgic adults
You don’t need fancy skills or ingredients. Just simple pantry staples and a love for pineapple. It’s the kind of dessert that disappears fast at potlucks and has guests asking for the recipe.
Tip: For the best texture and flavor, let it chill overnight. That extra time allows the crust to set and the filling to firm up beautifully, making slicing a breeze.
Whether you’re serving it in a square dish, trifle cups, or even in a mason jar, this pineapple refrigerator dessert will always be a crowd-pleaser.
Ingredients for Pineapple Cool Whip Dessert + Easy Swaps
One of the best things about this dessert? You can keep it classic or make it your own with a few easy substitutions. Here’s a breakdown of the core ingredients and their flexible swaps:
-
Graham crackers: These form the buttery crust. For variation, try crushed shortbread cookies, vanilla wafers, or even digestive biscuits.
-
Butter: Unsalted is best to balance sweetness, but you can use salted butter if that’s all you have—just skip adding extra salt.
-
Cream cheese: Use full-fat for the richest texture, but light cream cheese works if you’re watching calories. For a more decadent flavor, try mascarpone.
-
Powdered sugar: Blends smoothly with the cream cheese. Avoid granulated sugar—it won’t dissolve well.
-
Crushed pineapple: Canned pineapple in juice is traditional. If using fresh or frozen pineapple, make sure to chop finely and drain thoroughly.
-
Whipped topping: Store-bought whipped topping (like Cool Whip) makes this a breeze. Prefer a cleaner ingredient list? Use homemade whipped cream instead.
Each component plays a role in creating that pineapple and cream cheese magic. Just don’t skip draining the pineapple—too much liquid can ruin the texture.
Tools & Equipment Needed
Making No Bake Pineapple Dream Dessert doesn’t require much—just a few kitchen staples and a bit of counter space.
-
8×8 or 9×9-inch baking dish – glass or ceramic both work
-
Mixing bowls – medium for the crust, large for the filling
-
Electric mixer or hand whisk – for a smooth cream cheese base
-
Rubber spatula – perfect for folding and spreading
-
Measuring cups and spoons – accuracy matters for balance
Pro Tip: If you want clean slices, line your dish with parchment paper before pressing in the crust. It lifts out like a charm!
Texture, Flavor, and Serving Experience
This creamy summer dessert is all about contrast—cool and velvety filling meets buttery, slightly crisp crust, with sweet pineapple bursts in every bite.
The filling is soft, airy, and melt-in-your-mouth thanks to the whipped topping and smooth cream cheese. It’s not overly sweet—the tang of the pineapple balances it out beautifully. The crust adds that subtle crunch and warm, nutty depth from the graham crackers.
You’ll get a lovely balance of textures: creamy, crumbly, light, and luscious. When chilled overnight, the layers firm up just enough to cut clean squares that hold their shape.
Serving suggestions:
-
Top with toasted coconut flakes for tropical flair
-
Add maraschino cherries for a pop of color and retro vibe
-
Sprinkle on crushed pecans or walnuts for added texture
Perfect served straight from the fridge on a hot day, it pairs wonderfully with a cup of iced tea or fresh lemonade. Whether served at a baby shower, brunch, or after a BBQ, this chilled pineapple cake brings sunshine to every plate.
How to Make No Bake Pineapple Cream Cheese Dessert (Step-by-Step)
Making No Bake Pineapple Dream Dessert is incredibly easy and satisfying. Follow these simple steps for dreamy, no-fuss results:
-
Prepare the crust:
Crush graham crackers into fine crumbs using a food processor or a rolling pin in a sealed bag. In a mixing bowl, stir the crumbs with melted butter until evenly coated. Press the mixture firmly into the bottom of an 8×8 or 9×9-inch dish to form a solid base. Place in the fridge to set while preparing the filling. -
Whip the cream cheese and sugar:
In a large bowl, beat the softened cream cheese with powdered sugar using a hand mixer or stand mixer. Continue until the mixture is fluffy, smooth, and lump-free. -
Add pineapple and whipped topping:
Drain the crushed pineapple thoroughly to prevent excess moisture. Gently fold it into the cream cheese mixture using a spatula. Then fold in the whipped topping until everything is light and airy. Be careful not to overmix—this step keeps the dessert fluffy. -
Assemble and chill:
Spoon the filling over the chilled graham crust and smooth the top evenly with a spatula. Refrigerate for at least 4 hours, but overnight is ideal for clean slicing and firm texture.Advertisement -
Optional finishing touch:
Before serving, top with additional whipped topping and a few pineapple tidbits, or sprinkle with toasted coconut or chopped pecans for added flair.
This dessert is as easy as it is impressive—no baking, no stress, just pure pineapple bliss.

Expert Tips for Perfect Pineapple Dream Dessert
Getting that cloud-like texture and clean slice? It all comes down to technique. Here are some pro-approved tips:
-
Chill thoroughly: Always refrigerate for a minimum of 4 hours. For the best results, chill overnight. This allows the layers to set and flavors to meld.
-
Drain the pineapple well: Use a fine-mesh strainer or press gently with a spoon to remove excess liquid. Too much juice can make your filling watery or your crust soggy.
-
Don’t overmix the filling: Fold ingredients gently to maintain the light and airy consistency.
-
Line your pan with parchment paper: If you want clean slices or plan to lift the dessert out in one piece, this trick works wonders.
-
Use full-fat cream cheese: It sets better and offers richer flavor, especially important in a no-bake dessert.
These no-bake dessert tips ensure your pineapple dream dessert stays picture-perfect and delicious every time.
Flavor Twists for Pineapple Dream Squares and More
Want to give your pineapple dream dessert a personal twist? Here are some fun and easy ideas:
-
Tropical twist: Add a handful of shredded coconut or diced mango to the filling for extra island vibes.
-
Lemon-pineapple combo: Fold in a teaspoon of lemon zest or a tablespoon of instant lemon pudding mix for a tangy edge.
-
Low-sugar version: Use low-fat cream cheese, sugar-free whipped topping, and unsweetened crushed pineapple for a lighter option.
-
Layered trifle: Instead of a square pan, layer the crust and filling into a clear trifle dish or individual cups with sliced fruit for a beautiful presentation.
These variations keep things fresh while still preserving that dreamy flavor. Whether you’re going for a pineapple coconut no bake dessert or a sugar-free pineapple delight, there’s room to play.
Storing Your Pineapple Refrigerator Dessert + Make-Ahead Tips
This dessert is designed to be made ahead—and that’s one of its best features.
-
Storage: Keep it covered in the fridge in its original dish or transfer to an airtight container. It will stay fresh for 3 to 4 days.
-
Make-ahead friendly: Prep the night before an event so the layers have time to set perfectly.
-
Freezing: Not recommended. The whipped topping and cream cheese filling can separate or become watery once thawed.
Whether you’re meal prepping or planning a party, this refrigerated pineapple cream bar is a sweet time-saver you can count on.
Avoid These No Bake Pineapple Dessert Mistakes
Even a no-bake dessert can have pitfalls. Here’s how to avoid the most common ones:
-
Skipping the chill time: Don’t rush it. Chilling helps the dessert set and keeps it sliceable.
-
Using undrained pineapple: This is the number one culprit for soggy crusts or runny fillings.
-
Overmixing whipped topping: Fold gently—overmixing can deflate your filling and affect texture.
-
Using salted butter in the crust: It can throw off the sweet flavor balance unless that’s what you’re aiming for.
Avoid these no-bake dessert fails and you’ll have a pineapple dessert masterpiece every time.
FAQs
Can I use fresh pineapple instead of canned?
Yes—but make sure it’s finely chopped and very well drained. Canned pineapple is preferred for its soft texture and consistent sweetness.
Can I make this without cream cheese?
Absolutely. Try using mascarpone for a richer taste, whipped cottage cheese for more protein, or even vanilla pudding mix for a different consistency.
How long does it need to chill?
Minimum 4 hours, but overnight is best. This helps the layers firm up and develop flavor.
Is this the same as Pineapple Delight or Pineapple Cool Whip Dessert?
Yes! These names are often used interchangeably. Some versions use pudding mix or extra fruit, but they’re all part of the pineapple dream dessert family.
These quick answers help ensure you get the most out of this no-fail classic.
More Pineapple Dessert Recipes to Try
If you’re loving the tropical vibes of this No Bake Pineapple Dream Dessert, you’ll definitely want to explore these other pineapple-packed favorites. Each one brings a unique twist to this sunny fruit—whether baked, chilled, or spooned fresh from the pan:
-
Pistachio Pineapple Cake – A fluffy, pistachio-infused dessert layered with pineapple and whipped topping. Light, retro, and potluck-approved!
-
Southern Pineapple Casserole – A sweet-savory side dish made with pineapple, cheese, and buttery crackers. It’s strange—but oddly addicting.
-
Tropical Pineapple Paradise Pie – This chilled pie bursts with creamy coconut and pineapple, set in a golden graham crust.
-
Pineapple Coconut Cake – Moist, fragrant, and topped with creamy coconut frosting. It’s a beach vacation in every bite.
-
Pineapple Upside Down Cake Recipe – The classic with caramelized pineapple rings and rich vanilla cake.
-
Pineapple Sunshine Bread Recipe – Sweet quick bread made with crushed pineapple and a hint of citrus. Perfect for brunch or gifting.
-
Simple Pineapple Upside Cake – A beginner-friendly version of the iconic upside-down cake—easy and elegant.
Tip: Pair any of these with whipped cream, toasted coconut, or a scoop of vanilla ice cream for extra magic.
No Bake Pineapple Dream Dessert
Equipment
- 8x8 or 9x9 baking dish
- 2 Mixing bowls
- Hand or stand mixer
- Rubber spatula
- Measuring cups and spoons
- Fine-mesh strainer (for draining pineapple)
Ingredients
- 1½ cups graham cracker crumbs
- ½ cup unsalted butter melted
- 8 oz cream cheese softened
- 1 cup powdered sugar
- 8 oz whipped topping like Cool Whip
- 1 20 oz can crushed pineapple, drained
- Optional toppings: extra whipped topping pineapple tidbits, toasted coconut
Instructions
Make the crust:
- Mix graham cracker crumbs with melted butter. Press into the bottom of your dish. Chill while prepping filling.
Prepare filling:
- Beat cream cheese and powdered sugar until smooth. Gently fold in whipped topping and well-drained crushed pineapple.
Assemble:
- Spread the filling over the crust. Smooth the top. Chill for at least 4 hours or overnight.
Serve:
- Top with extra whipped topping or fruit. Slice and enjoy!
Notes
- For best results, chill overnight for cleaner slices.
- Don’t skip draining the pineapple—excess juice will water down the filling.
- Substitute cream cheese with mascarpone or use homemade whipped cream for a richer or cleaner version.
- Stores well for 3–4 days in the fridge; freezing not recommended.
Nutrition
Final Thoughts & Serving Suggestions
Whether you’re heading to a summer potluck, hosting a shower, or just craving something light and sweet, this No Bake Pineapple Dream Dessert checks every box. It’s versatile, refreshing, and nearly effortless to pull together.
Serve it in neat slices for a classic look or spoon it into parfait cups for individual servings. Garnish with pineapple tidbits, whipped cream rosettes, crushed pecans, or toasted coconut flakes for extra flair.
Once you try it, you’ll understand why it’s a go-to no bake dessert with cream cheese and fruit. One bite, and you’re hooked.