Introduction to Ham and Cheese Sliders
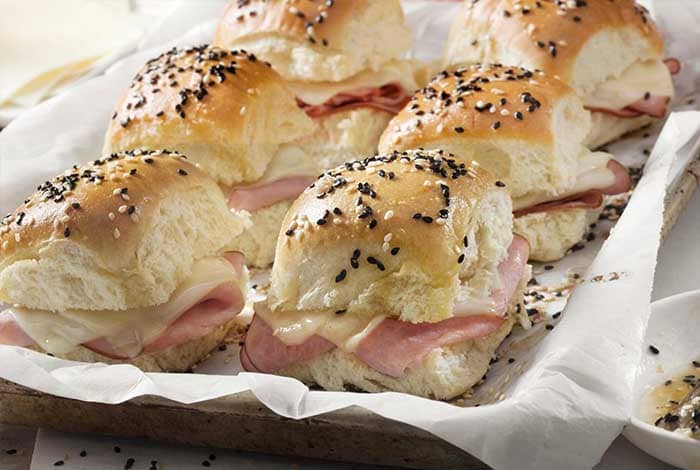
Sliders, the miniature sandwiches that have taken the culinary world by storm, trace their origins back to the early 20th century. Initially popularized as a convenient, bite-sized burger, sliders have evolved to encompass a variety of fillings, with ham and cheese emerging as a standout combination. This popularity is partly due to the perfect balance of flavors – the saltiness of the ham complemented by the creamy richness of the cheese.
The ham and cheese slider, in particular, has become a beloved fixture in party menus, family gatherings, and quick snack options. Its appeal lies in its simplicity and the comforting familiarity of its ingredients. Over time, this classic duo has seen numerous variations, adapting to changing tastes and dietary needs, yet it continues to be a favorite, showcasing the enduring love for this timeless combination.
Ingredients and Variations
Essential Ingredients for Classic Ham and Cheese Sliders
The classic ham and cheese slider is a testament to the magic of simple ingredients coming together to create something delicious. The essentials include:
- Soft Slider Buns: The base of any slider, these are typically small, soft, and slightly sweet, like Hawaiian rolls.
- Ham: Thinly sliced deli ham is the standard choice. Options range from honey ham for a touch of sweetness to smoked or black forest ham for a deeper flavor.
- Cheese: Swiss or cheddar cheese are popular for their melting qualities and flavor compatibility with ham.
Variations in Cheese and Ham Types
To cater to diverse palates, many variations have emerged:
- Cheese Varieties: Apart from Swiss and cheddar, other cheeses like Gouda, mozzarella, or Pepper Jack can add different flavor profiles. Each cheese brings its unique texture and taste, allowing for a personalized slider experience. Cheese.com offers a great selection guide for choosing the best cheese for your sliders.
- Ham Alternatives: Beyond traditional deli ham, options like prosciutto, capicola, or even leftover baked ham can be used. Each type offers a different level of saltiness and texture, adding a unique twist to the slider.
Alternative Ingredients for Dietary Restrictions
Adapting to dietary restrictions doesn’t mean compromising on taste. Here are some alternatives:
- Gluten-Free Options: Gluten-free slider buns are readily available for those with gluten sensitivities.
- Vegetarian and Vegan Variations: Plant-based hams and cheeses offer a vegetarian or vegan alternative without losing the essence of the classic slider.
- Healthier Choices: For a healthier version, opt for whole wheat buns, low-fat cheese, and lean ham slices. Adding lettuce, tomato, or avocado can also boost the nutritional value.
These variations not only cater to different dietary needs and preferences but also open up a world of creative possibilities, making ham and cheese sliders a versatile and universally loved dish.
Preparation Techniques
Creating the perfect ham and cheese slider involves a few simple steps and techniques. Here’s a step-by-step guide to ensure your sliders are a hit every time:
- Preheat the Oven: Start by preheating your oven to 350°F (175°C). This is crucial for achieving that golden-brown finish on the sliders.
- Assemble the Sliders:
- Slice the slider buns in half. Place the bottom halves in a baking dish.
- Layer each bun with a slice of ham and cheese. For an even melt, consider cutting the cheese to the size of the buns.
- Cap them off with the top halves of the buns.
- Prepare the Glaze: In a bowl, mix melted butter, Dijon mustard, minced onion, Worcestershire sauce, and poppy seeds. This glaze will add a rich flavor and a delightful crust to the sliders.
- Apply the Glaze: Brush the glaze generously over the top of the sliders. Ensure even coverage for a consistent taste and texture.
- Bake the Sliders: Bake in the preheated oven for 15-20 minutes. The cheese should be melted, and the tops golden brown.
Tips for Assembling Sliders
- Even Distribution: Ensure each slider has an equal amount of ham and cheese for consistent flavor.
- Tight Packing: Place the sliders close together in the baking dish. This helps them hold together and makes serving easier.
Baking vs. Grilling Methods
- Baking: Baking is the most common method. It evenly melts the cheese and gives a nice crust to the buns.
- Grilling: For a smoky flavor, sliders can be grilled. Wrap them in foil and grill over medium heat. This method requires more attention to avoid burning.
Serving and Presentation
Creative Serving Suggestions
- Platter Presentation: Arrange the sliders on a large platter. Garnish with parsley or edible flowers for a pop of color.
- Individual Servings: For a more formal setting, serve two sliders on individual plates with a garnish.
Pairing with Sides and Drinks
- Sides: Classic sides like coleslaw, potato salad, or a simple green salad complement the sliders well.
- Drinks: Pair with lemonade, iced tea, or light beers for a refreshing balance to the savory sliders.
Presentation Tips for Parties and Gatherings
- Themed Decor: Match the serving dishes and table decor to the theme of your event.
- Label Flavors: If you have different types of sliders, label them so guests can easily choose their preference.
- Accessible Arrangement: Arrange the sliders in a way that they are easily accessible to all guests, avoiding crowding.
With these preparation and serving tips, your ham and cheese sliders will not only taste great but also look inviting, making them the perfect choice for any gathering.
Nutritional Information
A typical ham and cheese slider, especially when made with traditional ingredients like Hawaiian rolls, deli ham, and Swiss cheese, can average around 200-300 calories per slider. This count includes about 10-15 grams of fat, 20-30 grams of carbohydrates, and 10-15 grams of protein. However, the nutritional content can vary based on the specific ingredients used.
Healthier Ingredient Swaps:
- Whole Wheat Buns: Opt for whole wheat slider buns to increase fiber content.
- Low-Fat Cheese: Choose low-fat cheese options to reduce saturated fat.
- Lean Ham: Select leaner cuts of ham to lower overall fat intake.
- Vegetable Additions: Incorporate lettuce, tomato, or avocado for added vitamins and minerals.
FAQs
Q: Can I prepare ham and cheese sliders in advance? A: Absolutely! Assemble the sliders and store them covered in the refrigerator. Bake them just before serving for best results.
Q: How should I store leftover sliders? A: Keep any leftovers in an airtight container in the refrigerator for up to 3 days. Reheat in the oven or microwave before serving.
Q: What’s the best way to serve sliders at a party? A: Serve them warm on a platter. If you’re hosting a large gathering, consider keeping them in a warming tray to maintain their temperature.
Q: Can I freeze ham and cheese sliders? A: Yes, sliders can be frozen. Wrap them tightly in foil or place them in a freezer-safe container. They can be reheated in the oven for a quick meal.
Q: How can I make my sliders more flavorful? A: Experiment with different types of cheese and ham, or add a glaze made from butter, mustard, and spices for extra flavor.
Part 7: Conclusion and Summary (100 words)
In conclusion, ham and cheese sliders are a versatile and delightful option for any meal or gathering. With their simple preparation, customizable ingredients, and universal appeal, they’re sure to be a hit. Remember, you can always tweak the recipe to fit dietary preferences or to add a personal touch. Whether you’re hosting a party, looking for a quick dinner option, or just craving a tasty snack, these sliders are a perfect choice. So, why not give this recipe a try and see just how delicious and easy making ham and cheese sliders can be?
Ham and Cheese Sliders Recipe
Equipment
- Baking dish
- Small bowl (for the glaze)
- Pastry brush (for applying the glaze)
- Aluminum foil
- Knife (for cutting the rolls)
- Cutting board
Ingredients
- 12 Hawaiian rolls or any small slider buns
- 12 slices of deli ham
- 12 slices of Swiss cheese or your preferred cheese
- 1/2 cup melted butter
- 1 tablespoon Dijon mustard
- 1 tablespoon minced onion optional
- 1 teaspoon Worcestershire sauce
- 1 tablespoon poppy seeds optional
Instructions
- Preheat Oven: Begin by preheating your oven to 350°F (175°C).
- Prepare the Buns: Cut the Hawaiian rolls in half without separating them from each other, creating a top and bottom slab.
- Layer Ham and Cheese: Place the bottom half of the rolls in a baking dish. Layer each roll with a slice of ham and a slice of cheese. Then, place the top half of the rolls on top.
- Make the Glaze: In a small bowl, mix together the melted butter, Dijon mustard, minced onion, Worcestershire sauce, and poppy seeds.
- Apply the Glaze: Brush the glaze evenly over the top of the sliders, allowing it to drip down the sides and into the rolls.
- Bake: Cover the baking dish with aluminum foil and bake for 15 minutes. Then, remove the foil and bake for an additional 5 minutes or until the tops are golden brown and the cheese has melted.
- Serve: Let the sliders cool for a couple of minutes, then cut them into individual sandwiches and serve.
Serving Suggestions:
- Serve these sliders hot as an appetizer, snack, or a main dish.
- Pair with sides like potato salad, coleslaw, or a simple green salad.
- For drinks, lemonade, iced tea, or light beers complement the sliders well.
Notes
- For a healthier version, use whole wheat slider buns and low-fat cheese.
- The sliders can be prepared ahead and stored in the refrigerator until ready to bake.
- Leftovers can be stored in the refrigerator for up to 3 days and reheated in the oven or microwave.