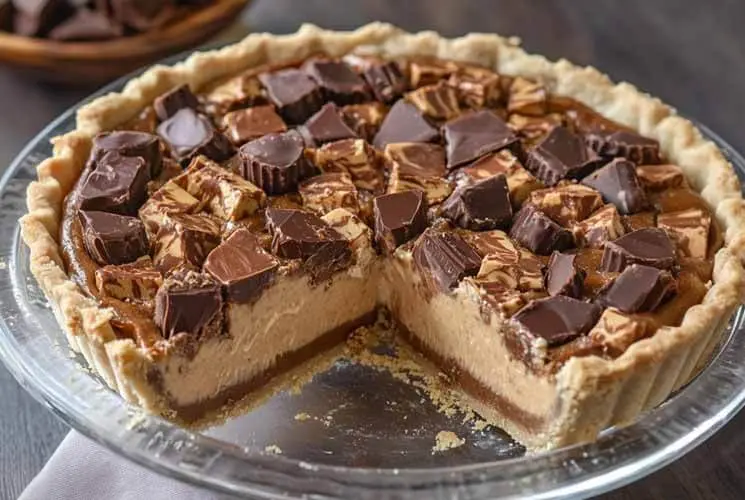
If you’re the kind of person who eats all the peanut butter cups out of the Halloween stash, this dessert was made for you. Imagine the rich, chocolatey comfort of a classic Reese’s—but super-sized into a full-blown pie. That’s right: the Giant Reese’s Peanut Butter Cup Pie is here to steal the show at birthdays, holidays, or any day ending in “Y.”
Lately, it’s been everywhere—from TikTok tutorials to Pinterest boards—because it delivers the wow factor with almost no effort. The best part? You don’t need fancy equipment or pastry school skills. Just a few pantry staples, a pie pan, and a little chill time.
Whether you’re making it for your family, friends, or (let’s be honest) just yourself, this over-the-top treat is pure peanut butter bliss. And once you slice into that glossy chocolate top and creamy filling? Game over—you’re officially obsessed.
What Is a Giant Reese’s Peanut Butter Cup Pie?
A Giant Reese’s Peanut Butter Cup Pie is exactly what it sounds like: your favorite peanut butter cup—but massive, homemade, and completely irresistible. Instead of a tiny candy you can pop in your mouth, this dessert is an indulgent pie-sized version with the same iconic flavor combo.
It starts with a buttery chocolate shell that cradles a thick, fluffy peanut butter filling, finished with a silky chocolate layer on top. Each slice gives you that perfect balance of salty-sweet richness and melt-in-your-mouth texture.
This idea first exploded when Hershey’s released a limited-edition Reese’s Thanksgiving Pie—3.4 pounds of candy that sold out instantly. But with this DIY version, you don’t have to hunt one down. You can whip it up right at home, no candy factory required. It’s bold, it’s nostalgic, and it’s the kind of dessert that makes everyone stop and say: Wait… you made THAT?
Why You’ll Love This Recipe
This giant Reese’s pie isn’t just fun—it’s deliciously practical. Whether you’re making it for a holiday dessert table, a birthday surprise, or a casual weeknight craving, it checks all the boxes.
First, it’s a no-bake (or low-bake) wonder. You can use a no-bake graham cracker or Oreo crust, or quickly pre-bake for extra structure. The filling is smooth, fluffy, and deeply peanut buttery without being too sweet.
It’s also super customizable—go classic with creamy PB, add crunch with chopped pretzels or mini Reese’s, or swirl in some Nutella for a surprise twist. And don’t worry about leftovers (though that’s unlikely): it holds up beautifully in the fridge or freezer.
Bold Tip: Slice and freeze individual portions for a ready-made treat whenever the craving hits.
This isn’t just a pie—it’s a peanut butter celebration in every bite.
Ingredients Overview + Optional Twists
This pie is surprisingly simple and uses ingredients you likely already have on hand. Here’s what you’ll need:
-
Chocolate chips: You can go with semi-sweet, milk, or dark, depending on your preference. Semi-sweet gives you that classic Reese’s flavor.
-
Peanut butter: Creamy gives a smooth filling, but crunchy adds texture. Use your favorite brand—just avoid natural peanut butters that separate.
-
Powdered sugar: This sweetens and thickens the filling for that signature fudge-like texture.
-
Butter: Helps the crust bind and adds richness to the filling.
-
Graham crackers or Oreos: Crushed for the base. Oreos make it extra chocolatey, while grahams are more traditional.
Want to jazz it up? Here are some fun flavor upgrades:
-
Add crushed pretzels to the crust for a salty crunch.
-
Stir in mini Reese’s pieces or peanut butter chips into the filling.
-
Top with flaky sea salt or a Nutella drizzle for gourmet vibes.
Pro Tip: Use high-quality chocolate—it makes all the difference in the final taste and texture.
Equipment You’ll Need
Good news: you don’t need anything fancy for this show-stopping pie. Here’s what you’ll want:
-
A 9-inch or 10-inch pie dish or tart pan (bonus if it has a removable bottom for easy release).
-
A couple of mixing bowls, a spatula, and a measuring cup.
-
A microwave-safe bowl or double boiler for melting chocolate.
-
Optional but helpful: an offset spatula to smooth the top and a cookie scoop if you want to add peanut butter scoops as a visual effect inside the pie.
Simple tools. Epic result.
Estimated Cost & Prep Time Breakdown
This rich dessert may look like something from a bakery, but it’s super budget-friendly. Here’s the breakdown:
-
Total ingredient cost: ~$12–$15, depending on your brands
-
Active prep time: About 20 minutes
-
Chill time: 2–3 hours to fully set (can be made a day ahead!)
-
Shelf life: Keeps for 4–5 days in the refrigerator
-
Freezer-friendly: Freeze whole or in slices for up to 2 months
You get a bakery-style dessert at a fraction of the price—and everyone will swear you bought it.
Step-by-Step Instructions to Make the Pie
Making this giant peanut butter cup pie is way easier than it looks. Here’s how to do it:
Step 1: Make the crust
Crush your graham crackers or Oreos until fine. Mix with melted butter until it feels like wet sand. Press it evenly into a pie dish, pressing firmly up the sides.
Bold Tip: Line the bottom with parchment paper for easy removal later!
Step 2: Make the peanut butter filling
In a mixing bowl, beat together creamy peanut butter, melted butter, and powdered sugar until smooth and thick. It should feel scoopable, like cookie dough.
Step 3: Press the filling into the crust
Transfer the peanut butter mixture into the crust. Use a spatula or wax paper to smooth and flatten it into an even layer.
Step 4: Melt the chocolate topping
In a microwave-safe bowl or double boiler, melt chocolate chips with a little butter or coconut oil for shine. Stir gently until smooth—don’t overheat!
Step 5: Pour and smooth the chocolate layer
Pour the melted chocolate over the peanut butter layer. Tilt the pan or use an offset spatula to spread evenly.
Step 6: Chill
Pop the pie into the fridge for 2–3 hours, or until the chocolate is fully set. Overnight is even better for clean slicing.
Then slice, serve, and prepare to impress!
Helpful Tips for Perfect Results
-
Don’t overheat the chocolate—it’ll seize or get grainy. Melt slowly and stir often.
-
Chill between layers if you want extra-clean slices and beautiful separation.
-
For the peanut butter filling, press it down using wax paper or a clean measuring cup for an ultra-smooth finish.
-
Want extra crunch?
Pro Tip: Fold in crushed peanuts or pretzel bits to the filling for a salty twist and satisfying texture.
Also, using high-quality chocolate makes a big difference here—this is where the flavor really shines!
Flavor Variations to Try
This pie is a dream canvas for your peanut butter and chocolate creativity. Try these fun twists:
-
Nutella swirl: Drop spoonfuls into the peanut butter layer and swirl with a knife.
-
Crust swaps: Use a pretzel crust for salty contrast or stick with classic Oreos for full chocolate impact.
-
Add-ins: Stir in crushed mini Reese’s, peanut butter chips, or even toffee bits for crunch.
-
Vegan twist: Use dairy-free chocolate chips and almond butter instead of peanut butter and butter.
-
Kid-friendly mini pies: Press into cupcake liners and layer as usual for individual treats.
So many ways to make it your own!
Serving Suggestions & Pairings
Once chilled and set, this pie is ready to shine. Serve it cold for a firm bite, or let it sit for 10 minutes at room temp for a creamier texture.
Great pairings include:
-
A hot cup of coffee or espresso
-
Vanilla ice cream for the ultimate contrast
-
Lightly sweetened whipped cream
Want to dress it up? Try these:
-
Mini Reese’s cups as topping decor
-
A sprinkle of flaky sea salt
-
Shaved chocolate curls or cocoa nibs for extra flair
It’s just as impressive on a holiday table as it is for a cozy movie night at home.
Storage & Freezing Instructions
Good news: this pie stores like a dream.
-
Refrigerate: Cover loosely with plastic wrap or store in an airtight container. Keeps fresh for up to 5 days.
-
Freeze: Wrap tightly in plastic + foil, then freeze for up to 2 months.
-
To thaw: Let sit in the refrigerator overnight before serving. You can even slice it frozen and thaw by the slice!
If you’re making it ahead of a party, the freezer is your friend.
FAQs
How do you make a giant peanut butter cup?
Combine a chocolate crust, a thick sweet peanut butter filling, and a glossy chocolate top. Layer, chill, and slice!
Can you make this with crunchy peanut butter?
Yes! It adds great texture. Just reduce the powdered sugar slightly to keep the filling from getting too dry.
What’s the best chocolate to use?
Semi-sweet or milk chocolate chips work beautifully. For a darker bite, use a high-quality dark chocolate bar.
How long does it take to set?
About 2–3 hours in the fridge, or chill overnight for the cleanest slices.
Is this the same as the Reese’s Thanksgiving Pie?
It’s inspired by it! Hershey’s released a 3.4-pound limited-edition Reese’s pie in 2021 that sold out immediately. This version lets you recreate the magic at home—no waitlist required.

Giant Reese's Peanut Butter Cup Pie Recipe
Equipment
- 9- or 10-inch pie pan (or tart pan with removable bottom)
- Mixing bowls
- Spatula
- Microwave-safe bowl or double boiler
- Optional: offset spatula, wax paper
Ingredients
For the crust:
- 1 ½ cups crushed graham crackers or Oreos
- 6 tbsp melted unsalted butter
For the peanut butter filling:
- 1 cup creamy peanut butter
- ½ cup unsalted butter softened
- 1 ½ cups powdered sugar
- ½ tsp vanilla extract optional
For the chocolate topping:
- 1 ½ cups semi-sweet or milk chocolate chips
- 1 tbsp butter or coconut oil for shine
Instructions
- Make the crust: Mix crushed graham crackers or Oreos with melted butter. Press firmly into the bottom and sides of the pie pan. Chill while you make the filling.
- Make the filling: In a bowl, beat peanut butter, softened butter, powdered sugar, and vanilla until smooth. Spread evenly into the crust.
- Make the chocolate topping: Melt chocolate chips with butter/coconut oil until smooth. Pour over the peanut butter layer and spread evenly.
- Chill: Refrigerate the pie for 2–3 hours (or overnight) until fully set.
- Serve: Slice and enjoy! Store leftovers in the fridge or freezer.
Notes
- Use crunchy peanut butter for texture, or add crushed pretzels to the filling.
- To remove the pie cleanly, line the bottom of the pan with parchment.
- Use dark chocolate for a richer, less sweet version.
- Freeze individual slices in plastic wrap for up to 2 months—perfect for ready-to-go treats!
Nutrition
Tried it already? Leave a comment below and tell us your favorite twist—did you add pretzels, use crunchy peanut butter, or sneak in some Nutella?
Hungry for More Crowd-Pleasing Desserts?
We’ve got you covered with these easy, comforting bakes that everyone will love:
-
Peach Cobbler Dump Cake – warm, gooey, and perfect with ice cream
-
Cherry Dump Cake – sweet, simple, and only a few ingredients
-
Gluten-Free Rhubarb Crumb Cake – a tart-sweet twist that’s gluten-free but big on flavor
Save them for later or bake your way through the list this weekend—your sweet tooth will thank you.

