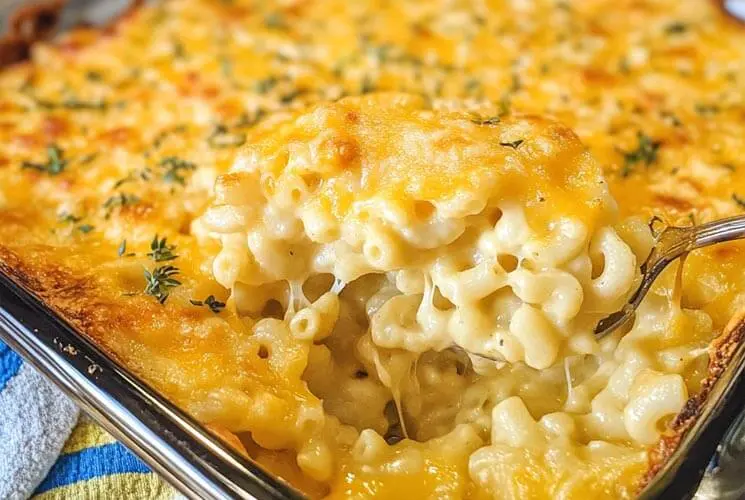
Irresistibly Creamy and Cheesy: Why This Baked Macaroni and Cheese Recipe Works
There’s something deeply nostalgic about a bubbling dish of baked macaroni and cheese. It’s the kind of comfort food that instantly takes you back—whether it’s grandma’s Sunday dinner or a holiday potluck where it disappeared faster than you could blink.
While stovetop mac has its place, baking takes this dish to a whole new level. The oven transforms a silky cheese sauce into a golden, crispy-topped masterpiece, with gooey, rich layers underneath. It’s a texture dream: crispy edges, creamy center, and just enough structure to slice and serve beautifully.
What makes this version special? It’s all in the balance. A flavorful cheese blend, a rich homemade roux-based sauce, and a perfectly baked top layer come together to deliver a mac and cheese that’s creamy without being soupy, and cheesy without being greasy. Whether you’re feeding kids or impressing guests, this recipe is a crowd-pleaser every time.
Ingredients That Make All the Difference
Great mac and cheese starts with high-quality ingredients. Here’s what you’ll need—and why each one matters:
-
Macaroni: Traditional elbow pasta is a classic, but cavatappi or shells are great alternatives for holding onto the cheese sauce.
-
Cheese Combo: For flavor and meltability, mix cheeses like sharp cheddar, Gruyère, mozzarella, and Monterey Jack. Cheddar provides that bold bite, while the others offer creaminess and stretch.
-
Milk Options: Whole milk gives a rich base, but heavy cream makes it extra luscious. For a nostalgic Southern version, try evaporated milk.
-
The Roux: A simple butter and flour base thickens your sauce and prevents separation. Don’t skip it—it’s the foundation of that creamy texture.
-
Flavor Boosters (optional but powerful): A touch of mustard powder, garlic, smoked paprika, or a pinch of cayenne adds a subtle kick and complexity.
-
Topping: You can go crust-free for a smooth top, but a buttery breadcrumb topping (or even crushed crackers) adds irresistible crunch.
Step-by-Step Instructions for Perfect Baked Macaroni and Cheese
Let’s break it down into an easy, foolproof process:
-
Cook the Pasta
Bring a pot of salted water to a boil and cook your pasta just shy of al dente. Remember: it will keep cooking in the oven. -
Make the Roux & Sauce
Melt butter in a saucepan, whisk in flour, and cook until light golden. Slowly add warm milk or cream while whisking constantly to avoid lumps. Let it simmer until thickened. -
Add the Cheese
Remove from heat and stir in your shredded cheese combo. Always add cheese off-heat to keep the sauce smooth and silky. -
Combine
Mix the pasta with the cheese sauce in a large bowl or directly in your baking dish. Make sure every noodle is coated! -
Assemble the Dish
Pour into a buttered dish. If you like extra cheese, layer a little more on top. Add breadcrumbs if using. -
Bake
Pop it in a preheated oven at 350°F (175°C) for about 25–30 minutes, or until bubbly and golden on top. -
Rest Before Serving
This is key! Let your mac and cheese sit for 5–10 minutes so the sauce sets and flavors meld.
Pro Tip: Want an ultra-crispy top? Broil the last 2–3 minutes—but watch closely so it doesn’t burn!
Customizations & Delicious Variations
Whether you’re feeling classic or creative, here are ways to make this recipe your own:
-
Southern-Style: Whisk an egg and a can of evaporated milk into your cheese sauce for a firm, custardy finish.
-
Extra Creamy: Stir in a few tablespoons of cream cheese or sour cream for ultra richness.
-
Bacon Mac: Add chopped, crisp-cooked bacon for a smoky twist.
-
Spicy Kick: Mix in diced jalapeños, a dash of hot sauce, or pepper jack cheese for heat lovers.
-
Kid-Friendly: Use mild cheeses (like American or Colby Jack) and skip the toppings for a smooth, non-crispy top.
-
Gluten-Free: Choose GF pasta and substitute gluten-free flour in the roux.
-
Vegan Version: Use plant milk (like oat or soy), vegan butter, and nutritional yeast or a cashew-based cheese sauce.
Tips for the Best Baked Mac Every Time
Here’s how to elevate your mac from good to legendary:
-
Grate Your Own Cheese
Pre-shredded cheese contains anti-caking agents that affect meltability. Always shred fresh blocks for best results. -
Cheese Blend = Flavor Power
Mixing 2–3 types of cheese creates depth and a smoother melt. -
Salt the Pasta Water
Like the sea! It’s your only chance to season the noodles from the inside out. -
Undercook the Pasta
Boil 1–2 minutes less than the box instructions—pasta continues to cook in the oven. -
Bake Uncovered
This allows moisture to evaporate and the top to crisp up beautifully. -
Choose the Right Dish
A cast iron skillet or deep baking dish helps distribute heat evenly. -
Let It Rest
Allow the baked mac to sit before scooping. This firms up the sauce and makes serving cleaner.
Common Mistakes to Avoid
Even seasoned cooks make missteps. Dodge these:
-
Overcooking the Pasta
Leads to mushy results. Go slightly under for perfect texture. -
Only One Cheese
Using just cheddar can make it oily or gritty. Mix it up! -
Skipping the Roux
You’ll miss out on that creamy, stable sauce. -
Low-Fat Dairy
These can cause separation or bland flavor. Stick with whole milk or cream. -
Underbaking
No golden top? Probably didn’t bake long enough or at the right temp.
What to Serve With Baked Macaroni and Cheese
Round out your meal with these tasty pairings:
-
Green Salad: Light and tangy vinaigrette balances the richness
-
Veggies: Roasted broccoli, steamed green beans, or sautéed spinach
-
BBQ Meats: Pulled pork, ribs, or grilled chicken make it a full Southern feast
-
Southern Staples: Try collard greens, fried okra, or black-eyed peas
-
Bread Sides: Garlic bread, cornbread, or biscuits for the carb-lovers
Make-Ahead, Storage, and Reheating Tips
Want to get ahead of the dinner rush? This baked macaroni and cheese is the perfect make-ahead dish and stores beautifully.
Make-Ahead Tips
You can fully assemble the mac and cheese up to 24 hours in advance. Just cover tightly with foil or wrap and refrigerate. Before baking, let it sit at room temperature for 30–45 minutes to ensure even baking.
Storing Leftovers
Got leftovers? Lucky you!
-
Refrigerate in an airtight container for up to 4–5 days.
-
Freeze for up to 2 months, though the texture might change slightly after thawing (especially the sauce).
Reheating Tips
-
Oven method is best: Cover with foil and warm at 325°F (160°C) until heated through (about 20 minutes).
-
Add a splash of milk or cream before reheating to loosen up the sauce and bring back that creamy goodness.
-
For a quick lunch, use the microwave. Cover the dish and heat in 30-second intervals, stirring in between.
Pro Tip: Store leftovers in single portions for easy grab-and-go meals or lunchboxes!
FAQs: Baked Mac and Cheese Questions Answered
Can I make baked mac and cheese without a roux?
Yes, but you’ll lose some of that rich, velvety texture. You can shortcut with cream cheese or egg-based custard versions, though they might be denser or less stable.
Why is my baked mac and cheese dry?
This usually means not enough sauce or overbaking. To avoid this, slightly undercook your pasta and add a bit more béchamel than you think you need—it will thicken in the oven.
What are the best cheeses to use?
For flavor and texture, mix:
-
Sharp cheddar for bold taste
-
Gruyère for a creamy melt
-
Mozzarella for that stretchy pull
-
Parmesan for a salty kick
Can I freeze baked macaroni and cheese?
Absolutely! For best results, freeze before baking. Let it thaw overnight in the fridge, then bake as directed. If freezing leftovers, wrap them well and reheat gently with a splash of milk.
How do I make it extra creamy?
Upgrade your sauce with heavy cream, cream cheese, or an extra cup of béchamel. You can also stir in sour cream just before baking.
Do I have to bake it?
Nope! You can stop right after mixing the pasta and cheese sauce for a stovetop version. But that bubbly, crispy golden topping? Totally worth the bake.
Final Thoughts: The Comfort Classic That Never Disappoints
Baked macaroni and cheese is one of those timeless dishes that brings everyone to the table. It’s comforting, nostalgic, and endlessly customizable—whether you’re keeping it classic or loading it with extras.
Don’t be afraid to make it your own. Use your favorite cheese blend, try spicy or smoky add-ins, or keep it simple and let the creamy sauce shine.
And hey—homemade beats boxed every single time. Once you taste this version, you’ll never look back.
Bonus Tip: Double the recipe if you’re feeding a crowd—this stuff disappears fast!

Baked Macaroni and Cheese Recipe
Equipment
- Large pot
- Saucepan
- Whisk
- 9x13 baking dish or cast iron skillet
- Cheese grater
- Mixing spoon
- Aluminum foil (optional, for reheating or freezing)
Ingredients
- 1 lb elbow macaroni or cavatappi
- 4 tbsp unsalted butter
- 4 tbsp all-purpose flour
- 3 cups whole milk or 2 cups milk + 1 cup heavy cream
- 3 cups shredded sharp cheddar cheese
- 1 cup shredded mozzarella or Monterey Jack, Gruyère
- ½ tsp salt
- ½ tsp garlic powder
- ½ tsp smoked paprika optional
- ½ tsp mustard powder optional
- ½ tsp ground black pepper
- 1 cup panko breadcrumbs optional topping
- 2 tbsp melted butter for topping, optional
Instructions
- Preheat the Oven: Preheat to 350°F (175°C). Grease a 9x13 baking dish.
- Cook Pasta: Boil macaroni in salted water until just al dente. Drain and set aside.
- Make Roux: In a saucepan, melt butter over medium heat. Whisk in flour and cook for 1–2 minutes until golden.
- Create Sauce: Gradually whisk in milk, stirring constantly until thickened (5–7 minutes).
- Add Cheese: Remove from heat and stir in shredded cheeses, reserving ½ cup for topping. Season with salt, pepper, and optional spices.
- Combine: Stir pasta into cheese sauce until well-coated.
- Assemble: Pour into prepared baking dish. Sprinkle reserved cheese and optional buttered breadcrumbs on top.
- Bake: Bake for 25–30 minutes until bubbly and golden brown.
- Rest & Serve: Let cool for 5–10 minutes before serving for best texture.
Notes
- Cheese Tip: Grate your own cheese for best melt and texture—avoid pre-shredded cheese if possible.
- Make-Ahead: Assemble and refrigerate unbaked for up to 24 hours. Bring to room temp before baking.
- Storage: Refrigerate leftovers in an airtight container for up to 5 days.
- Freezer Option: Freeze before or after baking. Reheat with a splash of milk to restore creaminess.
- Customize It: Add cooked bacon, caramelized onions, or jalapeños for added flavor.
- Gluten-Free Option: Use GF pasta and 1:1 gluten-free flour for the roux.
Nutrition

