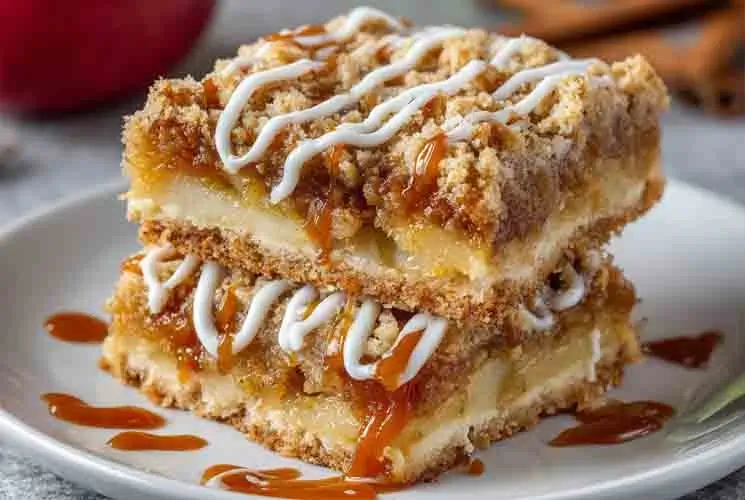
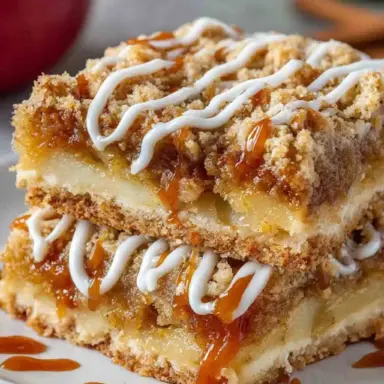
Apple pie bars are everything you love about classic apple pie—just easier, quicker, and perfectly portioned. With a buttery shortbread crust, a spiced apple filling, and a golden crumble topping, they’re the kind of treat that disappears fast at any gathering.
Whether you’re baking for a holiday crowd or just want a cozy dessert without all the fuss of rolling out pie dough, these bars have your back. They’re portable, easy to slice, and totally freezer-friendly, making them a go-to for potlucks, bake sales, and make-ahead treats.
Even better? No fork required. These handheld delights are the sweetest shortcut to everything you crave in an apple pie—warm cinnamon-spiced apples, rich buttery flavor, and that melt-in-your-mouth crumble finish. Once you make them, you’ll wonder why you ever bothered with a traditional pie in the first place.
What Are Apple Pie Bars?
Apple pie bars are a genius twist on the traditional American apple pie—same nostalgic flavor, but in a convenient, slice-and-serve format. Think of them as a cozy cross between a fruit crumble and a dessert bar, with all the best parts of apple pie packed into three simple layers.
Instead of dealing with finicky pie crusts and lattice tops, you’ll press a buttery base into a pan, load it up with cinnamon-kissed apple slices, and finish with a crumbly streusel topping. Then bake, slice, and serve—no pie plate required.
They’re especially popular for fall baking, but these bars fit right in at potlucks, bake sales, brunch tables, and holiday dessert trays all year long. Plus, they’re sturdy enough to transport and serve without a mess, making them a dream dessert for busy bakers or anyone hosting a crowd.
Best Apples to Use for Apple Pie Bars
The secret to perfect apple pie bars starts with the apples. You want varieties that are firm enough to hold their shape when baked and flavorful enough to shine through the sweetness of the crust and topping.
Some of the best choices:
-
Granny Smith – crisp, tart, and holds up beautifully in the oven.
-
Honeycrisp – sweet with a subtle tartness and great texture.
-
Braeburn – slightly spicy, complex flavor, and excellent structure.
For deeper flavor, mix two types—like Granny Smith with Honeycrisp—for a balanced sweet-tart combo. Avoid softer varieties like Red Delicious, which can turn mushy and lose their texture during baking.
Fresh, in-season apples will always give you the best result, but if you’re using stored apples, just make sure they’re firm and not mealy. A good rule: If you’d eat it fresh, it’ll probably bake well too—with the right texture and just enough natural sugar.
Overview of the Three Layers
What makes apple pie bars such a hit is their trio of textures and flavors, working together in every bite. Let’s break it down:
1. The Crust
The base is a buttery shortbread-style crust—a simple blend of flour, sugar, and cold butter pressed into your baking dish. It creates a firm foundation that doesn’t go soggy and adds a rich, slightly crumbly bite.
2. The Apple Filling
Here’s where the magic happens. Thinly sliced apples are tossed with brown sugar, cinnamon, nutmeg, and sometimes a touch of lemon juice or cornstarch to thicken things up. The result? A warm, tender filling that’s juicy but not runny, with deep caramelized apple flavor.
3. The Streusel Topping
This golden crumb topping is what takes the bars from basic to bakery-worthy. Made with oats, butter, flour, and brown sugar, it bakes into a crispy, slightly chewy layer that balances the softness of the apples.
Visual Tip: Include a labeled image or diagram showing all three layers—this helps readers understand the structure before diving in.
Together, these layers bake into a delicious harmony of crunch, warmth, and spice—just like your favorite pie, only simpler.
Key Tools & Equipment
You don’t need fancy tools to make apple pie bars, but having the right basics on hand will make the process smoother.
Here’s what you’ll need:
-
9×13 inch baking pan – the ideal size for even bars that bake up just right.
-
Parchment paper – a must for lifting out the whole batch cleanly (hello, neat slices!).
-
Apple peeler/corer – a real time-saver, especially if you’re working with lots of apples.
-
Mixing bowls – at least two: one for your crust/topping, one for the apple filling.
-
Pastry cutter or fork – for cutting cold butter into the flour for the crust and topping.
-
Sharp knife or mandoline – for slicing the apples thinly and evenly.
Optional but helpful: a cooling rack to speed up chilling before cutting. When everything’s prepped and within reach, the baking process becomes quick and enjoyable.
Make-Ahead & Storage Tips
One of the best things about apple pie bars is how make-ahead friendly they are. You can prep, store, freeze, and even transport them with ease—making them the ultimate low-stress dessert.
Make-Ahead Tips:
-
Crust and topping can be made a day in advance and stored in the fridge.
-
Apple filling can be prepped the same day, tossed with sugar and spices, and refrigerated.
-
Or assemble the full pan and bake fresh the next morning.
Storing Leftovers:
-
Cool completely, then cut into bars.
-
Store in an airtight container in the fridge for up to 5 days. The crust stays firm and the filling keeps its flavor.
Freezer-Friendly Instructions:
-
Wrap individual bars tightly in plastic wrap or parchment paper, then place in a freezer-safe bag or container.
-
Freeze for up to 3 months.
-
To thaw, let them sit at room temp or gently warm in the microwave or oven.
Pro Tip: If you’re making these for a party, bake them the night before and refrigerate. The flavors get even better the next day!
Common Mistakes to Avoid
To make apple pie bars that turn out picture-perfect, keep an eye out for these common pitfalls:
-
Overbaking: The crust can get too hard or the filling dry. Remove when the topping is golden and apples are fork-tender.
Advertisement -
Using mushy apples: Soft varieties break down too much and leave you with a soggy mess.
-
Skipping the cooling time: If you slice while they’re hot, you’ll end up with a gooey mess. Let bars cool completely for clean, neat cuts.
Baking is easy when you know what not to do—and now you’re set up for success.
How to Make Apple Pie Bars (Step-by-Step)
These apple pie bars are surprisingly simple to make once you break them down into layers. Here’s a step-by-step breakdown for baking success:
Prep the Crust
In a large mixing bowl, blend together flour, granulated sugar, and cold cubed butter using a pastry cutter or fork. The mixture should resemble coarse crumbs.
Press this evenly into the bottom of a parchment-lined 9×13-inch baking pan, forming a firm base.
Pro Tip: Leave an overhang of parchment paper for easy lifting and clean slicing later!
Cook the Apple Filling
In a skillet over medium heat, add your peeled and thinly sliced apples, brown sugar, cinnamon, and a dash of nutmeg.
Stir occasionally and let the apples soften and release their juices, about 8–10 minutes.
Optionally, add a teaspoon of cornstarch if the filling looks too runny.
Let cool slightly before assembling.
Assemble
Pour the warm apple filling evenly over the prepped crust.
Next, sprinkle your prepared streusel topping (a mixture of oats, flour, brown sugar, and butter) generously across the top.
Make sure the crumble covers all the apples—this is what gives that classic pie-bar texture.
Bake
Place the pan in a preheated 350°F (175°C) oven.
Bake for 40–50 minutes, or until the streusel topping is golden brown and the filling bubbles slightly around the edges.
Cool & Slice
Let the bars cool completely in the pan—this step is key for clean cuts.
Once cool, use the parchment overhang to lift the entire block onto a cutting board and slice into neat squares or bars.
These bars slice best when chilled slightly in the fridge first.
Easy Variations to Try
Switch up your apple pie bars with these fun and delicious twists:
-
Caramel Apple Pie Bars – Drizzle salted caramel sauce over the top after baking for a decadent finish.
-
Apple Cranberry Bars – Add a ½ cup of dried cranberries to the apple filling for a pop of tart flavor and color.
-
Apple Walnut Bars – Mix chopped walnuts into the streusel topping for extra crunch and nutty flavor.
-
Gluten-Free Version – Use a 1:1 gluten-free flour blend in place of all-purpose flour in both crust and topping layers.
Feel free to get creative with warm spices too—try a pinch of allspice or cardamom for a unique seasonal twist!
How to Serve Apple Pie Bars
These bars are delicious served warm, at room temperature, or chilled. Here are some of our favorite ways to enjoy them:
-
Warm with a scoop of vanilla ice cream for a cozy fall dessert.
-
Drizzle with salted caramel and a sprinkle of sea salt for extra indulgence.
-
Serve room temperature with whipped cream on a dessert platter for holidays or potlucks.
Want to take them over the top? Add a dash of cinnamon to your whipped cream or a crumble of pecans on top before serving.
Storing, Freezing, and Reheating Tips
These apple pie bars are perfect for prepping ahead and storing:
Store:
-
Keep in an airtight container at room temperature for up to 2 days, or in the fridge for up to 5 days.
Freeze:
-
Freeze bars individually by wrapping them in parchment or plastic wrap.
-
Stack in a freezer-safe container with layers of parchment in between to prevent sticking.
-
They’ll keep for up to 3 months.
Reheat:
-
Thaw frozen bars in the fridge or at room temp.
-
Warm slightly in the microwave (about 15–20 seconds) or toaster oven for a just-baked taste and crisp topping.
FAQs About Apple Pie Bars
Can I use canned apple pie filling instead of fresh apples?
Yes, but fresh apples give much better texture and flavor. Canned filling can be sweeter and mushier, so consider reducing added sugar and baking time slightly.
How do I keep the crust from getting soggy?
The key is to pre-bake the crust for about 10 minutes before adding the apple filling. Also, avoid excess liquid in the filling—drain it slightly if needed.
Can I make these bars vegan?
Absolutely! Use vegan butter in the crust and topping. These bars typically don’t require eggs, but if your recipe calls for one, try a flax egg or unsweetened applesauce as a substitute.
What’s the best way to slice apple pie bars cleanly?
Let the bars cool completely, or even refrigerate them before slicing. Use a sharp knife and wipe it clean between each cut to get neat, bakery-style edges.
Apple Pie Bars
Equipment
- 9x13 inch baking pan
- Parchment paper
- Apple peeler & corer
- Mixing bowls
- Pastry cutter or fork
- Sharp knife or mandoline
- Cooling rack (optional)
Ingredients
For the Crust:
- 2 cups all-purpose flour
- ½ cup granulated sugar
- 1 cup 2 sticks cold unsalted butter, cubed
For the Apple Filling:
- 4 –5 medium apples about 5 cups, peeled and sliced thin
- ⅓ cup brown sugar
- 1 tsp ground cinnamon
- ¼ tsp ground nutmeg
- 1 tbsp lemon juice
- 1 tbsp cornstarch optional
For the Streusel Topping:
- 1 cup old-fashioned oats
- ¾ cup all-purpose flour
- ⅓ cup brown sugar
- ½ cup cold unsalted butter cubed
Instructions
- Preheat oven to 350°F (175°C). Line a 9x13-inch pan with parchment paper, leaving an overhang.
- Make the crust: In a bowl, mix flour and sugar. Cut in butter until the mixture resembles coarse crumbs. Press evenly into the pan. Bake for 10 minutes, then set aside.
- Cook the apples: In a skillet over medium heat, combine sliced apples, brown sugar, cinnamon, nutmeg, and lemon juice. Stir until softened (8–10 min). Optional: stir in cornstarch to thicken.
- Assemble: Spread apple filling over baked crust. In another bowl, combine oats, flour, brown sugar, and cold butter for the streusel. Sprinkle evenly on top.
- Bake: Return pan to oven and bake for 40–50 minutes, until topping is golden and filling is bubbly.
- Cool & slice: Let cool completely before lifting out using parchment and slicing into bars.
Notes
- Let bars cool fully for clean slices.
- Best apples: Granny Smith + Honeycrisp for sweet-tart balance.
- Store in fridge up to 5 days or freeze for up to 3 months.
- Optional: Add chopped nuts to streusel or drizzle with caramel for variation.
Nutrition
Final Thoughts: Apple Pie Bars Made Easy
There’s something timeless and comforting about apple pie bars—the sweet, spiced apples, the buttery shortbread crust, and that golden, crumbly topping all come together in one perfect bite. Whether you’re baking for a cozy family night or prepping ahead for a festive gathering, these bars deliver all the flavors of homemade apple pie without the hassle.
They’re easy to make, simple to serve, and guaranteed to impress—no rolling pin required. Plus, with so many delicious ways to customize them, from caramel drizzle to nutty streusel, there’s always room to make them your own.
So go ahead—bake a batch, share a few, and maybe keep a couple just for you. Once you try them, these apple pie bars might just become your new favorite fall dessert (or year-round treat!).