Why Everyone Loves Stuffing Balls
If you’re searching for the perfect stuffing balls recipe that delivers big on flavor and ease, you’re in the right place. This is the kind of dish that transforms a holiday table—and it’s surprisingly simple to make.
For many families, a classic stuffing balls recipe is a must-have during Thanksgiving and Christmas. These golden bites combine everything you love about traditional stuffing—savory herbs, tender bread, buttery richness—but baked into crispy, hand-held portions that everyone loves.
Unlike basic stuffing in a casserole, a well-made stuffing balls recipe ensures even cooking and just the right texture: crispy edges with a moist, flavorful center. They also travel well, freeze beautifully, and make perfect leftovers.
Whether you’re making your first holiday dinner or upgrading grandma’s stuffing, this stuffing balls recipe will quickly become a favorite. Once you try these crispy little flavor bombs, you’ll want to make them part of your regular rotation!
What Are Stuffing Balls?
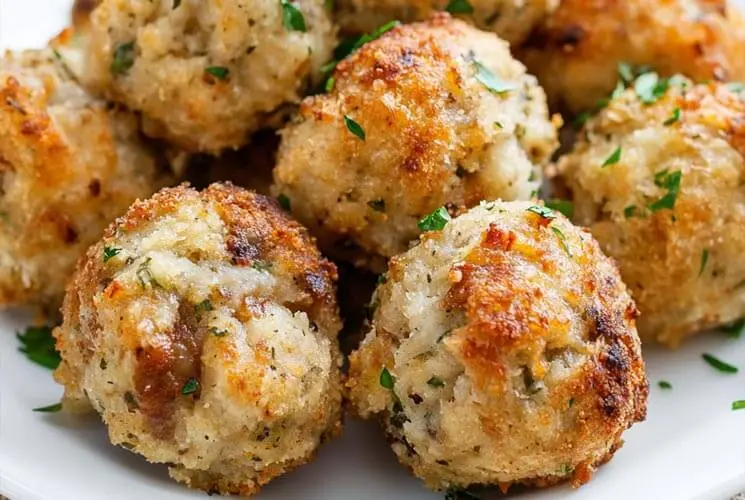
Stuffing balls are a delicious twist on the classic stuffing dish, shaped into hand-rolled balls and baked until golden. Popular in both the U.K. and U.S., they’ve become a go-to holiday side dish for their ease, portability, and crave-worthy texture.
Traditionally, stuffing was made to fill the cavity of poultry before roasting. But modern cooks often prepare it separately—and stuffing balls take that idea a step further. Instead of baking stuffing in a casserole, the mixture is rolled into portions, making it crispy, golden, and perfectly portioned.
The benefits? They cook evenly, can be made ahead, and are incredibly versatile. Plus, they look beautiful on the table, whether you’re feeding a crowd or prepping individual servings for a plated dinner. They also freeze and reheat well, making them perfect for meal prep or leftovers. Once you try them, you may never go back to the traditional tray version again!
Ingredients Overview & Flavor Tips
At their core, stuffing balls are made from a simple, humble list of ingredients—but each one brings something special to the table.
Basic Ingredients:
-
Breadcrumbs – Acts as the base. Use stale bread or store-bought breadcrumbs for ease.
-
Onions & Garlic – Add deep, savory flavor.
-
Butter – Brings richness and helps bind the mix.
-
Eggs – Essential for structure and hold.
-
Herbs – Sage, thyme, and rosemary are the classic trio.
Fresh vs. Dried Herbs:
Fresh herbs offer brighter, more fragrant flavor, but dried herbs are convenient and still delicious. Just remember: dried herbs are more concentrated—use about one-third the amount.
Pro Tip:
Toast your breadcrumbs or bread cubes in the oven before mixing. It adds a layer of nutty depth and prevents sogginess.
Optional Add-Ins for Flavor Upgrades:
-
Sausage – Crumbled and pre-cooked
-
Chopped chestnuts – A nod to traditional English Christmas flavors
-
Diced apples or cranberries – A sweet contrast to savory herbs
-
Mushrooms – For umami richness
Mix and match based on the occasion or your personal taste!
Step-by-Step Instructions: How to Make Stuffing Balls
Let’s walk through how to make these crowd-pleasing bites step by step.
1. Prep Your Aromatics
-
In a skillet, melt butter over medium heat.
-
Add finely chopped onion and garlic, cooking until soft and fragrant—about 5 minutes.
-
Let cool slightly before combining with the rest.
2. Combine Ingredients
-
In a large mixing bowl, add breadcrumbs, sautéed aromatics, chopped herbs, eggs, and a splash of stock or broth (just enough to moisten the mix).
-
Season well with salt, pepper, and any preferred extras (sage, thyme, etc.).
-
Mix until the mixture just holds together when pressed—not too wet.
3. Shape the Balls
-
Use clean hands or a cookie scoop to form even-sized balls, about the size of a golf ball.
-
Don’t compress too tightly—lightly packed is best for fluffy interiors.
4. Bake to Golden Perfection
-
Preheat your oven to 375°F (190°C).
-
Line a baking tray with parchment paper for easy cleanup.
-
Arrange balls with space in between and spray or brush tops lightly with oil or melted butter.
-
Bake for 20–25 minutes, or until golden and crisp on the outside.
Optional Cooking Methods:
-
Air Fryer: 350°F for 10–12 minutes (check halfway)
-
Skillet: Fry gently in butter for a crispy exterior, though baking is easier for batches.
Doneness Test:
They’re done when the outside is crisp and golden, and the inside is cooked through but still moist—not mushy.
Common Mistakes to Avoid
Even simple recipes have their quirks! Here are the top mistakes to avoid:
-
Over-packing the mixture: Tightly packed balls can become dense and dry.
-
Under-seasoning: Don’t skimp on herbs and salt—breadcrumbs are bland by nature.
-
Too much moisture: Adding too much broth can make them soggy.
-
Skipping the rest period: Let them cool slightly after baking so they firm up and hold together better when serving.
A little care goes a long way for stuffing balls that hold their shape and shine with flavor.
Best Time to Serve Stuffing Balls
Stuffing balls shine brightest during the holiday season, especially Thanksgiving and Christmas. Their tidy shape and rich flavor make them an ideal side dish for:
-
Roast turkey or chicken
-
Glazed ham
-
Herb-crusted pork loin
Advertisement
They’re also fantastic as a party appetizer (with a side of gravy or cranberry dip), or as a weekday treat when you want something cozy and savory.
Hosting a Friendsgiving or potluck? These are easier to transport and serve than a pan of stuffing—and guests love the individual servings!
Delicious Variations to Try
One of the best things about stuffing balls is how easy they are to customize. Whether you’re catering to dietary needs or just craving something a little different, these variations are sure to please.
-
Sausage Stuffing Balls: Add cooked crumbled sausage (pork, turkey, or plant-based) for a heartier, meaty version. It adds richness and makes them more filling.
-
Vegetarian Stuffing Balls: Use vegetable broth instead of chicken stock and toss in some sautéed mushrooms, grated cheddar, or a sprinkle of parmesan.
-
Gluten-Free Option: Swap breadcrumbs with certified gluten-free breadcrumbs or ground oats. Just make sure your broth and other ingredients are gluten-free too.
-
Low-Carb/Keto Style: Replace breadcrumbs with almond flour, skip the onions if you’re watching carbs, and increase egg or cheese to bind.
-
Holiday Twist: Add dried cranberries, chopped chestnuts, or even a little orange zest for a festive flavor punch. These pair beautifully with turkey and gravy!
Don’t be afraid to mix and match these ideas to make a batch that suits your table. The stuffing ball base is super adaptable!
Make-Ahead Tips & Meal Prep Ideas
Stuffing balls are a dream for busy cooks because they hold up beautifully when made ahead. Here’s how to prep smart:
-
Make the mixture a day ahead: Shape the balls, then place them on a parchment-lined tray. Cover tightly and refrigerate overnight.
-
Refrigerate cooked balls: Let them cool completely, then store in an airtight container in the fridge for up to 4 days.
-
Freezing tips: You can freeze unbaked stuffing balls on a tray, then transfer to a freezer bag. Or freeze fully baked ones once cooled. They’ll keep for up to 2 months.
-
Reheat like a pro: Bake from frozen at 350°F (175°C) for 15–20 minutes until heated through. For best texture, avoid microwaving—an air fryer or oven gives the crispiest results.
Perfect for prepping days before a big meal or saving leftovers for later.
How to Store & Reheat Stuffing Balls
Proper storage keeps your stuffing balls fresh and flavorful:
-
In the fridge: Store cooled stuffing balls in an airtight container for up to 4 days. They’re great for next-day meals or packed lunches.
-
In the freezer: Wrap them tightly in plastic wrap or foil, then place in a freezer-safe bag or container. They’ll last up to 2 months without losing flavor.
Reheating Tips:
-
Oven: Reheat at 350°F (175°C) for 10–15 minutes until warmed through.
-
Air fryer: Cook at 325°F for 8–10 minutes.
-
Toaster oven: Works well for small batches.
Avoid microwaving if possible—it softens the crispy exterior and can lead to rubbery texture. If you must use it, cover with a damp paper towel and heat in short bursts to retain some moisture.
What to Serve with Stuffing Balls
Stuffing balls go with just about everything! Here are some crowd-favorite pairing ideas:
Classic Holiday Pairings:
-
Roast turkey or chicken
-
Pan gravy or cranberry sauce
-
Mashed potatoes and green beans
Lighter Sides:
-
Steamed carrots with a honey glaze
-
Fresh green salad with vinaigrette
-
Roasted Brussels sprouts or squash
Creative Serving Ideas:
-
Thanksgiving sliders: Tuck a stuffing ball into a small bun with turkey and cranberry mayo.
-
Stuffing ball skewers: Stack them with roasted veggies for a festive appetizer.
-
Stuffing ball “bowl”: Serve with gravy and roasted turkey slices over mashed cauliflower or potatoes.
These versatile bites are great for buffets, plated dinners, or even next-day sandwiches!
FAQs About Stuffing Balls Recipe
Can stuffing balls be made ahead of time?
Absolutely! Prep and shape them the day before, then refrigerate until ready to bake.
Can I freeze cooked or uncooked stuffing balls?
Yes to both. Freeze unbaked ones on a tray first, or fully cooked balls once cooled. Reheat from frozen at 350°F until warmed through.
Why do my stuffing balls fall apart?
The mixture might be too dry or lacking a binder. Make sure to add enough eggs or broth, and let the mixture rest before shaping.
Can I make stuffing balls without eggs?
Yes—use a flax egg (1 tbsp flax + 2.5 tbsp water) or add grated cheese as a binder. Just be cautious about the texture.
Can I use leftover stuffing to make balls?
Definitely! Leftover stuffing is perfect for rolling into balls and rebaking for a second round of deliciousness.
How do I keep stuffing balls moist?
Don’t overbake, and make sure there’s enough liquid in the mix to start. Adding a touch of gravy or butter after reheating also helps.
Final Tips for Success
Before you head to the kitchen, keep these final tips in mind:
-
Let the mixture rest for 5–10 minutes before shaping—this helps everything bind together better.
-
Taste-test before baking (or cook a mini test ball) to adjust seasoning.
-
Use a cookie scoop or your hands to shape even-sized balls for consistent baking.
-
Bake until they’re crispy and golden, not just warm—color = flavor!
Stuffing balls are a simple recipe with endless potential. Get creative, serve with confidence, and enjoy every cozy, crispy bite!
Stuffing Balls Recipe
Equipment
- Large mixing bowl
- Baking tray
- Parchment paper
- Skillet (optional for aromatics)
- Measuring cups/spoons
- Cookie scoop or spoon (for shaping)
Ingredients
- 4 cups breadcrumbs fresh or dried
- 1 medium onion finely chopped
- 2 cloves garlic minced
- ¼ cup unsalted butter
- 2 large eggs
- ½ cup chicken or vegetable broth more as needed
- 1 tbsp fresh sage or 1 tsp dried
- 1 tsp thyme
- Salt and pepper to taste
- Optional: ½ cup cooked sausage cranberries, chopped chestnuts, mushrooms
Instructions
- Sauté Aromatics: In a skillet over medium heat, melt butter. Add chopped onion and garlic. Cook until softened, 5–6 minutes. Let cool slightly.
- Mix Ingredients: In a large bowl, combine breadcrumbs, sautéed aromatics, herbs, eggs, and broth. Mix until the mixture holds together but isn't too wet.
- Shape Balls: Use your hands or a cookie scoop to form balls about the size of a golf ball. Place them on a parchment-lined baking sheet.
- Bake: Preheat oven to 375°F (190°C). Bake for 20–25 minutes, or until golden brown and crisp on the outside.
- Serve: Let cool for 5 minutes, then serve warm with gravy or cranberry sauce.
Notes
- Make Ahead: Shape and chill balls up to 24 hours before baking.
- Freezer-Friendly: Freeze unbaked or baked balls for up to 2 months.
- Customize It: Add cooked sausage, dried cranberries, or chestnuts for seasonal flavor.
- Gluten-Free: Use certified GF breadcrumbs or ground oats.
- Crispier Texture: Lightly brush or spray the tops with olive oil before baking.