Introduction to Sourdough Starter
A sourdough starter is more than just a mixture of flour and water; it’s a living ecosystem that breathes life into the art of baking. This simple concoction begins its journey with humble ingredients and transforms through fermentation into a powerful leavening agent, capable of producing breads with complex flavors, textures, and aromas that are impossible to achieve with commercial yeast alone. The magic of a sourdough starter lies in its ability to capture wild yeast and bacteria from its surroundings, creating a unique blend that reflects its environment. This process not only leavens bread naturally but also imparts a distinctive tangy flavor, making sourdough products highly sought after.
The importance of a sourdough starter in baking cannot be overstated. It is the heart and soul of sourdough bread, providing the necessary rise and contributing to the bread’s nutritional profile by breaking down phytates, making it easier to digest. Moreover, the long fermentation process required by sourdough baking enhances the bread’s flavor and texture, setting it apart from its commercially yeasted counterparts. A well-maintained starter can last for decades, becoming a cherished part of the baker’s kitchen and a symbol of the timeless tradition of bread making.
The Science Behind Sourdough Starter
At the core of every sourdough starter is a symbiotic relationship between yeast and bacteria, primarily lactic acid bacteria. This partnership is what makes sourdough baking possible. The yeast, a type of fungus, consumes the sugars present in flour, producing carbon dioxide gas as a byproduct. This gas gets trapped in the dough, causing it to rise and giving the bread its light, airy structure.
The bacteria, on the other hand, play a crucial role in developing the starter’s flavor. As they metabolize the sugars, they produce organic acids, including lactic acid, which contributes to the sour taste characteristic of sourdough bread. This acidic environment also acts as a natural preservative, inhibiting the growth of harmful bacteria and extending the bread’s shelf life.
Understanding the microbiology of a sourdough starter is essential for successful sourdough baking. The balance between yeast and bacteria determines the starter’s health and activity level, influencing the rise and flavor of the bread. By controlling factors such as temperature, hydration, and feeding frequency, bakers can cultivate a starter that perfectly suits their baking needs, allowing them to create bread with unparalleled taste and texture.
Creating Your Sourdough Starter: A Step-by-Step Guide
Day 1-3: Activating the Microbes
The journey of creating a sourdough starter begins with a simple act of mixing flour and water. On day one, combine equal parts (by weight) of flour and water in a clean jar or container. Whole wheat or rye flour is often recommended for their higher nutrient content, which can help jump-start the fermentation process. Stir the mixture until smooth, cover loosely with a cloth or a lid that’s not completely sealed, and let it sit at room temperature.
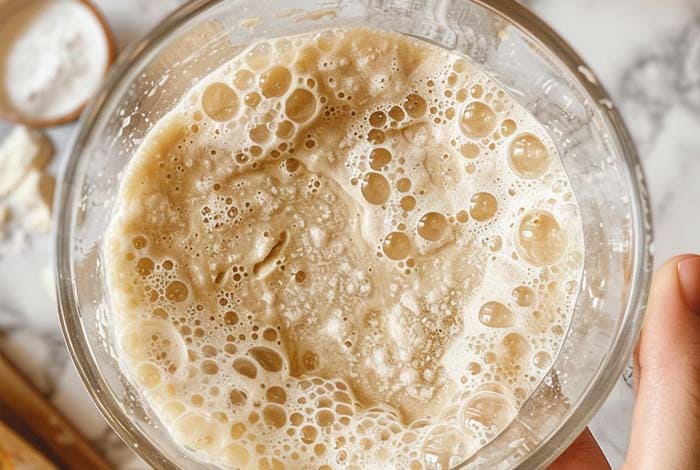
During the first three days, you’re likely to witness the first signs of life in your starter. This period is crucial for activating the microbes. Initially, the mixture might not show much activity, but by the second or third day, bubbles may begin to appear, and the volume might increase slightly. This is often referred to as the “false rise,” primarily driven by bacteria that thrive in the early stages. The mixture might have a strong smell, not necessarily pleasant, but this is normal. It’s a sign that the microbial community within your starter is beginning to establish itself.
Day 4-6: The Quiet Days
After the initial excitement, your starter will enter what’s often called the quiet days. During this phase, the activity may seem to slow down. This is a critical period where the balance between yeast and bacteria begins to stabilize. Continue to feed your starter daily with equal parts flour and water. It’s important to discard a portion of the starter before each feeding to keep the total volume manageable and to ensure the yeast and bacteria are well-fed.
You might notice fewer bubbles and less volume increase during these days. The smell may also shift, sometimes becoming less pleasant. This is all part of the process. The quiet days are a test of patience; they’re a reminder that creating a vibrant sourdough starter is a slow, natural process.
Day 7-10: Slow Strengthening
As you approach the one-week mark, your starter should begin to show signs of increased activity. This phase is characterized by slow strengthening, where the yeast becomes more dominant, and the starter begins to rise more predictably after feedings. You’ll start to see more consistent bubbling, and the volume should increase significantly within a few hours of feeding.
The aroma of the starter will also begin to change. It should start to smell more pleasant, with fruity, yeasty, and slightly acidic notes. This is a good sign that your starter is developing a healthy balance of yeast and bacteria. By day 10, your starter should be strong enough to double in volume within 4 to 8 hours of being fed. This indicates that it’s ready to be used in baking.
At this stage, it’s important to continue feeding your starter regularly. If you plan to bake often, you can keep it at room temperature and feed it daily. For less frequent baking, the starter can be stored in the refrigerator and fed once a week. Remember, a sourdough starter is a living culture; with regular care and feeding, it can serve as a lifelong companion in your baking adventures.
Maintaining Your Sourdough Starter
Daily Maintenance and Feeding
Maintaining a healthy sourdough starter is key to successful baking. Daily feeding ensures your starter remains active and ready to leaven bread. To feed your starter, discard about half of its current volume, then add equal parts flour and water by weight. This process replenishes the food source for the yeast and bacteria, keeping them vigorous and healthy.
Identifying When to Feed: A starter that’s ready for feeding will have a layer of liquid on top, known as “hooch,” and may have a sour smell. The volume will have expanded and then begun to recede, indicating that the microorganisms have consumed most of the available nutrients. Feeding your starter at this point stimulates activity and encourages a balanced microbial environment.
Troubleshooting Common Issues
Addressing Common Problems: Encountering issues like mold, unpleasant smells, or inactivity is not uncommon. Mold, usually indicated by colorful spots on the surface or sides, means the starter has been contaminated and should be discarded. Unpleasant smells can be a sign of imbalance; a more frequent feeding schedule can often rectify this. Inactivity may suggest the starter is either too cold or has been underfed. Adjusting the feeding ratio or moving the starter to a warmer spot can help.
How to Revive a Neglected Starter: If your starter has been neglected, it might still be salvageable. Begin by discarding all but a small amount, then feed it regularly for a few days. Look for signs of bubbling and growth as indicators of revival.
FAQs: Everything You Need to Know
- How to Tell if Your Starter is Ready? A ready starter will double in size within 4 to 6 hours of feeding and have a bubbly, domed surface. It should have a pleasant, yeasty aroma.
- Can You Use Different Types of Flour? Yes, while whole wheat and rye flour are often recommended for their nutrient content, all-purpose flour can also be used. Each type of flour will impart different characteristics to the starter.
- What to Do with Discard? Sourdough discard can be used in a variety of recipes, from pancakes and waffles to crackers and cakes, offering a delicious way to reduce waste.
Maintaining a sourdough starter requires attention and care, but the rewards of baking with your own natural leaven are immeasurable. With these tips and solutions to common problems, your starter can thrive, providing the foundation for countless loaves of delicious sourdough bread.
Classic Sourdough Bread Recipe
Equipment
- Mixing bowl
- Dutch oven or baking stone
- Banneton or linen-lined basket
- Razor blade or sharp knife
- Kitchen scale
Ingredients
- 500 g all-purpose flour
- 350 g water room temperature
- 100 g active sourdough starter
- 10 g salt
Instructions
- Mixing the Dough: In a large mixing bowl, combine flour and water. Mix until no dry flour remains. Cover and let rest for 30 minutes (autolyse).
- Adding Starter and Salt: Add the sourdough starter and salt to the dough. Mix until well incorporated.
- Bulk Fermentation: Cover the bowl with a damp cloth and let the dough rise at room temperature for 12-14 hours, or until doubled in size.
- Shaping: Turn the dough onto a lightly floured surface. Shape into two loaves and place into floured bannetons or baskets.
- Proofing: Cover the loaves and let them rise for 2-3 hours, or until they pass the poke test.
- Baking: Preheat your oven with a Dutch oven inside to 450°F (230°C). Carefully place the dough into the hot Dutch oven, score the top with a razor blade, and cover. Bake for 20 minutes, then uncover and bake for an additional 25 minutes until golden brown.
- Cooling: Let the bread cool on a wire rack for at least an hour before slicing.
Notes
- Water Temperature: Adjust the water temperature based on your kitchen's temperature. Cooler water in warmer environments, warmer water in cooler environments.
- Scoring: Scoring the dough right before baking helps it expand properly.
- Starter: Ensure your sourdough starter is active and bubbly for the best rise.
- Hydration: This recipe is at about 70% hydration, suitable for beginners. Adjust hydration based on your comfort and experience.