Introduction to Italian Sub Sliders
The Italian Sub, a beloved staple of American delis, traces its roots back to the early 20th century, when Italian immigrants in the Northeastern United States began to combine various meats, cheeses, and vegetables into a hearty sandwich. Originally served on long rolls and intended as a full meal, these subs quickly gained popularity for their rich flavors and satisfying nature. As culinary creativity flourished, the traditional Italian Sub began its evolution into various forms, adapting to changing tastes and occasions.
Enter the Italian Sub Slider – a miniature version of the classic, embodying all the robust flavors of the original in a bite-sized package. This adaptation has surged in popularity, particularly as party fare and snack options, thanks to its versatility and ease of consumption. The slider format allows for a wide range of ingredients and customization, making it a favorite among both hosts and guests for its ability to cater to different palates and dietary preferences.
The Basics of Italian Sub Sliders
At its core, the Italian Sub Slider is a testament to the power of quality ingredients combined in just the right way. What makes these sliders unique is not just their size but the careful balance of flavors and textures they offer. Here’s a breakdown of the key components that make up these delightful mini sandwiches:
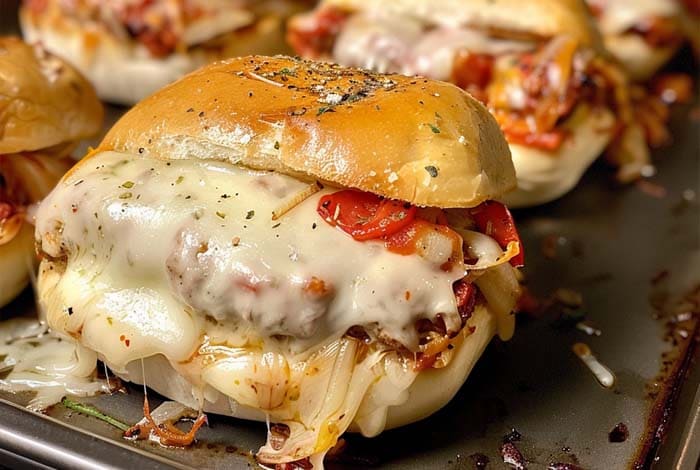
- Deli Meats: The heart of any Italian Sub Slider is the selection of deli meats. Classics include salami, ham, and pepperoni, each offering its own unique taste and texture. The choice of meat can greatly influence the overall flavor profile of the slider, with options ranging from spicy to sweet, catering to a wide array of taste preferences.
- Cheeses: Cheese adds a creamy, melting texture that binds the slider components together. Provolone is a traditional choice, known for its mild flavor and excellent melting properties. However, variations like mozzarella, Swiss, and even sharp cheddar are also popular, allowing for a range of flavors and textures.
- Bread Types: The right bread is crucial for holding all the ingredients together without overshadowing them. Soft, yet sturdy enough to handle the fillings, slider buns like mini versions of Italian rolls or even small ciabatta bread are preferred. The slight sweetness of certain rolls can complement the savory fillings beautifully.
- Condiments and Extras: The final touch to an Italian Sub Slider comes from the condiments and extras. A drizzle of Italian dressing, a spread of mayonnaise, or a layer of pesto can add moisture and richness. Extras like banana peppers, lettuce, tomatoes, and onions introduce freshness, crunch, and a hint of acidity, balancing out the hearty meats and cheeses.
Together, these elements combine to create Italian Sub Sliders that are not just a meal or snack, but a culinary experience that celebrates the rich heritage and versatility of Italian-American cuisine.
How to Make Italian Sub Sliders
Italian Sub Sliders are the perfect blend of savory meats, rich cheeses, and crisp vegetables, all nestled within soft, bite-sized buns. They’re ideal for gatherings, easy dinners, or a fun twist on lunch. Follow this step-by-step guide to create your own delicious sliders, along with tips for baking them to perfection and ideas for variations that cater to all tastes.
Preparing the Ingredients
- Select Your Meats: Choose high-quality deli meats such as salami, ham, and pepperoni. Aim for about 2-3 slices per slider, depending on their size and your preference for meatiness.
- Choose Your Cheeses: Provolone or mozzarella are classic choices. You’ll need one slice per slider, or more if you prefer a cheesier experience.
- Pick Your Buns: Soft slider buns work best. Hawaiian rolls are a popular choice for their slight sweetness and sturdy texture.
- Gather Condiments and Extras: Lettuce, tomato slices, banana peppers, and red onions add freshness and crunch. For condiments, have Italian dressing, mayonnaise, or pesto ready.
Assembly Instructions
- Preheat your oven to 350°F (175°C).
- Slice the buns in half horizontally, keeping them connected if possible to make the assembly and baking process easier.
- Layer the meats and cheese on the bottom half of the buns. Start with a slice of cheese, followed by your selection of meats, and another slice of cheese on top. The cheese on both ends helps to seal the meats in place during baking.
- Add the condiments to the top half of the buns. Spread a thin layer of your chosen sauces or dressings to prevent the sliders from becoming too dry.
Baking Tips for Perfection
- Cover with foil: Before baking, cover the sliders with aluminum foil to prevent the buns from browning too quickly and to ensure the cheese melts thoroughly.
- Bake for 15-20 minutes or until the cheese has melted and the meats are heated through.
- Uncover and bake for an additional 2-3 minutes if you prefer a slightly crispy top.
Variations to the Classic Recipe
- Vegetarian Options: Substitute the deli meats with grilled vegetables like zucchini, eggplant, or bell peppers. Add a slice of avocado for extra creaminess.
- Spicy Versions: Incorporate spicy deli meats like hot soppressata or add jalapeño slices for heat. A spicy aioli can also elevate the sliders.
- Gourmet Twists: For a more upscale slider, consider using ingredients like sun-dried tomatoes, arugula, and fresh mozzarella. A drizzle of balsamic glaze can add a sophisticated touch.
Creating Italian Sub Sliders is not just about following a recipe; it’s an opportunity to explore flavors and ingredients in a format that’s fun and shareable. Whether you stick to the classic recipe or experiment with variations, the key is to balance the flavors and textures for a slider that’s both satisfying and delicious. With these tips and ideas, you’re well on your way to making Italian Sub Sliders that will impress any crowd.
Serving and Presentation Ideas
Italian Sub Sliders are as much about the presentation as they are about the taste. Serving them in a way that’s both appealing and practical can elevate your meal or party to the next level.
- How to Serve: Arrange the sliders on a large platter or wooden board for a rustic look. If you’ve kept the buns connected while baking, slice them into individual sliders just before serving to ensure they stay warm and the cheese remains gooey.
- Side Dishes: Complement your sliders with side dishes that offer a contrast in texture and flavor. Classic potato chips, a crisp garden salad, or a tangy coleslaw can balance the richness of the sliders. For a heartier meal, consider serving them with pasta salad or garlic Parmesan fries.
- Presentation Tips: For parties and gatherings, label the variations if you’ve made multiple types of sliders. Use small flags or markers to indicate spicy options or vegetarian versions. Providing small plates and napkins in easy-to-access locations will also encourage guests to mingle and enjoy the sliders as they please.
Nutritional Information and Dietary Considerations
- Caloric Content: Italian Sub Sliders can vary in caloric content based on the ingredients used. On average, a slider might contain between 200-300 calories, making portion control easy.
- Gluten-Free and Low-Carb Options: For those avoiding gluten, opt for gluten-free slider buns or lettuce wraps as a bread alternative. Low-carb options can include using cucumber slices or grilled eggplant pieces as the base.
- Cheese and Meat Alternatives: Dairy-free cheese slices are available for those with lactose intolerance or vegan dietary preferences. Similarly, plant-based deli slices can substitute traditional meats for a vegetarian or vegan version without sacrificing flavor.
FAQs
- Can I make Italian Sub Sliders ahead of time? Yes, you can assemble the sliders a day in advance and refrigerate them. Bake just before serving to ensure they’re warm and the cheese is melted.
- What are the best meats for Italian Sub Sliders? Traditional Italian meats like salami, ham, and pepperoni are popular choices. For a gourmet twist, try prosciutto, capicola, or soppressata.
- How do I keep the sliders from getting soggy? Apply condiments sparingly and consider adding lettuce or other greens between the meat and the bun to act as a barrier. Toasting the inside of the buns can also help.
- Can Italian Sub Sliders be frozen? It’s best to enjoy them fresh for the best texture and flavor. However, you can freeze the assembled, unbaked sliders and then bake them from frozen, adjusting the cooking time as needed.

Italian Sub Sliders Recipe
Equipment
- Baking sheet
- Aluminum foil
- Knife
- Cutting board
Ingredients
- 12 slider buns e.g., Hawaiian rolls
- ¼ pound deli salami thinly sliced
- ¼ pound deli ham thinly sliced
- ¼ pound pepperoni thinly sliced
- 12 slices provolone cheese
- 1 tablespoon Italian seasoning
- 3 tablespoons unsalted butter melted
- Optional toppings: lettuce tomato slices, banana peppers, red onion
- Condiments: mayonnaise Italian dressing
Instructions
- Preheat oven to 350°F (175°C). Line a baking sheet with parchment paper.
- Prepare the slider buns: Slice the buns in half horizontally and lay the bottom halves on the baking sheet.
- Layer the meats and cheese: Start with a slice of cheese on the bottom half, add layers of salami, ham, and pepperoni, then top with another slice of cheese. Repeat for all sliders.
- Add the toppings: If using, add a small amount of lettuce, tomato, banana peppers, and red onion on top of the cheese.
- Prepare the bun tops: Spread a thin layer of mayonnaise and/or Italian dressing on the inside of the top halves of the buns. Place them on top of the sliders.
- Bake: Cover the sliders with aluminum foil and bake for 15-20 minutes, or until the cheese is melted. Remove the foil, brush the tops with melted butter mixed with Italian seasoning, and bake for another 3-5 minutes until golden.
- Serve: Let the sliders cool slightly, then cut them into individual servings and enjoy!
Notes
- Make Ahead: Assemble the sliders without baking, cover, and refrigerate up to one day in advance. Bake just before serving.
- Variations: Feel free to experiment with different meats, cheeses, and toppings to suit your taste preferences or dietary needs.
- Serving Suggestions: Pair with a side salad, potato chips, or your favorite side dish for a complete meal.
- Storage: Leftover sliders can be stored in an airtight container in the refrigerator for up to 3 days. Reheat in the oven or microwave before serving.