Introduction to Key Lime Pie
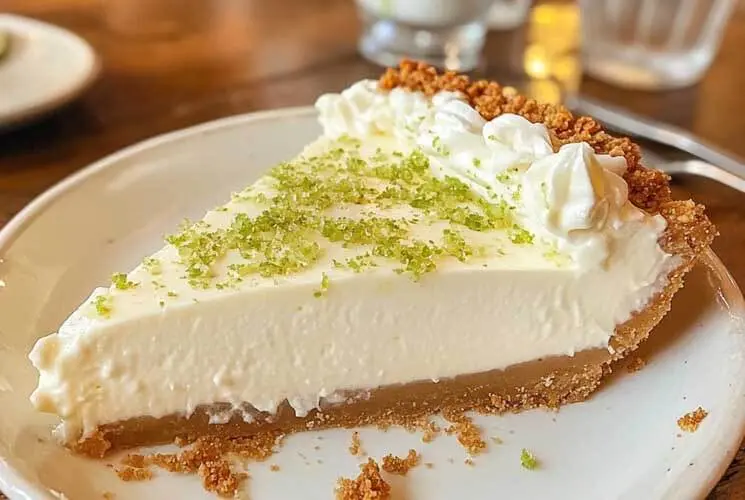
There’s something truly magical about the first bite of a Key Lime Pie. It’s refreshing, creamy, and just the right amount of tart — like sunshine in dessert form. Whether you first discovered it on a beach vacation or at a cozy backyard gathering, Key Lime Pie tends to leave a lasting impression.
What makes it even more beloved is its simplicity. With just a few ingredients — graham crackers, condensed milk, egg yolks, and key lime juice — you can create a dessert that’s both humble and spectacular. It’s the kind of recipe that feels like a little secret once you realize how easy it is. And today, I’m going to show you exactly how to make the perfect Key Lime Pie at home.
What Makes Key Lime Pie So Special?
Key Lime Pie strikes the perfect balance between sweet, creamy, and delightfully tart. It’s refreshing without being overpowering, indulgent without being heavy — a rare kind of dessert harmony.
Its story traces back to the Florida Keys, where Key limes — smaller, seedier, and more aromatic than regular limes — thrive in the warm, coastal climate. Traditionally, fishermen made this pie using shelf-stable ingredients like sweetened condensed milk and canned juice because fresh dairy was hard to store. That little bit of history makes every slice feel even more meaningful.
One of the keys (pun intended!) to an authentic Key Lime Pie is using real key lime juice. It has a more floral, slightly sweeter character compared to regular lime juice, and it’s what gives the pie its signature flavor.
Key Ingredients You Need
Before we dive into baking, let’s take a closer look at the essentials you’ll need:
-
Key Lime Juice:
Freshly squeezed is the gold standard, but high-quality bottled key lime juice can be a solid backup. Look for brands like Nellie & Joe’s if you go the bottled route. Avoid regular lime juice unless you’re adjusting the recipe a little. -
Sweetened Condensed Milk:
This isn’t just for sweetness — it’s the backbone of the pie’s luxurious, silky texture. Don’t confuse it with evaporated milk, which won’t give you the same creamy result. -
Egg Yolks:
Rich, vibrant, and key (no pun intended again!) to the filling’s smoothness and subtle custard flavor. Room-temperature yolks whisk more easily and evenly. -
Graham Cracker Crust:
The graham cracker base brings a light crunch and buttery goodness that pairs beautifully with the tart filling. While store-bought crusts work in a pinch, making your own really elevates the experience. -
Topping Options:
A soft crown of whipped cream is the classic finishing touch. Some traditionalists also love a fluffy meringue topping, which nods to the pie’s Florida roots.
Choosing the Best Key Limes
Real Key limes are smaller, rounder, and often more yellow than the standard grocery store Persian limes. They’re wonderfully aromatic and produce a slightly sweeter, less sharply acidic juice.
Fresh key limes can sometimes be tricky to find outside of Florida. If you spot them, go for limes that feel heavy for their size and have a slight give when squeezed. Tip: To juice lots of small key limes easily, microwave them for about 10 seconds to release more juice, then use a handheld citrus squeezer.
If fresh Key limes aren’t available, don’t worry — bottled key lime juice (preferably 100% juice) is perfectly acceptable for a delicious pie.
Step-by-Step: How to Make the Perfect Key Lime Pie
Making the Graham Cracker Crust
Start by crushing your graham crackers into fine crumbs — you can use a food processor or a zip-top bag and rolling pin. Mix the crumbs with melted butter and a bit of sugar until the texture resembles wet sand.
Press the mixture firmly into the bottom and sides of a 9-inch pie dish. Bake the crust at 350°F (175°C) for about 8–10 minutes, until lightly golden and set. Let it cool completely before filling.
Preparing the Key Lime Filling
Separate the egg yolks into a large bowl. Whisk the yolks by hand or with a mixer until they’re slightly thickened and pale in color. Gradually add the sweetened condensed milk and continue whisking until smooth.
Slowly pour in the key lime juice, whisking gently just until fully combined. Let the mixture rest for a few minutes — this helps everything bind together beautifully.
Baking the Pie
Pour the filling into the cooled crust and bake at 325°F (160°C) for about 15–17 minutes. You’re looking for a set edge with a slight, gentle jiggle in the center — similar to how you’d bake a cheesecake.
Once baked, allow the pie to cool completely at room temperature before transferring it to the refrigerator. Chill for at least 3 hours, though overnight chilling gives the absolute best flavor.
Topping Choices
-
Whipped Cream: Softly whipped cream piped or dolloped across the pie makes it look inviting and festive.
-
Meringue Topping: For a traditional Florida-style touch, whip up a meringue using the leftover egg whites and toast it under the broiler until golden.
Expert Tips for Key Lime Pie Success
-
Use fresh ingredients whenever you can. It truly makes a difference in flavor.
-
Let the pie chill completely before slicing. Cutting into a warm pie is a recipe for a gooey mess!
-
Don’t overbake. The center should still wiggle slightly when you pull it out of the oven.
-
Cool the crust before filling it. This prevents sogginess and keeps the base nice and crisp.
Advertisement -
Use high-quality key lime juice. Especially if you’re using bottled, check that it’s 100% juice with no additives.
Common Mistakes to Avoid
-
Overbaking the filling: It leads to cracks, dryness, and a dense texture. Pull it when it still jiggles a bit in the center.
-
Skipping pre-baking the crust: This can make the crust soggy and unstable.
-
Using regular limes without adjusting: If you must substitute, taste as you go — regular limes are less aromatic and more acidic.
Variations You’ll Love
Once you master the classic Key Lime Pie, it’s so much fun to explore different variations! Here are a few delicious twists you might want to try:
-
Frozen Key Lime Pie:
Instead of baking the filling, pour it into the crust and freeze it for a cool, creamy treat. It’s perfect for hot summer days and tastes almost like key lime ice cream! -
Mini Key Lime Pies:
Use a muffin tin and create adorable individual pies. They’re ideal for parties, BBQs, or anytime you want to serve up bite-sized desserts that still pack a punch. -
Key Lime Pie Bars:
Make the filling a little thicker and bake it in a rectangular pan. Slice into squares for easy serving — these are great for bake sales or picnics. -
Chocolate-Dipped Key Lime Pie Slices:
Inspired by Key West treats, freeze slices of pie and dip the tips into melted chocolate. It’s a truly next-level dessert that’s equal parts creamy, tart, and rich.
How to Store and Freeze Key Lime Pie
Storing:
Key Lime Pie keeps beautifully in the refrigerator for about 3–4 days. Just make sure it’s covered loosely with plastic wrap or foil to prevent it from drying out.
Freezing:
Yes, you can absolutely freeze Key Lime Pie!
Wrap the completely chilled pie tightly in plastic wrap and then a layer of foil. It will keep well for up to 2 months.
Thawing:
Move it to the fridge the night before you plan to serve it. Avoid thawing it at room temperature, as that can cause the filling to weep and the crust to get soggy.
Serving Suggestions
Elevate your Key Lime Pie with a few simple garnishes:
-
A sprinkle of fresh lime zest curls adds bright color and fragrance.
-
Extra whipped cream piped around the edges makes it extra festive and inviting.
-
For drinks, pair it with a light roast coffee, a sparkling wine, or even a tangy citrus cocktail for a tropical vibe.
Small touches like these can make your dessert feel straight out of a seaside cafe!
Key Lime Pie FAQs
Can I use regular limes instead of key limes?
Yes, you can, but the flavor will be slightly different. Regular (Persian) limes are less aromatic and a little more bitter. You might want to add a bit more zest to boost the flavor.
Why is my Key Lime Pie runny?
If your pie isn’t setting properly, it could be underbaked or didn’t chill long enough. Make sure you bake until there’s a slight jiggle and refrigerate for at least 3 hours (preferably overnight).
Do you need to refrigerate Key Lime Pie?
Absolutely. It’s a custard-based pie, so it must be kept cold to maintain its structure and prevent spoilage.
Can I make Key Lime Pie ahead of time?
Yes! It’s even better when made a day ahead because the flavors have more time to develop and the pie slices more cleanly.
What’s the difference between Key Lime Pie and regular lime pie?
The main difference is the type of lime used. Key Lime Pie uses key limes, which are smaller, more aromatic, and slightly sweeter. Regular lime pie uses Persian limes, resulting in a slightly sharper flavor.
Final Thoughts
There’s something wonderfully nostalgic and heartwarming about Key Lime Pie. It’s simple, fresh, and completely unforgettable — a dessert that never feels heavy or fussy.
Whether you’re celebrating a special occasion or just craving something bright and sunny, this pie is guaranteed to lift your spirits. Don’t be surprised if you find yourself making it again and again — it’s just that good. Happy baking!
Key Lime Pie Recipe
Equipment
- 9-inch pie dish
- Mixing bowls
- Whisk or electric mixer
- Measuring cups and spoons
- Citrus juicer (optional)
- Zester or fine grater
- Oven
Ingredients
- 1 and 1/2 cups graham cracker crumbs
- 1/3 cup granulated sugar
- 6 tablespoons unsalted butter melted
- 3 large egg yolks
- 1 can 14 ounces sweetened condensed milk
- 1/2 cup key lime juice fresh or bottled
- 1 tablespoon key lime zest
- Whipped cream for topping (optional)
Instructions
- Preheat the oven to 350°F (177°C).
- In a bowl, mix graham cracker crumbs, granulated sugar, and melted butter until evenly combined.
- Press the crumb mixture firmly into the bottom and sides of a 9-inch pie dish.
- Bake the crust for 8–10 minutes, until lightly golden. Set aside to cool.
- In another bowl, whisk the egg yolks until slightly thickened.
- Gradually add the sweetened condensed milk and continue whisking until smooth.
- Slowly whisk in the key lime juice and zest until fully incorporated.
- Pour the filling into the cooled crust.
- Bake the pie for 15–17 minutes, or until the edges are set but the center slightly jiggles.
- Allow the pie to cool at room temperature, then refrigerate for at least 3 hours or overnight.
- Top with whipped cream before serving, if desired.
Notes
- Key Lime Juice: Freshly squeezed key lime juice offers the best flavor, but bottled (high-quality) key lime juice is a fine alternative.
- Don't Overbake: A slight jiggle in the center is perfect — the pie continues setting as it cools.
- Crust Tip: Pre-baking the graham cracker crust ensures it stays crisp and doesn’t turn soggy.
- Storage: Store the pie covered in the refrigerator for up to 4 days, or freeze tightly wrapped for up to 2 months.
- Serving Suggestion: Garnish with lime zest curls or extra whipped cream for a festive touch.
Nutrition