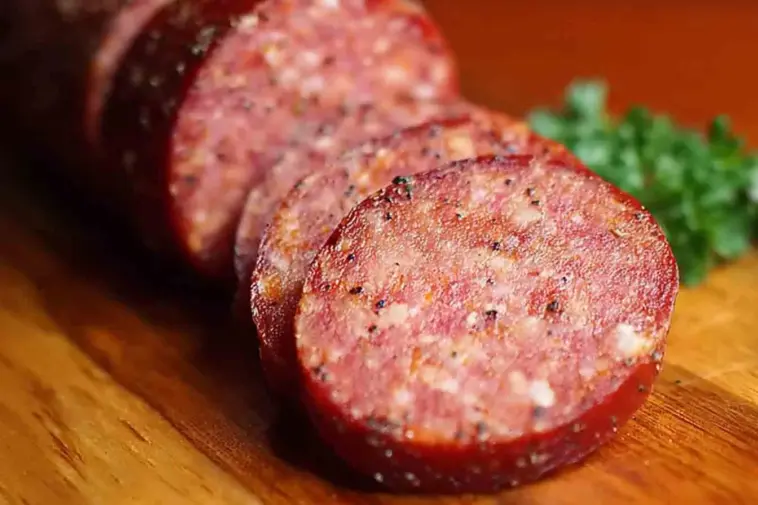
There’s something nostalgic and satisfying about slicing into a log of summer sausage—whether it’s on a picnic table during a warm afternoon or nestled on a holiday charcuterie board. I still remember the first time I tasted homemade summer sausage—my uncle brought a batch he’d smoked himself, and it was unlike anything I’d tried from the store. Rich, smoky, and just the right amount of tangy spice.
Summer sausage stands out from other sausages because it’s cured to last without refrigeration and has a distinct, tangy flavor developed through fermentation or curing. Unlike fresh sausages that require cooking right away, summer sausage is preserved and perfect for slicing cold.
The best part? You can absolutely make this at home. With the right ingredients and a bit of patience, homemade summer sausage is surprisingly easy—and incredibly rewarding. Whether you’re smoking it outdoors or baking it in your oven, this sausage will become a pantry (or fridge) staple.
What Is Summer Sausage?
Summer sausage is a type of semi-dry cured sausage traditionally made to be shelf-stable—meaning it doesn’t need refrigeration until opened. This feature made it ideal for warm months (“summer”) before modern refrigeration was widespread, hence the name.
The typical ingredients include a blend of lean beef and pork, mixed with curing salts, seasonings like mustard seed, black pepper, garlic, and sometimes fermenting agents to create its tangy signature taste. The curing and slow cooking process removes moisture while preserving flavor and safety.
There are two main types: cured and uncured.
-
Cured summer sausage uses a curing salt (like Prague Powder #1), which contains sodium nitrite to help preserve the meat and develop flavor.
-
Uncured versions (often labeled “nitrate-free”) may use natural preservatives like celery juice powder and require refrigeration.
Unlike bratwursts or Italian sausages, summer sausage is not meant to be grilled or pan-fried. It’s already cooked and ready to eat—slice it up for sandwiches, cheese boards, or snacking on the go.
Why Make It at Home?
Making summer sausage at home gives you total control over what goes into your food. Store-bought versions often contain preservatives, excess sodium, and ingredients you can’t pronounce. When you make it yourself, you can keep things simple, clean, and flavorful.
One of the best perks is how customizable it is. Want a kick of heat? Add jalapeños. Prefer a hint of sweetness? Toss in some brown sugar or maple syrup. You can even mix in cheddar cubes or swap out meats (like venison or turkey) for something more adventurous.
It’s also budget-friendly. A few pounds of meat and spices can yield enough sausage to feed a crowd—or keep your snack drawer stocked for weeks. Plus, you’ll be amazed at how gourmet it tastes compared to pre-packaged versions.
Bold tip: Homemade sausage is a great way to impress guests or bring a personal touch to holiday platters. Wrap it in parchment, tie it with butcher’s twine, and you’ve got a thoughtful, delicious DIY food gift.
Essential Ingredients for Homemade Summer Sausage
To make authentic summer sausage at home, you’ll need a few key ingredients:
-
Lean ground beef (90/10 or leaner) and/or pork – The base of your sausage. A mix gives better texture and flavor.
-
Cure #1 (Prague Powder #1) – A pink curing salt containing sodium nitrite, essential for food safety and preservation. If you prefer nitrate-free, you can substitute with celery juice powder—just note the flavor and shelf life may vary.
-
Spice mix – Think mustard seed, black pepper, garlic powder, coriander, and sometimes crushed red pepper for heat. You can buy pre-made sausage seasoning or create your own blend.
-
Optional add-ins – Diced cheese, jalapeños, or smoked paprika to customize your flavor.
-
Liquid smoke – If you don’t have a smoker, this gives the sausage that rich, smoky profile during oven baking.
Pro tip: Let your mixed meat and seasonings chill overnight before cooking to enhance the flavor and texture.
Equipment You’ll Need
You don’t need a full butcher setup to make summer sausage at home—just a few essentials:
-
Large mixing bowl or stand mixer – For blending the meat and spices thoroughly.
-
Meat thermometer – Absolutely critical to ensure your sausage reaches a safe internal temperature (160°F/71°C).
-
Sausage stuffer – Optional, but helpful if you’re using casings. You can also form sausage into logs by hand.
-
Smoker or oven – A smoker adds amazing flavor, but an oven works just fine, especially when paired with liquid smoke.
-
Sausage casing – Choose between collagen casings (easy to use and uniform) or natural casings (more traditional). Don’t have any? Wrap the mixture in foil and bake it log-style—just as delicious.
Safety Tips for Curing and Cooking
When working with meat and curing agents, safety is key. Here’s what to keep in mind:
-
Always use a proper cure (like Prague Powder #1) if you’re not refrigerating the sausage immediately after cooking. It helps prevent harmful bacterial growth.
-
Follow USDA guidelines and cook the sausage to a minimum internal temperature of 160°F (71°C).
-
During the curing/resting phase (typically 12–24 hours in the fridge), keep the mixture cold and covered. If stuffing into casings, do so quickly and refrigerate right away.
-
Use gloves when mixing meat to maintain hygiene, especially when handling the curing salt.
-
If giving your summer sausage as a gift, label it clearly with storage instructions (e.g., “Keep refrigerated. Use within 3–4 weeks.”)
Step-by-Step: How to Make Homemade Summer Sausage
Making your own summer sausage may seem intimidating at first, but it’s surprisingly straightforward once you know the process. Here’s how to do it from start to finish:
Step 1: Mix the meat and cure thoroughly
In a large mixing bowl (or stand mixer), combine your ground meat with the curing salt. Take your time here—this step is crucial for ensuring the cure is evenly distributed. Use gloved hands or a dough hook to mix until it’s fully incorporated.
Step 2: Add spices and mix until sticky
Add your spice blend and any optional ingredients (cheese, jalapeños, liquid smoke). Continue mixing until the texture becomes tacky and sticky—this helps bind the proteins and ensures a firmer final product.
Step 3: Shape into logs or stuff into casing
You can either hand-shape the mixture into tight logs and wrap them in foil, or stuff them into casings using a sausage stuffer. Collagen casings work beautifully and are easy to handle, but foil-wrapped logs are just as effective for oven baking.
Step 4: Cure in the fridge (12–24 hours)
Refrigerate the shaped sausage for at least 12 hours, ideally 24. This resting time allows the flavors to meld and the curing salt to do its job.
Step 5: Cook low & slow (180–200°F)
Bake in the oven or smoke at a low temperature until the internal temp reaches 160°F (71°C). This may take 3–4 hours depending on size.
Step 6: Cool and store properly
Once cooked, let the sausage cool completely before slicing. Wrap in plastic or vacuum seal and refrigerate.
Bold tip: Always cook to an internal temperature of 160°F – don’t guess, use a thermometer!
Cooking Methods Compared
Different methods offer slightly different results:
-
Oven Baking – The most accessible and consistent method for beginners. When paired with liquid smoke, it gives great flavor without special equipment.
-
Smoking – Delivers deep, authentic flavor using wood chips like hickory or apple. Ideal if you have a smoker.
-
Dehydrator – Some home dehydrators can cook meat to safe temps, but use caution and a thermometer to confirm doneness.
-
Liquid Smoke vs Real Smoke – Liquid smoke adds smokiness without needing a smoker. While it won’t fully replicate wood smoke, it comes pretty close for indoor cooking.
Each method works—choose the one that fits your tools and flavor preferences.
Storage, Shelf Life & Serving Tips
Once cooked and cooled, homemade summer sausage is both convenient and long-lasting:
-
Refrigerate: Wrapped tightly in foil or plastic wrap, it stays fresh in the fridge for 3–4 weeks.
-
Freeze: For longer storage, freeze logs in airtight bags for up to 4 months. Thaw in the fridge overnight before serving.
When serving, slice thinly and pair with:
-
Aged cheddar, brie, or smoked gouda
-
Grainy mustard or hot honey
-
Crackers, pickles, or crusty bread
Perfect for charcuterie boards, road trips, camping, or even as a protein-packed snack.
Flavor Variations to Try
Once you master the basic recipe, you can let your creativity run wild:
-
Jalapeño & Cheddar – Add diced jalapeños and cubes of sharp cheddar for a spicy, creamy kick.
-
Hickory Smoked – Use hickory wood chips or hickory-flavored liquid smoke for a classic BBQ flavor.
-
Maple & Brown Sugar – Sweet and savory with a breakfast-sausage vibe.
-
Cracked Pepper & Garlic – Bold, peppery flavor with savory depth.
-
Venison or Elk Sausage – Swap up to 25% of the beef for lean wild game for a heartier, rustic taste.
Bold tip: Swap up to 25% of the beef for wild game for a bold, rustic flavor. Just be sure to add enough fat for texture!
FAQs: Homemade Summer Sausage
Can I make summer sausage without cure?
Yes—but it must be refrigerated and eaten within a week. Without curing salt, you lose shelf-stability.
Do I need casings?
Not at all. Foil-wrapped logs work great in the oven. Casings are helpful for presentation and even cooking but aren’t essential.
Why is my sausage crumbly?
That usually means it wasn’t mixed enough. You want a sticky, tacky texture before shaping or stuffing to ensure proper protein binding.
Can I use only pork or turkey?
Yes! Just make sure the meat mixture contains around 20% fat to avoid a dry texture.
Is it safe to store at room temperature?
Only if cured properly, vacuum sealed, and kept in a cool, dry place. When in doubt, refrigerate.
Homemade Summer Sausage
Equipment
- Large mixing bowl or stand mixer
- Meat thermometer
- Sausage stuffer (optional)
- Foil or sausage casing
- Oven or smoker
- Sharp knife
- Plastic wrap or vacuum sealer for storage
Ingredients
- 2 lbs lean ground beef 90/10
- 1 tsp Prague Powder #1 curing salt
- 2 tsp mustard seed
- 2 tsp garlic powder
- 1 ½ tsp black pepper
- 1 tsp ground coriander
- 1 tbsp liquid smoke
- Optional: ½ cup diced cheddar 2 tbsp chopped jalapeños
Instructions
- Mix meat and cure: In a large bowl, combine ground beef with curing salt. Mix thoroughly to evenly distribute the cure.
- Add spices: Mix in mustard seed, garlic powder, pepper, coriander, and liquid smoke. Continue mixing until the texture becomes tacky.
- Shape or stuff: Shape into 2 tight logs and wrap in foil, or stuff into sausage casings.
- Cure in fridge: Let rest in the refrigerator for 12–24 hours.
- Cook low and slow: Bake at 180–200°F (82–93°C) or smoke until internal temperature reaches 160°F (71°C) (about 3–4 hours).
- Cool and store: Let cool completely, then wrap tightly in plastic wrap or vacuum seal. Refrigerate for up to 4 weeks or freeze up to 4 months.
Notes
- For a nitrate-free version, replace Prague Powder #1 with celery juice powder, but refrigerate and consume within 7–10 days.
- You can use a mix of ground beef and pork for added richness.
- Always use a meat thermometer—guessing temps can lead to undercooked sausage.
Nutrition
Final Thoughts & Serving Inspiration
Homemade summer sausage is one of those recipes that sounds impressive—but is surprisingly easy once you get the hang of it. It’s endlessly customizable, stores well, and makes a thoughtful gift or delicious snack.
Don’t be afraid to experiment with meats, seasonings, or even presentation. Whether you’re keeping it classic or going bold with jalapeños and cheese, there’s no wrong way to do it.
Serve it on a charcuterie board, fold it into omelets, slice it into pasta, or just enjoy it with crackers and a cold drink. However you use it, homemade summer sausage adds that special “I made this myself” flavor that store-bought just can’t match.