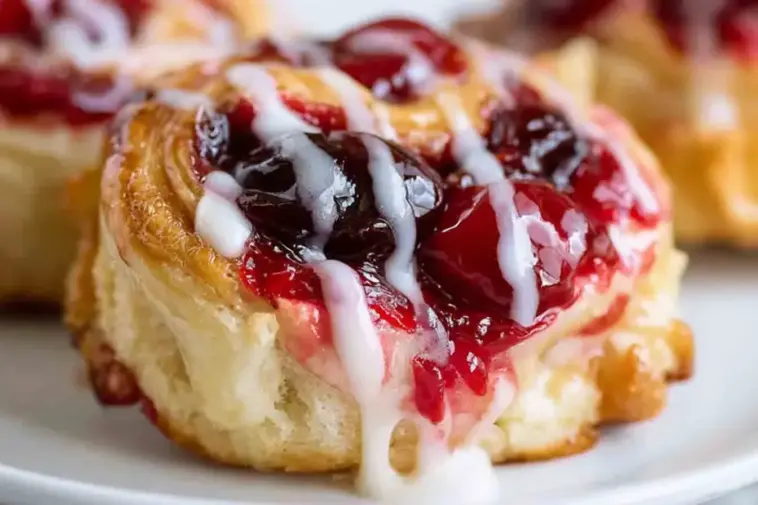
Imagine biting into a warm, golden pinwheel—flaky on the outside, velvety on the inside—with a swirl of rich cream cheese and sweet-tart cherry filling. That’s the magic of Cherry Cheesecake Pinwheels. These delightful treats take everything you love about cherry cheesecake and wrap it up in a beautiful, bite-sized spiral of joy.
They’re cozy, nostalgic, and irresistibly charming. Whether you’re craving a comforting weekend brunch treat, need a crowd-pleaser for a holiday gathering, or simply want to surprise your family with a quick and easy dessert, these pinwheels rise to the occasion—literally!
Visually stunning with their red and white swirls and slightly golden edges, they’re the kind of dessert that looks like you spent hours baking, even though they come together in minutes. With just a few ingredients and a whole lot of flavor, Cherry Cheesecake Pinwheels will quickly earn a spot in your regular dessert rotation.
What Are Cherry Cheesecake Pinwheels?
Cherry Cheesecake Pinwheels are a simple, delicious mashup of a classic cheesecake and a flaky pastry roll. Each pinwheel is made by spreading a sweetened cream cheese mixture over dough, adding cherry pie filling, and then rolling and slicing it into beautiful spirals before baking.
The dough base can vary depending on how much time you have or how hands-on you want to be. Most home bakers use store-bought crescent roll dough or puff pastry, though you can absolutely make your own dough if you’re up for it. Either way, the result is flaky, buttery, and a perfect contrast to the creamy, tangy filling.
At the center of it all is that luscious cheesecake filling made with cream cheese and a hint of sugar and vanilla. Topped with vibrant, juicy cherry pie filling, the combination delivers rich flavor and striking presentation every time.
Ingredients You’ll Need
Here’s a quick glance at the simple, easy-to-find ingredients you’ll need to make these Cherry Cheesecake Pinwheels. Grouped by category to help you stay organized:
Dough Base
-
Refrigerated crescent roll dough or puff pastry sheets
(Shortcut for fast prep. Crescent dough gives a soft texture; puff pastry adds crispness.)
Cheesecake Filling
-
Full-fat cream cheese
-
Granulated sugar
-
Vanilla extract
(A rich, smooth filling that mimics classic cheesecake flavor.)
Cherry Topping
-
Canned cherry pie filling
(Provides bright flavor and a pop of color. Homemade cherry compote also works well.)
Optional Garnish
-
Powdered sugar for dusting
-
Icing drizzle or graham cracker crumbs
(Add visual appeal and texture.)
Pro Tip: Use full-fat cream cheese for a creamier texture—it melts and spreads more smoothly than low-fat versions.
Tools & Equipment Checklist
You won’t need any fancy gadgets to make Cherry Cheesecake Pinwheels, just a few baking basics:
-
Mixing bowls (medium and large)
-
Hand mixer or whisk
-
Rolling pin (if using puff pastry or homemade dough)
-
Sharp knife or dough cutter
-
Baking sheet
-
Parchment paper or silicone baking mat
-
Spatula
-
Cooling rack
Having everything prepped and ready will make this process smooth and mess-free—especially when you’re working with sticky cherry filling and soft dough.
Step-by-Step Guide: How to Make Cherry Cheesecake Pinwheels
Making Cherry Cheesecake Pinwheels is easy, fun, and oh-so-rewarding. Just follow these clear, simple steps:
1: Prep the Dough
-
Unroll your crescent dough or puff pastry onto a parchment-lined surface.
-
If using crescent rolls, press the seams together to form one smooth sheet.
2: Make the Cheesecake Filling
-
In a bowl, beat cream cheese, sugar, and vanilla extract until smooth and fluffy.
-
This should take about 1–2 minutes using a hand mixer.
3: Spread, Layer, and Roll
-
Gently spread the cream cheese mixture evenly over the dough, leaving a ½-inch border around the edges.
-
Carefully spoon cherry pie filling on top, distributing cherries evenly.
-
Starting from one long edge, tightly roll the dough into a log, jelly-roll style.
4: Slice into Pinwheels
-
Use a sharp knife or floss to cut the log into ¾- to 1-inch thick slices.
-
Place each slice onto your prepared baking sheet, spacing them an inch apart.
5: Bake
-
Preheat your oven to 375°F (190°C).
-
Bake the pinwheels for 12–16 minutes, or until the edges are golden brown and the centers are set.
-
Keep an eye on them during the last few minutes to avoid overbaking.
6: Cool and Finish
-
Let pinwheels cool for 5–10 minutes on a wire rack.
-
Optional: Dust with powdered sugar or drizzle with icing.
Want an extra touch of elegance? Garnish with fresh mint or a few crushed graham cracker crumbs before serving.
Tips for Baking Perfect Cherry Cheesecake Pinwheels
Getting that beautiful swirl and perfect texture is easier with a few pro tricks:
-
Chill your dough slightly before rolling. This makes it easier to handle and slice without squishing.
-
Avoid overfilling. Too much cream cheese or cherry filling will ooze out during baking. A thin, even layer is best.
-
Use parchment paper. This prevents sticking and helps the pinwheels bake evenly.
-
Let them cool slightly before serving. This allows the filling to set and avoids burning your mouth on molten fruit!
-
Clean your knife between cuts. If using a knife to slice the dough, a quick wipe between cuts keeps the spirals clean and defined.
Remember, it’s okay if they’re not perfectly round—homemade charm is part of the fun!
Cherry Cream Cheese Pinwheels: Flavor Variations to Try
One of the best things about Cherry Cheesecake Pinwheels is how easy they are to customize. Whether you’re catering to a different fruit preference or simply looking to add a twist, the options are as creative as your cravings.
Swap the fruit:
-
Don’t have cherry pie filling? Try blueberry, raspberry, or strawberry pie filling for a colorful variety pack.
-
Even a dollop of apple cinnamon filling can transform these into a cozy fall treat.
Add-ins for extra flavor and texture:
-
Sprinkle in some mini chocolate chips for a decadent surprise.
-
Add a pinch of lemon zest to brighten the cream cheese filling.
-
Crushed graham crackers give a fun nod to traditional cheesecake crust.
Upgrade your cream cheese:
-
Try vanilla, almond, or cinnamon-flavored cream cheese for a subtle but noticeable difference.
-
For a tangier profile, blend in a spoonful of sour cream or Greek yogurt.
Get creative and make them your own. These little spirals are a perfect canvas for fun flavor experiments!
Make-Ahead and Freezer Tips
If you’re planning ahead—or want to enjoy a batch later—Cherry Cheesecake Pinwheels freeze beautifully.
To freeze before baking:
-
After slicing the rolled dough into pinwheels, place them on a parchment-lined tray and freeze until firm.
-
Transfer to a zip-top freezer bag. When ready to bake, let them thaw for 10–15 minutes, then proceed as usual.
To freeze after baking:
-
Let the pinwheels cool completely. Wrap them tightly in plastic wrap and foil or use an airtight container.
-
They’ll keep for up to 2 months in the freezer.
Storage:
-
Store leftovers in the fridge for 3–4 days in an airtight container.
Reheating tip:
-
Warm in the oven at 300°F (150°C) for 5–7 minutes to restore crispness. Avoid the microwave—it softens the pastry too much.
Pairing Suggestions: What to Serve With Cherry Cheesecake Pinwheels
These sweet spirals shine on their own, but pairing them with the right drink or side can turn a simple snack into a full experience.
Beverage pairings:
-
A cup of hot coffee or cappuccino makes the perfect morning treat.
-
Kids love them with cold milk or hot chocolate.
-
For dessert platters, serve with a glass of dessert wine or sparkling rosé.
Serving ideas:
-
Arrange them on a brunch board alongside fresh berries, yogurt parfaits, and croissants.
-
Serve with a side of fruit salad or a whipped cream dip for an elevated dessert spread.
They’re charming enough for a party, yet simple enough for a weekday breakfast surprise.
Kid-Friendly Baking: How to Involve Children
This recipe is perfect for baking with kids! It’s simple, colorful, and hands-on—ideal for short attention spans and big imaginations.
Let little ones:
-
Roll out the dough (with a bit of help)
-
Spread the cream cheese filling like frosting
-
Spoon on the cherry topping and sprinkle chocolate chips or sugar
It’s a fun way to build kitchen confidence—and they’ll love seeing (and eating!) the results of their work.
Baking together makes memories just as sweet as the pinwheels themselves.
Cherry Cheesecake Pinwheels for Special Occasions
Cherry Cheesecake Pinwheels are the ultimate crowd-pleaser for holidays and celebrations. Their festive red swirl and indulgent flavor make them perfect for:
Birthday parties – Serve with candles or colorful sprinkles
Holiday dessert trays – Add green sprinkles for Christmas or heart confetti for Valentine’s Day
Bridal showers or brunches – Display on tiered cake stands for extra flair
Add a drizzle of glaze or powdered sugar dusting just before serving for that elegant, bakery-style finish.
These pinwheels turn any occasion into a little celebration.
Common Mistakes When Making Cheesecake Pinwheel Desserts
Even though they’re easy, Cherry Cheesecake Pinwheels can go sideways without a few precautions:
-
Overfilling the dough: Too much cream cheese or cherries will leak out while baking. Stick to a thin, even layer.
-
Not sealing the edges properly: When rolling, pinch the seam gently to help keep everything together.
-
Slicing too thick or too thin: Aim for ¾ to 1 inch for best texture and shape.
-
Baking too long or too short: Watch closely in the final minutes. Overbaking dries them out; underbaking leads to doughy centers.
Don’t skip cooling time—hot pinwheels are fragile and can fall apart easily!
FAQs: Cherry Cheesecake Pinwheels
Can I use pie filling instead of fresh cherries?
Absolutely! In fact, most recipes call for canned cherry pie filling because it’s easy and mess-free. Just make sure it’s not too runny.
Can I make these ahead of time?
Yes—prepare and refrigerate the rolled log, then slice and bake fresh. You can also freeze them before or after baking.
How do I keep the pinwheels from unrolling while baking?
Roll tightly and gently pinch the seam when placing them on the tray. You can also place them seam-side down.
Can I use store-bought dough?
Definitely. Crescent roll dough or puff pastry are both convenient options that deliver flaky, delicious results.
What’s the best cream cheese for baking?
Always use full-fat, brick-style cream cheese—it provides better texture and flavor than spreadable or whipped varieties.
Cherry Cheesecake Pinwheels
Equipment
- Mixing bowl
- Hand mixer
- Rolling pin (optional)
- Sharp knife or dental floss
- Baking sheet
- Parchment paper
- Cooling rack
Ingredients
- 1 can 8 oz refrigerated crescent roll dough
- 4 oz full-fat cream cheese softened
- 2 tbsp granulated sugar
- ½ tsp vanilla extract
- ½ cup cherry pie filling
- Optional: powdered sugar or icing for topping
Instructions
- Preheat oven to 375°F (190°C). Line a baking sheet with parchment paper.
- Unroll the crescent dough and press the seams together to form a single sheet.
- Mix cream cheese, sugar, and vanilla until smooth and spreadable.
- Spread cream cheese mixture over the dough, leaving a ½-inch border.
- Spoon cherry filling evenly on top.
- Roll the dough tightly from the long edge into a log.
- Cut into 12 equal slices using a sharp knife or floss.
- Place pinwheels on the baking sheet, spaced apart.
- Bake for 12–16 minutes or until golden brown.
- Cool for 5–10 minutes, then dust with powdered sugar or drizzle icing if desired.
Notes
- Use puff pastry for a crispier texture.
- Chill the dough briefly before slicing for neater spirals.
- Try different fruit fillings like blueberry or raspberry.
Nutrition
Final Thoughts and Encouragement
Cherry Cheesecake Pinwheels bring together the best of both dessert worlds—cheesecake and flaky pastry—in one delightful swirl. They’re easy to make, fun to customize, and guaranteed to put a smile on every face.
Whether you’re baking with kids, prepping for a brunch, or whipping up a late-night treat, this recipe never disappoints. Don’t be afraid to get creative—try new flavors, mix up the toppings, or make them mini!
If you give them a try, tag us on social media—we’d love to see your delicious pinwheel creations!