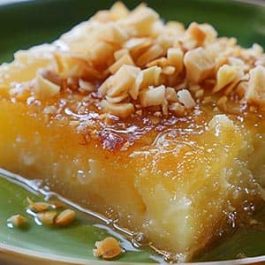
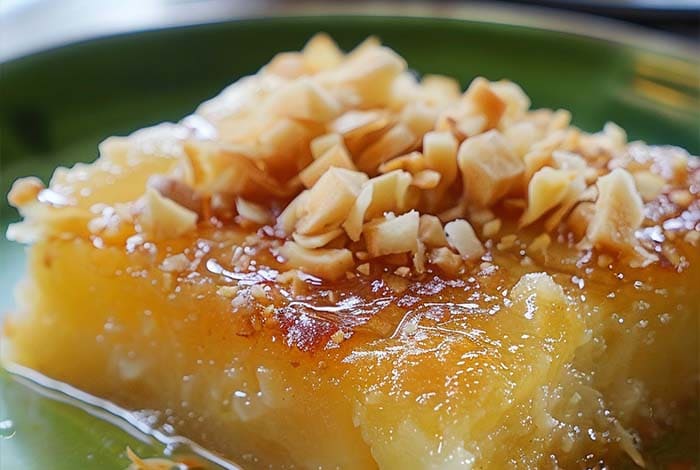
Introduction to Cassava Cake with Macapuno
Cassava Cake with Macapuno is a cherished dessert in Filipino culture, embodying the rich culinary traditions of the Philippines. This dessert is a staple at festive occasions and family gatherings, showcasing the unique flavors and ingredients native to the country. The main components, cassava and macapuno, are indigenous to the tropical climate of the Philippines, making this dish a true representation of Filipino heritage.
Cassava, a starchy root vegetable, serves as the base of the cake, providing a subtly sweet and slightly nutty flavor. Macapuno, a special variety of coconut with a soft, jelly-like texture, complements the cassava with its unique sweetness and richness. Together, these ingredients create a dessert that is not only delicious but also deeply rooted in the Filipino way of life.
Understanding the Ingredients
Cassava: Known scientifically as Manihot esculenta, cassava is a versatile root vegetable widely used in tropical regions around the world. It’s a significant source of carbohydrates and provides essential nutrients such as vitamin C, calcium, and magnesium. In the culinary world, cassava can be used in various forms – from boiled, fried, or mashed in savory dishes to grated and mixed with sweeteners for desserts. Its adaptability and nutritional benefits make it a staple in many diets.
Macapuno: This special type of coconut is considered a delicacy in the Philippines. Unlike regular coconut, macapuno has a soft, gelatinous texture and a sweeter flavor, making it highly prized for use in desserts. The creation of macapuno involves a natural mutation, which results in the coconut meat filling the entire shell, differing from the typical coconut with its firm meat and liquid center. Its rarity and distinctive taste elevate any dish it’s added to, especially the beloved cassava cake.
Other Key Ingredients:
- Coconut Milk: Adds creaminess and a rich coconut flavor, enhancing the overall taste of the cake.
- Condensed Milk: Provides sweetness and a smooth texture, binding the ingredients together.
- Sugar: Adjusts the sweetness to the perfect level, balancing the flavors of cassava and macapuno.
Together, these ingredients form the foundation of Cassava Cake with Macapuno, a dessert that is not only a treat to the taste buds but also a celebration of Filipino culinary tradition.
Step-by-Step Recipe for Cassava Cake with Macapuno
Creating the perfect Cassava Cake with Macapuno involves a blend of traditional techniques and simple, yet precise steps. This recipe will guide you through the preparation of ingredients, the mixing and baking process, and provide tips for achieving the perfect consistency and flavor.
Preparation of Ingredients
- Thaw and Prepare Cassava: Begin by thawing two 16-ounce packages of frozen grated cassava. If using fresh cassava, peel, wash, and grate it finely. Ensure all fibrous parts are removed.
- Drain Macapuno: Open a jar of macapuno strings and drain the syrup. While the syrup adds sweetness, controlling the amount of liquid is crucial for the cake’s texture.
- Measure Additional Ingredients: Prepare one 14-ounce can of coconut milk, one 10-ounce can of condensed milk (reserving half for topping), about 5 tablespoons of brown sugar, a quarter cup of unsalted butter (softened), and a pinch of salt.
Mixing and Baking Process
- Combine Ingredients: In a large mixing bowl, combine the grated cassava, drained macapuno, coconut milk, half of the condensed milk, brown sugar, softened butter, and a pinch of salt. Mix thoroughly until the batter is uniform.
- Preheat Oven: Preheat your oven to 350°F (175°C). Greasing a 9×13 inch baking dish with butter or non-stick spray.
- Bake: Pour the batter into the prepared baking dish, smoothing the top with a spatula. Bake in the preheated oven for about 1 hour or until the edges start to turn golden brown and the center is set.
- Add Topping: Remove the cake from the oven and evenly spread the remaining condensed milk over the top. Return to the oven and bake for an additional 15-20 minutes, or until the top is caramelized to a golden brown. For a quicker caramelization, you can broil the top for 2-3 minutes, watching closely to prevent burning.
Tips for Perfect Consistency and Flavor
- Consistency: The key to the perfect consistency lies in the balance of wet and dry ingredients. Ensure the cassava and macapuno are well-drained to avoid a soggy cake.
- Flavor: The combination of coconut milk and condensed milk should provide enough sweetness and coconut flavor. However, you can adjust the sugar according to your taste preferences.
Expert Baking Tips
Achieving the perfect Cassava Cake with Macapuno requires attention to detail and understanding a few expert tips to avoid common mistakes.
How to Avoid Common Mistakes
- Overmixing: While it’s important to mix the ingredients thoroughly, overmixing can lead to a dense and tough cake. Mix just until the ingredients are combined.
- Baking Time: Oven temperatures can vary, so it’s crucial to check the cake regularly towards the end of baking time. Look for a firm center and golden edges as indicators of doneness.
Adjustments for Different Oven Types
- Conventional vs. Convection Ovens: Convection ovens circulate hot air for even baking and usually bake faster. If using a convection oven, reduce the temperature by 25°F (about 15°C) and check the cake earlier than the suggested baking time.
- Oven Hot Spots: Rotate the baking dish halfway through baking if your oven has hot spots to ensure even browning and cooking.
By following these steps and tips, you’ll be well on your way to creating a delicious Cassava Cake with Macapuno that’s sure to impress.
FAQs
What is cassava and is it different from yuca?
- Cassava and yuca refer to the same starchy tuber, which is known by different names in various regions. In the Americas, it’s commonly called yuca, while in Africa and Asia, it’s referred to as cassava. This root vegetable is a staple ingredient in many parts of the world due to its versatility and carbohydrate content.
Can I use fresh cassava instead of frozen?
- Yes, fresh cassava can be used in place of frozen. If opting for fresh, it should be peeled, washed, and grated finely. Ensure to remove any fibrous parts. Fresh cassava may require a bit more preparation time but can offer a fresher taste and texture to the cake.
How do I store leftover cassava cake?
- Leftover cassava cake should be stored in an airtight container in the refrigerator. It can last up to a week when stored properly. To enjoy, simply reheat slices in the microwave for a few seconds until warm.
Egg-free recipe clarification
- This recipe for Cassava Cake with Macapuno is indeed egg-free. The omission of eggs makes the cake denser and more traditional in texture, which is characteristic of many Filipino desserts.
Serving and Presentation Ideas
How to cut perfect squares
For clean cuts, allow the cassava cake to cool completely before slicing. Use a sharp knife, dipping it in hot water and wiping it clean between cuts. This method helps achieve smooth, even squares.
Serving suggestions: Warm vs. cold
Cassava Cake with Macapuno can be enjoyed both warm and cold. Serving it warm accentuates its creamy texture and rich flavors, making it a comforting dessert. When served cold, it offers a refreshing and firmer texture, ideal for hot days.
Garnishing tips
Garnish with a sprinkle of toasted coconut flakes or a drizzle of coconut syrup for extra flavor. Freshly grated coconut or a dollop of whipped cream can also add a delightful touch.
Health and Dietary Considerations
Cassava’s health benefits and concerns
Cassava is rich in carbohydrates, providing energy, and contains vitamin C, calcium, and magnesium. However, it must be properly cooked to remove naturally occurring cyanide compounds, which can be toxic.
Making a gluten-free version of cassava cake
Cassava cake is naturally gluten-free, making it an excellent dessert option for those with gluten sensitivities or celiac disease. Ensure all other ingredients, such as condensed milk and coconut milk, are gluten-free.
Adjustments for a less sweet version
For a less sweet cassava cake, reduce the amount of condensed milk and sugar in the recipe. You can also increase the amount of cassava to balance the sweetness further. Experiment with the ratios to suit your taste preferences.

Cassava Cake with Macapuno
Equipment
- 9x13 inch baking dish
- Large mixing bowl
- Mixing spoon or spatula
- Oven
Ingredients
- 2 16-oz packs of frozen grated cassava, thawed
- 1 11-oz jar of macapuno strings, drained
- 1 14-oz can of coconut milk
- 1 10-oz can of condensed milk, divided
- 5 tbsp brown sugar
- ¼ cup unsalted butter softened
- A pinch of salt
Instructions
- Preheat the oven to 350°F (175°C). Grease a 9x13 inch baking dish.
- In a large mixing bowl, combine the thawed grated cassava, drained macapuno strings, coconut milk, half of the condensed milk, brown sugar, softened butter, and a pinch of salt. Mix well until all ingredients are evenly incorporated.
- Pour the mixture into the prepared baking dish, smoothing the top with a spatula.
- Bake in the preheated oven for about 1 hour, or until the edges start to turn golden brown and the center is set.
- Remove the cake from the oven and evenly spread the remaining condensed milk over the top. Return to the oven and bake for an additional 15-20 minutes, or until the top is caramelized to a golden brown. Optionally, broil for 2-3 minutes for quicker caramelization, watching closely to prevent burning.
- Allow the cake to cool in the baking dish before cutting into squares and serving. Best served warm.
Notes
- For a less sweet version, reduce the amount of condensed milk and sugar according to your taste preferences.
- Ensure the cassava and macapuno are well-drained to avoid a soggy cake.
- The cake can be stored in an airtight container in the refrigerator for up to a week. Reheat slices in the microwave for a few seconds before serving if desired.
- This recipe is naturally gluten-free, making it a great dessert option for those with gluten sensitivities or celiac disease. Always check the labels of your ingredients to ensure they are gluten-free.

