Introduction to Peanut Butter Lunch Lady Cookie Bars
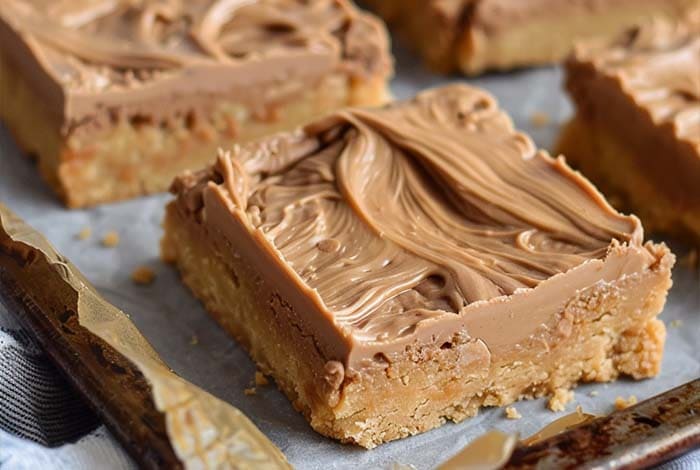
Peanut Butter Lunch Lady Cookie Bars are more than just a dessert; they’re a portal to the past, evoking memories of school cafeterias and the simple joy of a midday treat. Originating from the quintessential American school lunch experience, these bars have a special place in the hearts of many. Crafted with a rich, peanut butter base and crowned with a smooth, creamy frosting, they strike the perfect balance between sweet and salty, chewy and soft.
The nostalgic charm of Peanut Butter Lunch Lady Cookie Bars lies in their ability to transport adults back to their childhoods while simultaneously winning over the taste buds of the younger generation. This timeless appeal makes them a beloved treat across all ages. The simplicity of the recipe, combined with the universal love for peanut butter, ensures these cookie bars are a hit at any gathering, from school events to family reunions.
The Recipe Breakdown
Ingredients Overview
At the core of Peanut Butter Lunch Lady Cookie Bars are a few essential ingredients: flour, sugar, eggs, peanut butter, unsalted butter, milk, and powdered sugar. Each component plays a pivotal role in creating the bars’ signature texture and taste. Flour and sugar form the foundation, providing structure and sweetness. Eggs bind the mixture, contributing to the bars’ moist, chewy texture. Peanut butter, the star ingredient, infuses the bars with its rich, nutty flavor, while unsalted butter adds creaminess. Milk softens the texture, and powdered sugar is key to the smooth frosting that tops these delightful bars. The importance of quality ingredients cannot be overstated; they are the secret to transforming simple components into a memorable treat.
Step-by-Step Recipe Guide
Preparation and Preheating: Start by preheating your oven to the specified temperature and preparing your baking sheet with parchment paper or a light greasing. This ensures your bars will cook evenly and release easily.
Mixing Dry Ingredients: In a large bowl, whisk together the flour, sugar, baking soda, and salt. This step ensures that the flavors and leavening agents are evenly distributed throughout the batter.
Combining Wet Ingredients: In a separate bowl, mix the milk, vanilla extract, and beaten eggs. This mixture will add moisture to the dough and help to bind the dry ingredients together.
Melting and Mixing Butter and Peanut Butter: In a saucepan, gently melt the butter and peanut butter together over low heat. Once melted, combine this with the dry ingredients, followed by the wet ingredients, stirring until you have a smooth batter.
Baking Process: Pour the batter into the prepared baking sheet, spreading it evenly. Bake in the preheated oven until the edges are lightly golden and a toothpick inserted into the center comes out clean.
Frosting Preparation and Application: For the frosting, melt additional peanut butter and butter together, then gradually mix in powdered sugar and milk until smooth. Spread this frosting over the cooled bars, creating a creamy topping that complements the chewy base.
Storage and Preservation
To ensure your Peanut Butter Lunch Lady Cookie Bars remain fresh and delicious, store them in an airtight container at room temperature for up to 5 days. For longer storage, they can be refrigerated for up to 2 weeks or frozen for up to 3 months. When freezing, wrap the bars individually in plastic wrap and then place them in a freezer-safe bag. Thaw at room temperature before serving, to revive their chewy texture and rich flavor. These storage tips make the cookie bars a convenient make-ahead treat for any occasion.
Customizing Your Cookie Bars
Peanut Butter Lunch Lady Cookie Bars are wonderfully versatile, allowing for numerous variations and substitutions to cater to different dietary needs and preferences. Whether you’re looking to tweak the recipe for health reasons, dietary restrictions, or simply to add a bit of variety, there’s plenty of room for creativity.
Variations and Substitutions for Dietary Needs
- Peanut Butter Alternatives: For those with peanut allergies or simply looking for a different flavor profile, almond butter, cashew butter, or sunflower seed butter can be excellent substitutes. Each alternative offers a unique taste and texture, while still maintaining the creamy, nutty essence of the original recipe.
- Gluten-Free Options: Making these cookie bars gluten-free is as simple as substituting the all-purpose flour with a gluten-free flour blend. Look for a blend that’s designed to be a 1:1 replacement to ensure the texture remains as close to the original as possible.
- Dairy-Free Modifications: For a dairy-free version, replace the butter with a plant-based alternative, such as coconut oil or a vegan butter substitute. Similarly, any milk can be swapped for almond milk, soy milk, or oat milk, depending on your preference.
Creative Add-Ins for Extra Flavor and Texture
- Chocolate Chips: Stirring in chocolate chips before baking adds a delightful contrast to the peanut butter base, creating a classic flavor combination that’s hard to resist.
- Nuts and Seeds: For added crunch and nutritional value, consider folding in chopped nuts like almonds, walnuts, or pecans, or seeds such as pumpkin or sunflower seeds.
- Dried Fruit: Dried cranberries, cherries, or raisins can introduce a sweet and tart element, enhancing the overall flavor profile of the bars.
FAQs
What can I use instead of peanut butter?
- Almond butter, cashew butter, and sunflower seed butter are great alternatives that maintain the creamy texture and rich flavor profile, catering to different allergies or taste preferences.
Can I make these bars gluten-free?
- Yes, simply use a gluten-free flour blend in place of all-purpose flour to make these cookie bars suitable for those with gluten sensitivities or celiac disease.
How long do these cookie bars last?
- Stored in an airtight container at room temperature, the bars can last up to 5 days. For longer storage, refrigerate them for up to 2 weeks or freeze for up to 3 months.
Can the recipe be doubled for larger batches?
- Absolutely. Doubling the recipe is straightforward and perfect for large gatherings or events. Just ensure your baking sheet is large enough to accommodate the increased volume, and adjust the baking time as needed to ensure even cooking.
Conclusion
Peanut Butter Lunch Lady Cookie Bars are more than just a dessert; they’re a trip down memory lane, a celebration of simple ingredients, and a testament to the joy of baking. Whether you’re recreating cherished memories or making new ones, these cookie bars are sure to delight. So, preheat your oven, gather your ingredients, and get ready to indulge in the sweet nostalgia of Peanut Butter Lunch Lady Cookie Bars.
Peanut Butter Lunch Lady Cookie Bars Recipe
Equipment
- Large mixing bowl
- Medium saucepan
- Baking sheet
- Parchment paper (optional)
- Whisk
- Spatula
Ingredients
- 2 cups all-purpose flour or gluten-free flour blend
- 2 cups sugar
- 2 large eggs beaten
- 1 ½ cups creamy peanut butter divided
- 1 ½ cups unsalted butter or dairy-free alternative, softened, divided
- ½ cup milk or dairy-free milk, plus 2 tablespoons, divided
- 1 teaspoon baking soda
- 1 teaspoon vanilla extract
- 1 teaspoon salt
- 4 cups powdered sugar
Instructions
- Preheat the oven to 400°F (200°C). Grease a large cookie sheet or line with parchment paper.
- Mix Dry Ingredients: In a large bowl, combine flour, sugar, baking soda, and salt.
- Combine Wet Ingredients: In a separate bowl, whisk together ½ cup milk, vanilla extract, and eggs.
- Melt Butter and Peanut Butter: In a saucepan, melt 1 cup butter and 1 cup peanut butter over low heat, stirring until smooth.
- Combine: Gradually add the dry ingredients to the wet mixture, then incorporate the melted butter and peanut butter. Stir until well combined.
- Bake: Spread the batter evenly onto the prepared cookie sheet. Bake for 20 minutes, or until a toothpick inserted into the center comes out clean.
- Prepare Frosting: In the same saucepan, melt the remaining butter and peanut butter. Add 2 tablespoons of milk and gradually mix in the powdered sugar until smooth.
- Frost: Spread the frosting over the cooled bars. Allow to set before cutting into squares.
Notes
- Gluten-Free Option: Substitute all-purpose flour with a gluten-free flour blend to cater to gluten sensitivities.
- Dairy-Free Modification: Use dairy-free butter and milk alternatives for a dairy-free version.
- Add-Ins: Feel free to customize your cookie bars with chocolate chips, nuts, or dried fruit for added texture and flavor.
- Storage: Store in an airtight container at room temperature for up to 5 days, refrigerate for up to 2 weeks, or freeze for up to 3 months.