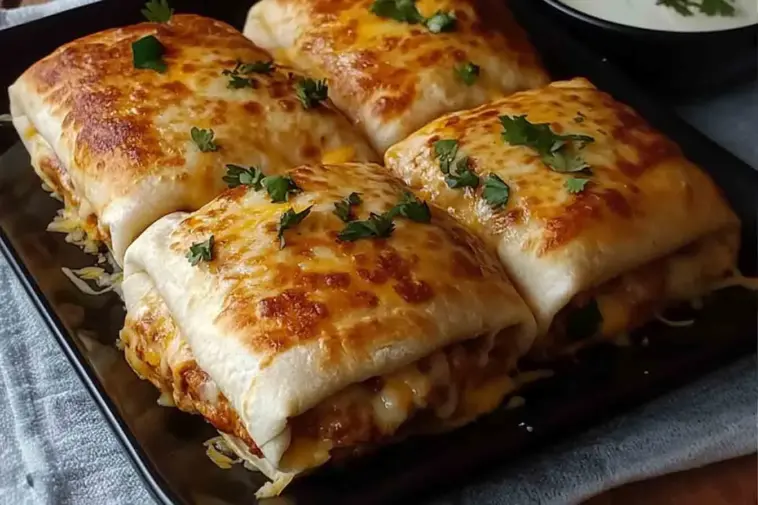
What Are Baked Chicken Chimichangas?
Craving something crispy, cheesy, and full of bold flavor—but still want to keep things light? Enter baked chicken chimichangas—the oven-friendly twist on a classic Mexican-American favorite.
Traditionally, a chimichanga is a deep-fried burrito stuffed with meats, cheese, and all the good stuff. But here’s the twist: we’re baking instead of frying—giving you that irresistible golden crunch without the excess oil and mess.
The result? A flavor-packed meal that’s crispy on the outside, melty and juicy on the inside. Perfect for those weeknights when you want something satisfying but still feel good about what’s on your plate.
These baked beauties are great for:
-
Busy families looking for quick dinner wins
-
Meal preppers who love make-ahead options
-
Anyone who can’t resist cheesy Tex-Mex comfort food
Personally, I love how easy they are to customize. You can go spicy, creamy, veggie-loaded—whatever fits your mood. Plus, my family never complains when these hit the table. (That’s a rare win!)
Ingredients Overview: What You’ll Need
Before we get rolling (literally), let’s talk about what makes the perfect chicken chimichanga:
-
Shredded chicken – You can cook your own, but I often use rotisserie chicken or leftovers to save time.
-
Cheese – Cheddar, Monterey Jack, or a Mexican blend all melt beautifully.
-
Tortillas – Stick with large flour tortillas; they hold up best in the oven and turn crispy without tearing.
-
Spices – Think cumin, chili powder, garlic powder—those classic warm Mexican flavors.
Want to level it up? Try these optional add-ins:
-
Black beans or corn for texture
-
Diced green chilies for mild heat
-
Salsa or enchilada sauce to keep the filling moist
-
A dollop of sour cream or cream cheese for extra creaminess
Tip: Use block cheese and shred it yourself—it melts smoother and adds that gooey goodness chimichangas are known for.
Why Bake Instead of Fry? Health & Texture Talk
Traditional chimichangas are deep-fried, which makes them delicious… but heavy. Baking them gives you all the flavor without the extra oil and calories.
Here’s why baking wins:
-
Healthier: No deep fryer, no greasy splatter, fewer calories
-
Easier cleanup: Say goodbye to hot oil and messy pans
-
Still crispy: A light brushing of oil or spray delivers that signature crunch
Want even crispier results? The air fryer is your best friend. It gives you deep-fried texture with almost no oil—perfect for smaller batches or quick dinners.
Flavor Boosters: How to Season the Chicken Filling
Let’s make sure the inside is just as irresistible as the outside. Seasoning your chicken is key! Start with this bold, balanced blend:
-
Cumin
-
Chili powder
-
Paprika
-
Garlic powder or fresh minced garlic
Pro tip: Simmer shredded chicken in a little chicken broth with these spices to lock in juicy, flavorful meat.
Want a creamier texture? Stir in a spoonful of:
-
Cream cheese
-
Sour cream
-
Salsa or enchilada sauce for extra moisture and a zesty kick
This step transforms bland chicken into a crave-worthy filling.
How to Roll and Seal Chimichangas Properly
Rolling your chimichanga the right way ensures all that delicious filling stays put while baking. Here’s the step-by-step:
-
Spoon the filling into the center of the tortilla (avoid overfilling).
-
Fold the sides in toward the center.
-
Fold the bottom edge up and over the filling, then roll tightly toward the top.
-
Place seam-side down on the baking sheet.
Microwave your tortillas for 10–15 seconds before filling—they’ll be more pliable and less likely to crack.
Seal edges well so nothing leaks out during baking—and your chimichangas stay picture-perfect.
Tips for Baking Perfectly Crisp Chimichangas
You want that beautiful golden crunch? Here’s how to do it without frying:
-
Line your baking sheet with parchment paper to avoid sticking.
-
Brush or spray the tops and sides with a little oil—this helps create a crisp, bubbly finish.
-
Bake at 400°F until golden brown, usually about 20–25 minutes.
-
Flip halfway through for even crisping on both sides.
Bonus tip: Broil for the last 2–3 minutes if you want that extra deep golden top—just keep a close eye so it doesn’t burn!
Advertisement
Delicious Toppings & Serving Suggestions
What’s a chimichanga without the toppings? These crispy baked wraps shine even brighter when dressed up with flavorful add-ons. Try serving yours with:
-
A dollop of sour cream
-
Creamy guacamole or sliced avocado
-
Zesty salsa or pico de gallo
-
Warm, melty queso dip
-
Crunchy shredded lettuce for a fresh contrast
For a full meal, pair your chimichangas with classic Mexican sides like:
-
Spanish or Mexican rice
-
Refried or black beans
-
Elote-style street corn or roasted veggies
Want to impress guests?
Hosting tip: Set up a chimichanga bar with toppings and sauces—perfect for family dinners, potlucks, or game day spreads!
And for a bold twist, drizzle with chipotle mayo or a creamy jalapeño-lime sauce—your guests will go wild for it.
Make-Ahead, Freezing & Reheating Tips
Baked chicken chimichangas are a meal prep dream—perfect for busy weeknights or feeding a crowd.
Make-ahead tips:
-
Assemble the chimichangas, then refrigerate them uncooked for up to 24 hours.
-
To freeze, wrap each one tightly in foil or plastic wrap, then place in a freezer-safe zip-top bag. They’ll last for up to 3 months.
Reheating methods:
-
Oven (best method): Bake at 375°F for 20–25 minutes from frozen or until heated through.
-
Air fryer: Preheat to 375°F and cook 8–10 minutes, flipping halfway.
-
Toaster oven: A great option for single servings.
Avoid microwaving if you want that signature crispy crust—it tends to make the tortilla soft and chewy instead.
Planning ahead saves time and keeps dinner exciting!
Creative Variations on Chicken Chimichangas
Once you’ve nailed the base recipe, it’s easy to get creative! Here are a few delicious variations to try:
-
Cheesy Chicken & Rice Chimichangas: Add cooked Spanish rice and extra cheese to the filling.
-
Creamy Chicken & Jalapeño: Mix in cream cheese and diced jalapeños for a rich, spicy version.
-
Buffalo Chicken Chimichangas: Toss shredded chicken in buffalo sauce, and add a drizzle of ranch or blue cheese.
-
Southwest Style: Load up with black beans, corn, bell peppers, and pepper jack cheese.
-
Low-Carb Option: Use low-carb or whole wheat tortillas and lighter cheese to cut carbs and calories.
-
Kid-Friendly Mini Chimis: Use taco-size tortillas, go easy on the spice, and double the cheese.
The beauty of this recipe? It’s totally customizable—just use what you’ve got in the fridge!
How to Make Baked Chicken Chimichangas in the Air Fryer
Love crispy food fast? The air fryer is your new best friend when it comes to chimichangas.
Here’s how to do it:
-
Preheat the air fryer to 375°F.
-
Lightly brush the chimichangas with oil or use spray oil for even coverage.
-
Place seam-side down in the basket—don’t overcrowd.
-
Air fry for 8–10 minutes, flipping halfway, until golden brown and crispy.
Bonus: The air fryer gives you all the crunch with even less oil—and it’s faster than baking!
This method is ideal for reheating leftovers or small-batch meals.
FAQs
What is the difference between a chimichanga and a burrito?
A chimichanga is essentially a fried or baked burrito. While burritos are soft-wrapped and typically not cooked again, chimichangas are golden and crisp—either deep-fried or oven-baked.
Can I use corn tortillas instead of flour?
Flour tortillas are highly recommended. Corn tortillas tend to crack and tear when folded, especially when baked. Flour gives you a soft interior and crispy exterior.
How do you keep chimichangas from getting soggy?
Avoid overstuffing, use drained fillings, and bake uncovered so the moisture can escape. Also, brush the exterior lightly with oil for that golden finish.
Are baked chimichangas healthy?
They’re a lighter alternative to deep-fried versions. With lean protein, baked preparation, and control over ingredients, they’re great for balanced weeknight meals.
What kind of cheese is best for chimichangas?
Use Cheddar, Monterey Jack, or a Mexican shredded cheese blend. These melt smoothly and give you that gooey, stretchy bite.
Baked Chicken Chimichangas
Equipment
- Large baking sheet
- Parchment paper
- Medium mixing bowl
- Small saucepan (optional for warming chicken)
- Basting brush or spray oil
- Oven or air fryer
Ingredients
- 2 ½ cups shredded cooked chicken rotisserie or homemade
- 1 ½ cups shredded cheddar or Mexican blend cheese
- 6 large flour tortillas burrito size
- ½ cup salsa or enchilada sauce
- ½ teaspoon cumin
- ½ teaspoon chili powder
- ¼ teaspoon paprika
- ¼ teaspoon garlic powder
- Salt and pepper to taste
- Cooking spray or oil for brushing
- Optional mix-ins: black beans corn, diced green chilies, sour cream
Instructions
- Preheat oven to 400°F (200°C). Line a baking sheet with parchment paper.
- Prepare the filling: In a bowl, combine shredded chicken, cheese, salsa, and all spices. Stir until well mixed.
- Warm tortillas in the microwave for 15 seconds to soften.
- Assemble: Place filling in center of each tortilla. Fold sides inward, then roll tightly like a burrito. Place seam-side down on baking sheet.
- Brush with oil or spray tops lightly.
- Bake for 20–25 minutes, flipping halfway through, until golden and crisp.
- Optional: Broil for the last 2–3 minutes for extra crispiness.
- Serve hot with your favorite toppings!
Notes
- Use rotisserie chicken for faster prep.
- Store leftovers in the fridge up to 3 days or freeze individually for 3 months.
- Reheat in oven or air fryer for best results.
- Add your favorite toppings like sour cream, guac, or salsa!
Nutrition
Final Thoughts: Why You’ll Love This Recipe
Baked chicken chimichangas are everything you want in a meal: crispy, cheesy, flavorful, and surprisingly easy to make. Whether you’re cooking for your family or prepping a freezer stash, they’re a reliable go-to.
You can customize the filling, spice level, and toppings to fit your cravings or dietary needs—and the leftovers? Even better the next day!
Give it a try, and don’t forget to drop your favorite twist or topping combo in the comments. Let’s make chimichanga night a thing!