There’s something magical about the combination of buttery shortbread, sweet-tart apples, and a cinnamon oat crumble. Apple Crumb Bars bring all the cozy flavors of apple pie into a portable, easy-to-make dessert that’s perfect for bake sales, brunch tables, or a quiet moment with a warm cup of tea. If you’ve ever wished apple pie came in a handheld version, this is it.
In this guide, we’ll walk you through everything you need to know to create the perfect batch—from choosing the right apples to expert baking techniques that guarantee a crisp crust and juicy filling. Whether you’re a beginner or a seasoned baker, these bars are a guaranteed crowd-pleaser.
What Exactly Are Apple Crumb Bars?
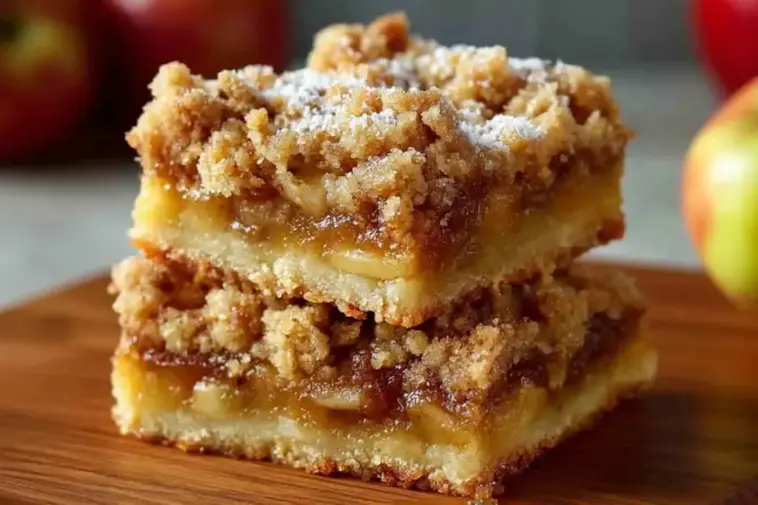
Apple Crumb Bars are a delightful cross between a fruit crisp and a cookie bar. They feature three layers: a buttery shortbread-like base, a spiced apple filling, and a sweet, crumbly oat topping. Think of them as apple pie’s relaxed, more shareable cousin.
Unlike traditional pies, these bars don’t require rolling dough or lattice tops, making them simpler and faster to prepare. They also cut cleanly into squares, making them ideal for transporting or freezing. And let’s be honest—who doesn’t love a dessert that delivers both crunch and softness in a single bite?
These bars are especially popular in fall but are delicious year-round.
Why You’ll Love These Apple Crumb Bars – Texture, Flavor & Ease
Here’s why Apple Crumb Bars should be your next baking project:
-
Texture trifecta: Buttery base, soft apples, crispy topping.
-
Bold fall flavor: Cinnamon, brown sugar, and a touch of nutmeg enhance the apple’s natural sweetness.
-
Easy to make ahead: These bars actually taste better the next day, once the flavors have melded and the base has set.
-
Portable & freezer-friendly: Great for potlucks, school lunches, or Sunday brunch.
-
Customizable: Adjust sweetness, switch apple varieties, or toss in extras like chopped nuts or caramel drizzle.
Whether you serve them warm with ice cream or cool with coffee, these bars shine.
Best Apples to Use in Apple Crumb Bars
The apples you choose will make or break your crumb bars. You want a variety that holds its shape when baked and provides a balance of tartness and sweetness. Here are some top apple picks for baking:
-
Granny Smith – Firm, tart, and a classic for baked desserts. Perfect if your crumble topping is sweet.
-
Honeycrisp – Juicy, crisp, and slightly sweet-tart. Excellent for layered textures.
-
Braeburn – Mildly tart and holds up beautifully when baked.
-
Pink Lady – Great sweet-tart balance and doesn’t get mushy.
-
Jonagold – Slightly softer but flavorful and fragrant.
Pro tip: Combine two varieties (like Granny Smith + Honeycrisp) for the best flavor and texture contrast.
Avoid apples like Red Delicious or McIntosh, which become too soft and watery when baked.
No need to spend extra on organic unless you plan to keep the peel on. If peeling, conventional apples will do just fine—just give them a good rinse.
Apple Crumb Bar Layers: Crust, Spiced Apple Filling & Oat Topping
You’ll be using three main components—each playing a unique role in texture and flavor.
1. Buttery Shortbread Crust
This is your foundation. Typically made with butter, flour, sugar, and a pinch of salt. It should be just sweet enough to balance the tartness of the apples. A touch of vanilla adds warmth.
Expert Tip: Chill the crust before baking to reduce shrinkage and help it hold up under juicy filling.
2. Cinnamon-Spiced Apple Filling
This layer brings the fruit flavor front and center. Sliced apples are tossed with brown sugar, lemon juice, cinnamon, and sometimes a bit of cornstarch or flour to thicken.
You can choose to pre-cook the apples slightly to reduce moisture or add them raw for a more rustic texture.
3. Oatmeal Crumb Topping
A mix of rolled oats, flour, brown sugar, butter, and cinnamon. Some variations use chopped nuts or a touch of maple syrup.
Pro Tip: Use cold butter and crumble with your fingers or a pastry cutter for the crispiest topping.
The magic happens when these layers bake together—melting slightly into each other but keeping their delicious identity.
Essential Tools & Prep Tricks
No fancy gadgets needed, just a few kitchen staples:
-
8×8 or 9×9 baking pan (for a thicker bar)
-
Parchment paper (makes clean removal and slicing easy)
-
Mixing bowls (one each for crust, filling, and topping)
-
Pastry cutter or clean hands (for crumbly topping)
-
Cooling rack (essential for setting the bars)
Helpful Tip: Use a parchment sling with overhanging edges to lift the bars out easily after baking.
Step-by-Step – Perfect Shortbread Base
A solid base keeps your bars from crumbling into mush. Here’s how to get it right:
-
Start with softened or melted butter – This makes it easier to mix evenly with flour and sugar.
-
Mix dry ingredients – In a bowl, whisk together flour, sugar, and a pinch of salt.
-
Add butter & vanilla – Combine until the mixture resembles coarse sand or wet clumps.
-
Press into pan – Use your hands or the bottom of a glass to press the dough firmly and evenly.
-
Chill for 10–15 minutes – Helps the crust stay intact while baking.
-
Blind bake for 12–15 minutes at 350°F (175°C) – You want a slightly golden base that’s set but not browned.
Why it matters: Blind baking keeps the crust from going soggy when you add the moist apple filling later.
Once out of the oven, let the base cool slightly before adding the filling. This prevents overbaking the apples and helps keep clean layers.
Step-by-Step – Juicy Cinnamon-Apple Filling
This filling should be soft but not watery, flavorful but not overpowering.
-
Slice or dice apples evenly – About 1/4 inch thick. Uniform slices bake more evenly.
-
Toss with brown sugar, cinnamon, and lemon juice – This enhances the flavor and prevents browning.
-
Optional add-ins: A tablespoon of cornstarch helps thicken the juice as it bakes. Add nutmeg or allspice for warmth.
-
Pre-cook or not?
-
Raw apples: More texture, slightly longer bake.
-
Sautéed apples: Shorter bake, more cohesive filling.
-
For juicier varieties, a quick 5-minute sauté in butter works wonders.
-
-
Spread evenly over crust – Try to avoid piling in the center; you want even thickness throughout.
Pro Tip: Don’t overload the bars with too much filling—about 2 to 2½ cups is plenty for an 8×8 pan.
Let the apple layer rest for a few minutes before topping with the crumble to reduce sogginess.
How to Bake Apple Crumb Bars to Golden Perfection
Now comes the fun part—putting it all together:
-
Crust: Ensure the base is slightly cooled but still warm.
-
Apple filling: Spoon evenly over the crust, gently pressing the apples into place.
-
Crumb topping: Sprinkle generously across the apples. It’s okay if some larger clumps form—that’s texture gold!
Bake at 350°F (175°C) for 35–40 minutes, or until:
-
The top is golden brown,
-
The apples are fork-tender,
-
And the edges bubble slightly with juicy goodness.
Watch the edges around the 30-minute mark. If they’re browning too quickly, tent loosely with foil.
Let the bars cool completely in the pan for easier slicing. For best results, chill in the fridge for 1–2 hours before cutting. This helps the layers set and makes clean squares.
Cooling, Slicing & Presentation Hacks
Once cooled, lift the bars out using the parchment sling.
Use a sharp serrated knife or bench scraper for clean, bakery-style edges. Wipe the blade between cuts for a neat finish.
For serving:
-
Dust lightly with powdered sugar for a classic look.
-
Drizzle with a bit of warm salted caramel.
-
Serve à la mode with vanilla bean ice cream for full apple pie vibes.
These bars travel well, stack without sticking, and hold their shape—perfect for gifting or packing in lunchboxes.
Pro Tip: Store sliced bars between parchment layers to keep them neat.
Serving Ideas & Pairings
Apple Crumb Bars are incredibly versatile. Here’s how to serve them up:
-
Warm with ice cream: Classic and comforting.
-
Drizzled with caramel sauce or maple glaze: Adds richness.
-
On a fall dessert platter: Pair with pumpkin bread, spiced nuts, or chocolate-dipped pretzels.
-
Cut into mini squares for bite-size treats on a brunch board.
-
Top with whipped cream or crème fraîche for a more elevated presentation.
Drink pairings? Try chai tea, hot apple cider, or a crisp sparkling white wine for gatherings.
Whether served casual or classy, these bars shine in any setting.

Apple Crumb Bar Variations & Dietary Substitutions
Make the recipe your own with these delicious twists:
Flavor Twists:
-
Salted Caramel Apple Bars – Add a caramel layer between filling and crumb topping.
-
Cheddar-Apple Crumb Bars – Add shredded sharp cheddar into the crust for a sweet-savory contrast.
-
Spiced Pear Crumb Bars – Sub pears and a touch of cardamom.
Dietary Options:
-
Gluten-Free – Use a 1:1 gluten-free flour blend for the crust and topping. Also, confirm oats are certified GF.
-
Dairy-Free – Use vegan butter or coconut oil. Note that coconut oil will firm more when chilled.
-
Lower Sugar – Reduce sugar by 20–25% and rely on naturally sweet apple varieties like Gala.
Pro Tip: Taste the raw filling before baking. Adjust spices or sweetness to your preference.
Experimenting can turn this classic into a signature dessert for your table.
Storage & Freezing Tips
These bars store well, making them ideal for prepping ahead:
Room Temperature:
-
Store in an airtight container for up to 2 days.
Refrigerator:
-
Extend freshness up to 5–6 days.
-
Flavor deepens and layers firm up when chilled.
Freezing:
-
Wrap individual bars in plastic wrap and store in freezer-safe bags.
-
Freeze for up to 2 months.
-
Thaw overnight in the fridge or microwave on low for 20–30 seconds.
Bonus: These taste amazing straight from the fridge—no reheating needed.
If serving for a party, pull out an hour in advance to let the flavors open up.
Apple Crumb Bars Troubleshooting – Common Issues & Easy Fixes
Even the best bakers need a few backups. Here’s how to handle common hiccups:
Soggy crust
-
Solution: Blind bake longer or reduce apple moisture by sautéing beforehand.
Crumb topping too soft
-
Solution: Ensure butter is cold, not melted. You can also add more oats for extra texture.
Overbaked apples
-
Solution: Use firmer apples (like Granny Smith), and don’t slice too thinly.
Bars fall apart when sliced
-
Solution: Chill fully before cutting. Use parchment for easy lifting.
Pro Tip: Let bars rest for a few hours before serving—the flavor and texture improve dramatically.
Still not right? Don’t toss them! Crumble over yogurt or ice cream for an epic apple crisp sundae.
Nutrition Snapshot & Portion Guide
Here’s a general breakdown per bar (based on 16 bars from an 8×8 pan):
-
Calories: ~210
-
Carbs: ~28g
-
Fat: ~10g
-
Protein: ~2g
-
Fiber: ~2g
-
Sugar: ~15g
Contains: wheat, dairy (unless modified)
Note: Nutrition will vary based on apples used, sugar level, and serving size.
FAQs – Apple Crumb Bars
Can I freeze apple crumb bars?
Absolutely! Wrap each square tightly and freeze for up to 2 months. Thaw in the fridge or gently microwave to serve warm.
What apples give the best flavor?
Try a blend of tart and sweet—Granny Smith with Honeycrisp is a go-to combo.
How do I keep the crumb topping crispy?
Use cold butter and don’t overmix. Let the bars cool uncovered before storing.
Can the recipe be doubled?
Yes—use a 9×13 pan and increase bake time by 10–15 minutes. Watch the center for doneness.
Do I need to peel the apples?
It’s optional. Peeled apples yield a smoother texture, while unpeeled adds rustic flair (just clean them well!).
Apple Crumb Bars
Equipment
- 8x8 or 9x9 baking pan
- Mixing bowls
- Parchment paper
- Pastry cutter or fork
- Knife & peeler
- Cooling rack
- Measuring cups/spoons
Ingredients
Shortbread Crust:
- 1 cup all-purpose flour
- 1/3 cup granulated sugar
- 1/2 cup unsalted butter melted
- 1/2 tsp vanilla extract
- Pinch of salt
Apple Filling:
- 2 1/2 cups peeled sliced apples (about 3 medium)
- 1/3 cup brown sugar
- 1 tsp cinnamon
- 1 tsp lemon juice
- 1 tbsp cornstarch optional
Crumble Topping:
- 3/4 cup rolled oats
- 1/2 cup all-purpose flour
- 1/3 cup brown sugar
- 1/2 tsp cinnamon
- 1/2 cup cold butter diced
- Pinch of salt
Instructions
Prepare the crust:
- Preheat oven to 350°F (175°C). Line an 8×8 pan with parchment. In a bowl, mix flour, sugar, salt, butter, and vanilla. Press firmly into pan. Chill for 10 minutes, then bake for 12–15 minutes until set but not browned.
Make the filling:
- Toss apple slices with brown sugar, lemon juice, cinnamon, and cornstarch. Set aside.
Make the crumb topping:
- Mix oats, flour, brown sugar, and cinnamon. Cut in cold butter until coarse crumbs form.
Assemble:
- Spread apple mixture over baked crust. Top with crumble mixture evenly.
Bake:
- Bake for 35–40 minutes until topping is golden and apples are tender.
Cool:
- Cool completely before slicing. Chill for cleaner cuts.
Notes
- Use a mix of tart and sweet apples (like Granny Smith + Honeycrisp).
- Chill bars before slicing for best results.
- These freeze beautifully—wrap each bar individually for up to 2 months.
Nutrition
Final Thoughts & Invitation to Bake
Apple Crumb Bars are everything we love about fall baking—comforting, simple, and full of nostalgic flavor. Whether you make them for a cozy night in or a festive family gathering, they never disappoint.
Tried this recipe or made a fun twist? Drop a comment, rate it, or tag your creation on Pinterest. Let’s get baking together!