Italian Easter cookies are a delightful symbol of springtime celebration and religious tradition. In Italy, Easter is one of the most important holidays of the year—marked by vibrant processions, elaborate meals, and a table full of homemade sweets. Among the most cherished are these soft, round, often twisted cookies, known for their light glaze and cheerful sprinkles. Every bite offers a taste of tradition passed down through generations.
Loved for their tender crumb, subtle sweetness, and festive appearance, these cookies are baked in households from Sicily to Milan. While the core recipe stays the same, there are countless regional variations, from the anise-scented knot cookies of Southern Italy to the lemon-zest glazed rings of the north. Whether you’re Italian or just inspired by the cuisine, these holiday cookies add warmth and nostalgia to any Easter gathering.
Historical and Cultural Significance
Baking during Easter has deep roots in Italian culture, especially in southern regions like Calabria, Puglia, and Sicily. These areas are known for transforming simple pantry ingredients into symbolic confections that honor rebirth, family, and faith. Italian Easter cookies, often shaped into rings or braids, reflect these values—representing eternity, unity, and the resurrection of Christ.
In some areas, the cookies are baked with a dyed egg nestled inside the dough, symbolizing new life. Others focus on shape—like knots or twists—to represent the binding of loved ones. Each family might have its own unique spin, whether it’s a different glaze or added flavors like orange blossom or almond.
Across Italy, Easter tables overflow with traditional desserts—from Colomba di Pasqua (dove-shaped bread) to ciambelline. Yet, Italian Easter cookies remain a staple, cherished for their simplicity and the intergenerational joy they bring during the holiday.
Common Names and Variations
While most refer to them simply as Italian Easter cookies, they go by many names depending on the region and shape. You might hear:
-
Taralli Dolci – sweet, glazed ring cookies
-
Italian Knot Cookies – twisted dough often glazed and sprinkled
-
Easter Egg Cookies – dough shaped around dyed eggs
-
Ciambelline – small rings, often flavored with anise or citrus
Despite these differences, they all share a common heritage: lightly sweet dough, symbolic shape, and festive decoration. Some regions may add ingredients like ricotta for softness or use almond extract instead of anise, giving each cookie a local twist.
Traditional Ingredients and What They Represent
The beauty of Italian Easter cookies lies in their simplicity. Each ingredient carries both flavor and meaning:
-
Flour – the base of nourishment and abundance
-
Eggs – a universal symbol of rebirth and new beginnings
-
Sugar – for the sweetness of life and celebration
-
Butter or shortening – for richness and tender texture
-
Baking powder – helps the dough rise, symbolizing hope
For flavor, Italians often add:
-
Anise extract – offering a licorice-like flavor reminiscent of tradition
-
Lemon zest or vanilla – adds brightness and aroma
Toppings include:
-
Pastel glazes – soft colors to reflect spring
-
Colorful nonpareils – for a festive, celebratory finish
Optional ingredients used in modern or regional versions include:
-
Ricotta cheese – for a softer, moister bite
-
Orange zest – for a citrusy twist that pairs beautifully with glaze
These ingredients come together to create a cookie that’s both meaningful and delicious.
How Italian Easter Cookies Differ from Other Holiday Cookies
Unlike rich Christmas treats like biscotti or pizzelle, Italian Easter cookies are known for their soft, cakey texture and light flavor. They’re not overly sweet and often rely on a simple glaze to finish. The dough, often egg-based, is rolled into symbolic shapes—like knots or circles—instead of cutouts.
While Christmas cookies often emphasize indulgence, Easter cookies focus on symbolism and subtlety. Their purpose is less about decadence and more about honoring tradition, family, and the renewal of life. They’re meant to be shared, gifted, and enjoyed in good company.
Tools and Kitchen Equipment You’ll Need
To make Italian Easter cookies at home, you’ll need some basic kitchen tools:
-
Stand mixer or hand mixer – for creaming the butter and mixing the dough
-
Mixing bowls – for separating wet and dry ingredients
-
Baking sheets and parchment paper – to prevent sticking
-
Cookie scoop or spoon – for consistent cookie sizing
-
Cooling racks – to set your cookies before glazing
-
Piping bag (optional) – for a neat glaze finish
These tools will help ensure your cookies bake evenly and look just as good as they taste.
Step-by-Step Guide to Making Italian Easter Cookies
Making Italian Easter cookies at home is both easy and rewarding. Here’s a simple step-by-step process that captures the authentic flavor and festive charm of this beloved tradition:
1. Mix the Wet Ingredients
In a large bowl, cream together butter (or shortening) and sugar until light and fluffy. Add in eggs, milk, and your chosen flavoring—such as anise extract, lemon zest, or vanilla.
2. Add the Dry Ingredients
In a separate bowl, combine flour, baking powder, and a pinch of salt. Slowly add this to the wet mixture until a soft dough forms. If the dough feels sticky, chill it in the refrigerator for 20–30 minutes.
3. Shape the Cookies
Take small portions of dough, roll into ropes, and shape into knots, twists, or circles. Place them on a parchment-lined baking sheet, leaving space between each.
4. Bake
Preheat your oven to 350°F (175°C) and bake for 12–15 minutes. The bottoms should be lightly golden; avoid overbaking.
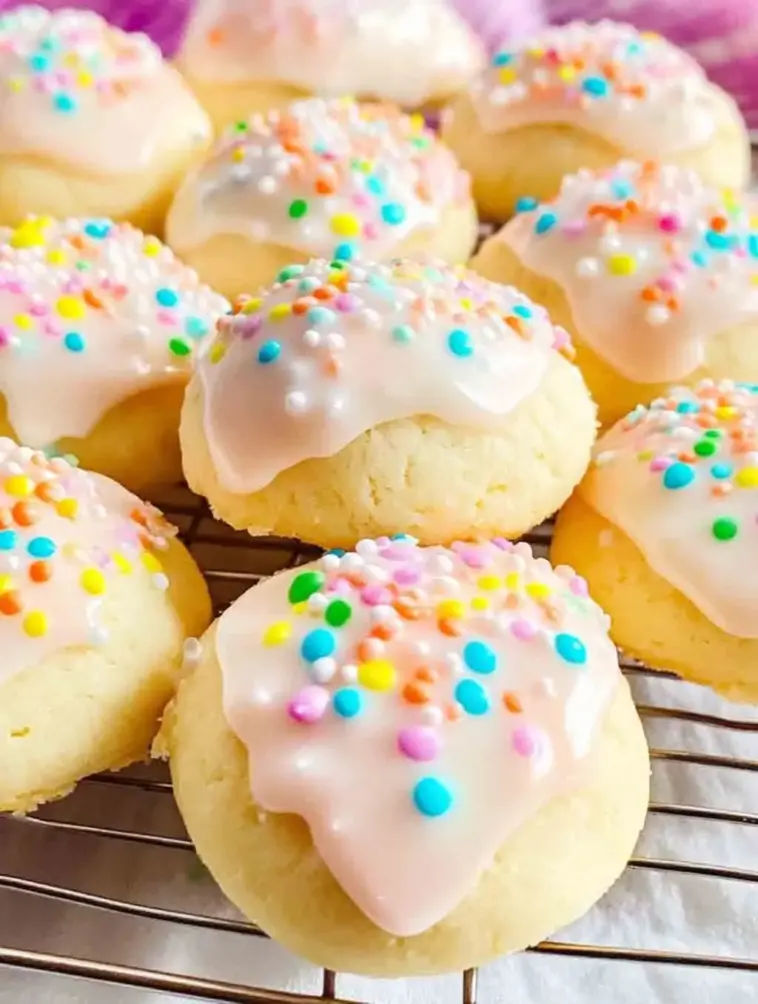
5. Glaze and Decorate
Once cooled, dip cookies in a simple glaze made from powdered sugar, milk, and a touch of flavoring. Decorate with nonpareils or pastel sprinkles, and let the glaze set completely.
Tips for Perfect Italian Easter Cookies
Baking the perfect batch of these cookies doesn’t require much—just a few smart tips:
-
Chill the dough to make shaping easier and prevent spreading in the oven
-
Avoid overbaking – the cookies should remain soft and light, not browned or crispy
-
Let glaze set fully before stacking or storing to avoid smudging
-
Use a cookie scoop for consistent sizing and even baking
-
For a smoother glaze, sift your powdered sugar before mixing
These tips ensure that your cookies come out tender, flavorful, and as beautiful as they are delicious.
Flavor Variations to Try
While the classic anise-flavored version is the most traditional, there’s plenty of room to experiment. Here are a few tasty variations:
-
Lemon glaze with zest – Add lemon juice and zest for a bright, citrusy finish
-
Almond extract or orange blossom water – Subtle and fragrant alternatives to anise
-
Ricotta – Mix a bit into the dough for an ultra-moist, cake-like texture
-
Chocolate-dipped cookies – Dip half of each cookie in melted white or dark chocolate after glazing for a modern twist
Each variation still captures the holiday spirit, with a little extra personal flair.
How to Store and Freeze Them
To keep your Italian Easter cookies tasting fresh, proper storage is key:
-
Room Temperature: Store glazed cookies in an airtight container for 5–7 days. Layer parchment between them to protect the glaze.
-
Freezing: For longer storage, freeze unglazed cookies in a zip-top bag for up to 2 months.
-
Glazing After Thawing: It’s best to glaze cookies after thawing to prevent the icing from cracking or becoming sticky during defrost.
These cookies are great for make-ahead Easter baking and still taste delicious days later—making them perfect for gifting or holiday prep.
Fun Decorating Ideas for Easter
Part of the charm of Italian Easter cookies is how festive and colorful they look. Here are some decorating ideas to make them stand out:
-
Use pastel glazes—light pink, baby blue, sunny yellow—for that classic springtime palette
-
Top with rainbow nonpareils, Easter sprinkles, or edible glitter for extra shine
-
Shape dough into mini wreaths or rings and bake with a dyed Easter egg in the center (a Southern Italian tradition)
-
Pipe glaze with a piping bag for cleaner lines and more precision
-
Add a drizzle of white chocolate or edible pearls for elegance
Let your creativity shine—it’s half the fun!
What to Serve With Italian Easter Cookies
These cookies pair beautifully with:
-
Espresso, cappuccino, or Vin Santo (Italian dessert wine)
-
A light brunch spread of fruit, breads, and cheeses
-
As part of a holiday dessert tray alongside biscotti, cannoli, or lemon ricotta cake
They’re equally good as a festive snack or a sweet finale.
Frequently Asked Questions (FAQs)
Why are Italian Easter cookies shaped like knots or rings?
The shapes symbolize eternal life, unity, and the resurrection, making them a perfect reflection of Easter themes.
Can I use butter instead of shortening?
Absolutely. Butter adds richness, but shortening makes the cookies fluffier and more cake-like. You can also use a mix of both.
Are Italian Easter cookies supposed to be soft or crunchy?
They’re meant to be soft and cakey on the inside, not crisp like biscotti. The glaze adds just a touch of crunch on the surface.

Italian Easter Cookies Recipe
Equipment
- Mixing bowls
- Hand or stand mixer
- Measuring cups/spoons
- Cookie scoop or spoon
- Parchment paper or silicone mat
- Baking sheets
- Cooling rack
- Piping bag (optional for glaze)
Ingredients
For the Cookies:
- 1/2 cup 1 stick unsalted butter or shortening
- 3/4 cup granulated sugar
- 3 large eggs
- 1/4 cup milk
- 1 tsp anise extract or substitute with lemon or almond extract
- 1 tsp vanilla extract optional
- Zest of 1 lemon or orange optional
- 2 1/2 cups all-purpose flour
- 2 tsp baking powder
- Pinch of salt
For the Glaze:
- 1 cup powdered sugar
- 2 –3 tbsp milk adjust for consistency
- 1/2 tsp vanilla or anise extract
- Food coloring optional: pastel pink, yellow, blue
- Sprinkles or nonpareils for decorating
Instructions
- Preheat oven to 350°F (175°C). Line baking sheets with parchment paper.
- Mix wet ingredients: In a large bowl, cream together the butter (or shortening) and sugar until light and fluffy. Beat in the eggs one at a time, followed by milk, extract(s), and citrus zest.
- Combine dry ingredients: In another bowl, whisk together the flour, baking powder, and salt.
- Form the dough: Gradually mix the dry ingredients into the wet mixture until a soft dough forms. Chill for 20–30 minutes for easier shaping.
- Shape the cookies: Roll dough into ropes and twist into knots, rings, or small wreaths. Place them spaced out on baking sheets.
- Bake for 12–15 minutes, or until bottoms are light golden. Do not overbake.
- Cool completely before decorating.
- Make the glaze: Stir together powdered sugar, milk, and extract. Tint with food coloring if desired.
- Dip cookies in glaze, then decorate with sprinkles. Allow glaze to set for at least 30 minutes before storing.
Notes
- Flavor it your way: Swap anise for almond or lemon if preferred.
- Add ricotta: Mix 1/4 cup ricotta into the dough for a softer texture.
- Storage: Store in an airtight container at room temp for up to 5 days.
- Freeze: Freeze unglazed cookies for up to 2 months. Glaze after thawing.
- Make ahead: Dough can be refrigerated overnight before baking.
Nutrition
Reminds me exactly of the cookies my Nonna used to make! So soft, buttery, and lightly sweet. Perfect with a cup of coffee. Thank you for the memories!
These Italian Easter Cookies are so soft and perfectly sweet! The icing and sprinkles make them feel so festive. Thank you for sharing such a beautiful, traditional recipe!