Introduction to Danish Pastries
Danish pastries, or “Danishes,” are a beloved feature of bakeries worldwide, known for their buttery, flaky layers and rich fillings. The story of the Danish pastry begins in Denmark in the early 19th century, albeit not without a touch of international influence. It is widely believed that these pastries were introduced to the Danes by Austrian bakers, who were hired during a strike among Danish bakery workers. This cross-cultural exchange birthed a pastry that the Danes made their own, incorporating local ingredients and culinary preferences to enhance the original recipes.
Over the years, the Danish pastry has evolved into an array of shapes and flavors, each variant more enticing than the last. From the traditional custard-filled to the modern fruit-topped, the versatility of Danishes has led to their global popularity. In the United States, they are a staple of breakfast menus and coffee breaks, while in Europe, they continue to be a symbol of culinary artistry and tradition. This widespread appeal lies not just in their delicious taste but also in their ability to adapt to local tastes and ingredients, making them a universal symbol of comfort and indulgence.
What Makes Crescent Cheese Danishes Special
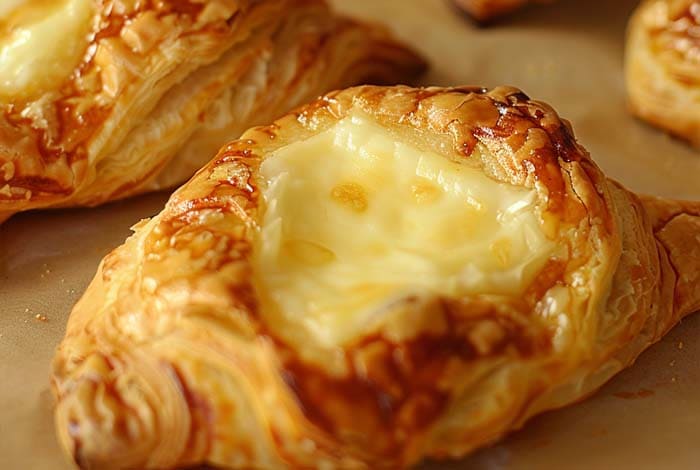
Among the many types of Danish pastries, the Crescent Cheese Danish holds a special place for its simplicity and elegance. Characterized by its crescent shape, this pastry combines a flaky, butter-rich dough with a creamy, sweet cheese filling, often flavored with vanilla or lemon zest to add depth. The result is a delightful contrast in textures: the crisp exterior gives way to a soft, melt-in-your-mouth center that is both comforting and luxurious.
What sets Crescent Cheese Danishes apart is their universal appeal. They are loved for their perfect balance of sweetness and richness, making them suitable for any occasion, from a quick breakfast to an elegant brunch or a comforting snack. Their popularity also stems from their versatility; they can be customized with various toppings and fillings, catering to a wide range of palates and preferences. Moreover, the process of making Crescent Cheese Danishes—rolling the dough, filling it with cheese, and shaping it into crescents—allows for a personal touch, turning baking into an enjoyable and rewarding experience. In essence, the Crescent Cheese Danish is more than just a pastry; it’s a celebration of the joys of baking and the simple pleasures of eating, bringing people together over a shared love for delicious, comforting food.
How to Make Crescent Cheese Danishes Step-by-Step
Creating a Crescent Cheese Danish is an art that combines simplicity with the potential for creativity. At its core, this pastry is a testament to the beauty of baking, where basic ingredients come together to form something truly special. Here’s how you can create your own Crescent Cheese Danishes, complete with tips for ensuring perfection and ideas for variations.
Ingredients Needed
To start, you’ll need the following:
- 1 can (8 oz) refrigerated crescent roll dough
- 8 oz cream cheese, softened
- ¼ cup granulated sugar
- 1 teaspoon vanilla extract
- 1 egg yolk (reserve the white for brushing the pastries)
- Optional: lemon zest for flavor enhancement
For dietary restrictions:
- Gluten-Free: Use gluten-free puff pastry dough instead of traditional crescent roll dough.
- Dairy-Free: Substitute dairy-free cream cheese and use a plant-based milk for brushing the pastries.
- Vegan: Alongside dairy-free substitutes, use a flax egg (1 tablespoon ground flaxseed mixed with 3 tablespoons water) in place of the egg yolk.
Step-by-Step Recipe
- Prepare the Dough: Preheat your oven to 375°F (190°C). Unroll the crescent roll dough on a lightly floured surface and separate into triangles. For a more traditional Danish shape, you can press two triangles together and roll them out slightly to form squares.
- Mix the Filling: In a medium bowl, beat the cream cheese with sugar, vanilla extract, and egg yolk until smooth. If using, stir in the lemon zest.
- Assemble the Danishes: Place a spoonful of the cream cheese mixture near the wider end of each dough triangle (or in the center of each square). Carefully roll the dough around the filling, shaping it into a crescent if starting from triangles. For squares, bring the corners to the center above the filling and pinch the edges to seal.
- Bake: Place the assembled Danishes on a baking sheet lined with parchment paper. Brush each Danish with a mixture of egg white and a tablespoon of water. Bake for 11-13 minutes or until golden and puffy.
- Cool and Serve: Let the Danishes cool for a few minutes before serving. They can be enjoyed warm or at room temperature.
Tips for Flaky Crescent Dough and Creamy Danish Filling
- Dough Texture: Keep the dough cold until you’re ready to use it. Warm dough can be difficult to handle and may not puff up as nicely.
- Cheese Filling: For a smoother filling, ensure your cream cheese is at room temperature before mixing. Beat the filling until it’s completely smooth to avoid lumps.
Crescent Cheese Danish Variations: Fruit, Cheese, and More
Fruit-Topped Danishes: Before baking, add a small spoonful of your favorite jam or fresh fruit on top of the cream cheese filling. Berries, sliced peaches, or apple compote are excellent choices.
Different Types of Cheese: Experiment with different cheeses for the filling. Mascarpone can offer a richer flavor, while ricotta will make for a lighter, fluffier filling.
Sweet vs. Savory Options: For a savory twist, reduce the sugar in the filling and add chopped herbs or spinach. You can also include savory ingredients like sautéed mushrooms or ham.
The versatility of the Crescent Cheese Danish makes it a canvas for your culinary creativity. Whether you stick to the classic recipe or experiment with your own variations, the key is to enjoy the process of making (and eating) these delightful pastries. With each batch, you’ll find new ways to make this classic treat uniquely yours.
Part 2: Serving and Enjoying Crescent Cheese Danishes
Once your Crescent Cheese Danishes are golden and fragrant, fresh out of the oven, the next step is serving them in a way that enhances their delectable flavors. These pastries are versatile, making them perfect for various occasions, from a leisurely breakfast to an elegant brunch.
How to Serve Crescent Cheese Danishes for Any Occasion
Ideal Pairings with Beverages: The subtle sweetness and creamy texture of Crescent Cheese Danishes pair wonderfully with a range of beverages. For a morning treat, a strong cup of coffee or a latte complements the pastry’s richness, while tea enthusiasts might enjoy a black or herbal tea with floral notes to balance the cheese’s creaminess. On more festive occasions, a glass of sparkling wine or a mimosa adds a celebratory touch, elevating the danishes from a simple pastry to a brunch delicacy.
Serving Sizes and Presentation Tips: When it comes to serving sizes, individual danishes are perfect for personal servings, allowing guests to enjoy their own neatly prepared pastry. For presentation, arrange the danishes on a beautiful platter, perhaps garnished with powdered sugar or a drizzle of icing for an extra touch of elegance. Fresh berries or a sprig of mint can add color and vibrancy, making the dish as visually appealing as it is delicious.
Storing and Reheating
Best Practices for Freshness: If you find yourself with leftover danishes, proper storage is key to maintaining their freshness. Once cooled, place them in an airtight container, separating layers with parchment paper to prevent them from sticking together. Store in the refrigerator if keeping them for more than a day, as the cream cheese filling can spoil if left out. For longer storage, freezing is an excellent option. Wrap each Danish individually in plastic wrap and then place them in a freezer bag. They can be stored this way for up to a month.
How to Reheat Without Losing Texture: The challenge with reheating pastries is maintaining the crispness of the dough without drying it out. To reheat, preheat your oven to 350°F (175°C). Place the danishes on a baking sheet and lightly cover them with aluminum foil to prevent them from browning too much. Heat for about 10 minutes, or until they’re warmed through. If they’re frozen, let them thaw in the refrigerator overnight before reheating. This method helps preserve the delicate balance of flaky crust and soft, creamy filling, restoring the danishes close to their original glory.
Enjoying Crescent Cheese Danishes is about more than just savoring their delightful taste; it’s about creating moments of joy and indulgence, whether shared with loved ones over brunch or savored alongside your morning coffee. With these tips for serving, storing, and reheating, you can ensure that every Danish is as satisfying as the last.
FAQs
- Can I use puff pastry dough instead of crescent roll dough?
Yes, puff pastry dough is a fantastic alternative to crescent roll dough for making cheese danishes. It offers a flakier texture but requires a bit more finesse in handling. When using puff pastry, ensure it’s thawed yet still cold for easier manipulation. Roll out lightly, and proceed as you would with crescent roll dough. The key difference is in the texture—puff pastry will yield a more layered and flaky Danish. - How can I prevent the cheese filling from leaking out?
To prevent the cheese filling from leaking, make sure not to overfill your danishes. A tablespoon of filling for each Danish should suffice. Additionally, ensure the edges of your dough are sealed tightly after adding the filling. You can press the edges together with your fingers or use the tines of a fork for a decorative touch. Chilling the filled danishes for about 10-15 minutes before baking can also help the filling set and reduce leakage. - Are Crescent Cheese Danishes suitable for freezing?
Absolutely! Crescent Cheese Danishes freeze beautifully. To freeze, place the baked and completely cooled danishes on a baking sheet and freeze until solid. Then, transfer them to an airtight container or freezer bag. They can be stored in the freezer for up to 3 months. When ready to enjoy, thaw them in the refrigerator overnight and reheat in the oven at 350°F (175°C) until warmed through, usually about 10 minutes, for a fresh-baked taste.

Crescent Cheese Danishes Recipe
Equipment
- Baking sheet
- Parchment paper
- Mixing bowl
- Electric mixer (optional)
- Rolling pin (for puff pastry option)
Ingredients
- 1 can 8 oz refrigerated crescent roll dough
- 8 oz cream cheese softened
- ¼ cup granulated sugar
- 1 teaspoon vanilla extract
- 1 egg yolk reserve the white for brushing the pastries
- Optional: lemon zest for added flavor
- *For dietary restriction alternatives see recipe notes.
Instructions
- Preheat oven to 375°F (190°C) and line a baking sheet with parchment paper.
- Unroll the crescent dough and separate into triangles or squares as preferred.
- In a mixing bowl, combine cream cheese, sugar, vanilla extract, and egg yolk until smooth. Add lemon zest if using.
- Place a spoonful of the cream cheese mixture on each piece of dough and roll or fold into shape.
- Arrange the Danishes on the prepared baking sheet. Brush each with a mix of reserved egg white and a tablespoon of water.
- Bake for 11-13 minutes or until golden. Let cool slightly before serving.
Notes
- Dietary Alternatives: For a gluten-free version, substitute crescent roll dough with a gluten-free pastry dough. Dairy-free cream cheese can replace regular cream cheese for a dairy-free option. Use a flax egg instead of a regular egg for a vegan variant.
- Storage: Store in an airtight container in the refrigerator for up to 3 days. Freeze for longer storage, and reheat in the oven to enjoy later.
- Variations: Add a spoonful of your favorite jam on top of the cheese filling before baking for a fruity twist, or sprinkle the top with cinnamon sugar for added flavor.
- Serving Suggestion: Pair with a strong cup of coffee or tea for a delightful breakfast or mid-morning snack.