What do you get when cheeseburgers meet buttery garlic bread? Pure magic. That’s exactly what Cheeseburger Garlic Bombs deliver—ooey-gooey, garlicky, beefy goodness packed into golden bites of joy.
These little flavor-packed bombs have exploded in popularity across TikTok, Pinterest, and food blogs—and for good reason. They’re everything we love about a cheeseburger, but wrapped up in a cozy blanket of garlic-buttered dough.
Whether you’re planning a game night, prepping for a casual family dinner, or hosting a party, these crowd-pleasers come together fast and disappear even faster. They’re simple to assemble, customizable to your favorite burger toppings, and perfect for dipping, sharing, or even packing into lunchboxes.
The best part? You don’t need to be a pro chef to make them. With just a handful of ingredients and a few smart steps, you’ll be serving up gooey cheeseburger bombs that will have everyone asking for seconds.
What Are Cheeseburger Garlic Bombs?
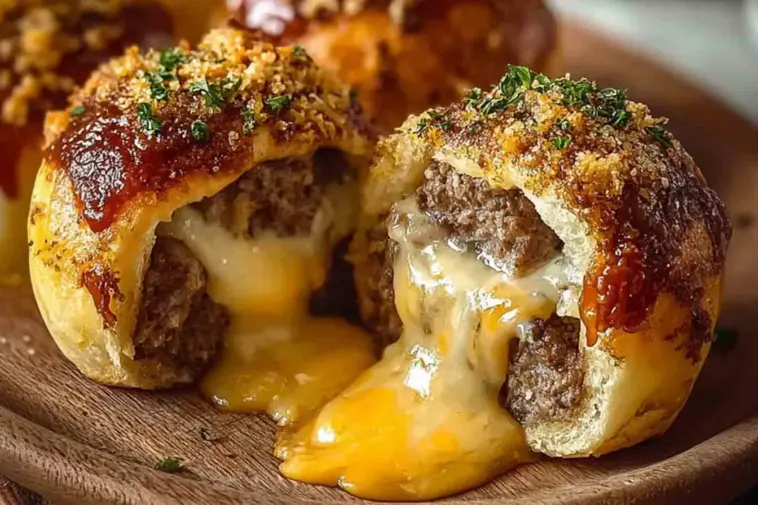
Cheeseburger Garlic Bombs are handheld, biscuit-wrapped bites stuffed with seasoned ground beef and melty cheese, all brushed with rich garlic butter and baked (or air-fried) to golden perfection.
Each bite delivers a perfect balance: a soft and flaky dough exterior with a crisp, buttery shell, giving way to juicy beef and gooey cheese inside. It’s comfort food reimagined into a finger-friendly, flavor-packed snack.
What sets these apart from sliders or regular stuffed buns? It’s the garlic butter element—brushed on after baking—that adds a garlicky punch and irresistible shine. Plus, they’re far more portable and customizable than traditional burgers, making them ideal for parties and family dinners alike.
Key Ingredients for Cheeseburger Stuffed Bombs + Flavor Tips
Let’s break down what makes these bombs so flavorful—and how to get them just right.
-
Ground Beef: Opt for an 80/20 blend. The fat content keeps the filling juicy without being greasy. Avoid leaner beef—it tends to dry out during baking.
-
Cheese: Sharp cheddar brings classic cheeseburger flavor. Mozzarella adds that stringy, melty pull. You can also try a mix! Freshly shredded cheese melts better than pre-shredded.
-
Dough: Canned biscuit dough is quick and convenient. But if you’re feeling adventurous, homemade dough gives an artisanal touch.
-
Garlic Butter: Use real butter and fresh garlic for bold flavor. Jarred garlic works in a pinch, but fresh gives you that crave-worthy aroma.
Pro Tip: Stir in a teaspoon of Worcestershire sauce or a squirt of yellow mustard into the beef mix for a deeper umami flavor.
Tools to Make Perfect Garlic Butter Burger Bites
-
Cast Iron Skillet or Nonstick Sheet Pan – For even baking and crisp edges
-
Pastry Brush – Essential for applying garlic butter
-
Cheese Grater – If you’re using block cheese (recommended for best melt)
-
Air Fryer or Muffin Tin – Optional for experimenting with shapes or batch sizes
You don’t need a fancy kitchen—just the basics and some good oven mitts.
How to Make Cheeseburger Garlic Bombs – Step-by-Step Guide
Here’s your foolproof path to golden, cheesy glory.
Step 1: Prep the Beef
In a skillet, cook ground beef until browned. Season with salt, pepper, garlic powder, and onion powder. Let it cool slightly—this helps prevent soggy dough when stuffing.
Optional: Stir in ketchup, mustard, or Worcestershire for a burger-like taste.
Step 2: Stuff the Dough
Flatten biscuit dough into small rounds. Spoon in a bit of beef mixture, add a pinch of shredded cheese, then fold the dough up and pinch the seams tightly to seal.
Tip: Don’t overfill. You want just enough to stuff without stretching the dough too thin.
Step 3: Bake or Air Fry
Arrange the sealed bombs on a baking sheet or in the air fryer basket. Leave space between them to expand.
-
Oven: Bake at 375°F (190°C) for 12–15 minutes, or until golden
-
Air Fryer: 350°F (175°C) for 8–10 minutes
Step 4: Garlic Butter Finish
While still hot, brush generously with melted garlic butter. Add a sprinkle of parsley or sesame seeds if you’d like.
Pro Tips:
-
Chill filled bombs for 10 minutes before baking to help them hold their shape
-
Use parchment paper to prevent sticking in both oven and air fryer
Air Fryer vs Oven: Best Method for Cooking Cheeseburger Dough Bombs
If you’re short on time, the air fryer gives you a quick, crispy finish with less preheat time. Perfect for small batches and extra-crispy edges.
Prefer even cooking for a larger batch? The oven is your friend. It allows you to bake more bombs at once with a softer, slightly fluffier dough.
Suggested Temps & Times:
-
Air Fryer: 350°F for 8–10 minutes
-
Oven: 375°F for 12–15 minutes
Choose what works best for your kitchen and batch size!
Cheeseburger Garlic Bomb Variations You’ll Want to Try
Want to mix things up? These bombs are super versatile.
-
Bacon Cheeseburger Bombs – Add crumbled cooked bacon to the beef
-
Pickle-Stuffed Bombs – Insert a pickle slice inside for tang
-
Jalapeño Popper Style – Combine cream cheese with shredded cheddar and chopped jalapeños
-
Mushroom & Swiss – Sautéed mushrooms + Swiss cheese for a gourmet twist
-
Veggie Version – Use plant-based ground or sautéed veggies and vegan cheese
Pro Tip: Add a pinch of smoked paprika or chipotle powder for a BBQ-inspired kick!
How to Serve Cheesy Beef Biscuit Bombs as a Full Meal
These are more than just snacks—they can anchor a whole meal.
-
Dipping Sauces: Ketchup, mustard, spicy mayo, ranch, or garlic aioli
-
Sides: Pair with fries, sweet potato wedges, or a fresh green salad
Advertisement -
Party Platter: Serve on a tray with mini sliders, pretzel bites, and dips for a winning appetizer spread
They also make amazing lunchbox fillers—just wrap in foil and pack with a dipping cup.
Storing & Reheating Cheeseburger Garlic Bombs the Right Way
-
Fridge: Store leftovers in an airtight container for up to 3 days
-
Freezer: Freeze uncooked or cooked bombs (wrapped individually) for up to 2 months
-
Reheat: Use an air fryer or oven to revive the crispness. Microwave works but softens the dough
Make-Ahead Tip: Assemble the bombs, refrigerate them raw overnight, and bake fresh the next day.
Cheeseburger Garlic Bombs Nutrition Info & Lightened-Up Tips
-
Calories: 220–250
-
Protein: 10–12g
-
Fat: 15g
-
Carbs: 15g
Lighter Options:
-
Use lean beef and reduced-fat cheese
-
Substitute whole wheat or low-carb dough
-
Skip the garlic butter (but really—don’t!)
Cheeseburger Biscuit Bomb Mistakes to Avoid for Best Results
Even simple recipes can go sideways—here’s how to avoid the most common mishaps when making cheeseburger garlic bombs:
-
Overfilling the dough can lead to messy leaks and broken bombs.
-
Using lean beef might sound healthy, but it often results in a dry filling.
-
Not sealing the edges properly lets steam escape and causes bombs to open while baking.
-
Skipping the garlic butter brushing robs the final product of its iconic rich flavor.
-
Using cold cheese slows the melt and affects that gooey center we all crave.
Pro Tip: Let the beef cool slightly before stuffing the dough—this helps prevent sogginess and keeps the dough easier to handle.
Fun Ways to Serve These Bombs
You don’t have to stick to just one way of serving these cheesy bites. Here are some fun and creative ideas to get you started:
-
Mini Bombs for Appetizers – Divide dough into smaller pieces to create bite-sized bombs for cocktail parties or snack platters.
-
Lunchbox Idea – Wrap cooled bombs in foil or parchment and tuck them into a lunchbox with a dipping sauce on the side.
-
Game Day Snack Board – Serve them alongside sliders, buffalo wings, nachos, and assorted dips for the ultimate party spread.
-
Brunch-Style Twist – Serve with scrambled eggs, avocado slices, and a dash of hot sauce for a savory morning meal.
They’re easy to reheat, making them ideal for planning ahead too!
Behind the Dish: The Evolution of Cheeseburger Bombs
Cheeseburger Garlic Bombs are a modern mash-up born from some of our favorite comfort foods. Think of them as the love child of gooey cheeseburgers and garlicky pull-apart bread.
The concept gained traction on TikTok and YouTube, where food creators started stuffing biscuit dough with beef and cheese for quick, satisfying snacks. Soon, variations with garlic butter and dipping sauces took over food blogs and social feeds.
Their rise mirrors the success of garlic knots, pizza bombs, and sliders—all bite-sized, shareable, and endlessly customizable. What makes these bombs unique is their combo of bold garlic flavor, meaty filling, and buttery bread—irresistible in every sense.
FAQs
Can I make cheeseburger bombs ahead of time?
Absolutely! You can prepare and assemble the bombs up to 24 hours in advance. Store them covered in the fridge, then bake when ready. You can also freeze them raw for future meals.
How do I keep the filling from leaking out?
Less is more! Use a modest amount of filling, seal the dough edges well, and let the bombs chill before baking to help them hold their shape.
Can I use crescent rolls instead of biscuit dough?
Yes, crescent rolls work beautifully! They create a slightly flakier texture and bring a buttery taste that complements the beef and cheese.
How do I make these vegetarian?
Swap out the ground beef with plant-based ground meat or a combo of sautéed mushrooms, onions, and seasoning. Pair with your favorite vegan cheese for a delicious meat-free version.
Can I freeze them after baking?
Yes! Let them cool completely, wrap them individually, and freeze. To reheat, place in a 350°F oven or air fryer for 8–10 minutes until warmed through and crisp again.
Expert Tips to Make Them Extra Special
Take your cheeseburger bombs to the next level with these simple but impactful upgrades:
-
Use freshly shredded cheese—it melts better and tastes richer.
-
Add a pickle slice inside for an authentic burger bite.
-
Brush the tops with egg wash and sprinkle with sesame seeds before baking for that classic burger bun look.
-
After baking, brush again with warm garlic butter to lock in flavor and add that glossy, golden finish.
A little attention to detail goes a long way in making these truly unforgettable.
Cheeseburger Garlic Bombs
Equipment
- Skillet (for browning beef)
- Baking sheet or air fryer
- Parchment paper
- Pastry Brush
- Mixing bowl
- Cheese grater
Ingredients
- 1 lb ground beef 80/20 preferred
- 1 cup shredded cheddar cheese or mozzarella
- 1 can refrigerated biscuit dough 8–10 biscuits
- 2 tbsp unsalted butter melted
- 2 cloves garlic minced
- Salt & pepper to taste
- ½ tsp garlic powder
- ½ tsp onion powder
- Optional: 1 tsp Worcestershire sauce or yellow mustard
Instructions
- Preheat oven to 375°F (190°C) or air fryer to 350°F (175°C).
- Cook beef in a skillet over medium heat until browned. Add salt, pepper, garlic powder, and onion powder. Let it cool slightly.
- Flatten biscuit dough rounds with your hands.
- Scoop beef onto the center of each round, add shredded cheese.
- Fold and seal the dough tightly around the filling. Pinch seams to prevent leaks.
- Place bombs seam-side down on parchment-lined tray or air fryer basket.
- Bake for 12–15 minutes (oven) or air fry for 8–10 minutes until golden.
- Brush with garlic butter (butter + minced garlic) immediately after baking.
- Serve warm with dipping sauces or as part of a party spread.
Notes
- Use freshly shredded cheese for better melt quality.
- Chill bombs before baking to help them hold their shape.
- Make-ahead tip: Assemble and refrigerate up to 24 hours in advance.
- For extra flavor, sprinkle sesame seeds or parsley on top before baking.
- Store leftovers in the fridge (up to 3 days) or freezer (up to 2 months).
Nutrition
Final Thoughts: Why You’ll Keep Coming Back to These Bombs
These Cheeseburger Garlic Bombs are the ultimate comfort food shortcut—quick to prep, deeply satisfying, and perfect for every occasion. Whether you’re feeding hungry kids, prepping for a party, or just craving something savory and melty, these bombs deliver big-time flavor with minimal effort.
They combine the best parts of cheeseburgers, garlic bread, and stuffed rolls—all in a neat, poppable package.
Once you make them, you’ll find yourself coming back again and again—and maybe even inventing your own delicious twists.