
Welcome to dessert heaven! If you’re a fan of no-bake treats, layered desserts, or anything with a crunchy peanut butter twist, this Butterfinger Lush is about to become your new favorite indulgence. It’s creamy, dreamy, and packed with the nostalgic flavor of crushed Butterfinger candy bars layered between soft, pillowy fillings.
So what exactly makes this treat such a hit? For starters, it’s effortless to make—no oven required. Just a handful of ingredients and a little chill time deliver a dessert that looks impressive and tastes even better. With its crunchy cookie crust, silky cream cheese layer, peanut buttery pudding, and whipped topping showered in candy pieces, each bite is a flavor bomb of textures and sweetness.
Whether you’re hosting a holiday party, planning a potluck, or just craving something special to dig into after dinner, Butterfinger Lush is always a crowd-pleaser. Even better? It can be made in advance and served straight from the fridge.
Pro Tip: For a no-mess candy crush, toss Butterfinger bars into a zip-top bag and roll over them with a rolling pin. Less cleanup, more crunch!
What Makes a Butterfinger Lush Dessert So Special?
If you’re not familiar with “lush” desserts, you’re in for a treat—literally. A lush is a type of no-bake, layered dessert typically made with a cookie crust, a cream cheese filling, a pudding layer, and whipped topping. It’s chilled until set, then sliced into soft, creamy squares.
These layered creations first gained popularity in the American South, especially in church cookbooks and family gatherings where comfort food reigns supreme. Variations like lemon lush, chocolate delight, and Oreo lush have become staples at potlucks and holiday tables across the country.
So why Butterfinger? This candy bar adds a delightful twist. Its peanut butter and chocolate crunch makes every bite of this lush feel indulgent, playful, and just a little bit nostalgic. It’s a modern twist on a vintage dessert—bringing generations together with each forkful.
Why Butterfinger Bars Make This No-Bake Dessert Irresistible
Let’s talk about why Butterfinger is the star of the show. This classic candy bar has a crispety, crunchety, peanut buttery center coated in milk chocolate—making it the ultimate dessert booster. The combo of sweet and salty, crunchy and smooth, brings perfect balance to each layer of this lush.
The contrast of textures is what really sets this dessert apart. Soft pudding and creamy layers meet crispy Butterfinger pieces, creating an explosion of flavor in every bite. Plus, those recognizable candy chunks instantly trigger a wave of childhood nostalgia. Who didn’t love unwrapping a Butterfinger on Halloween?
Crushed Butterfingers sprinkled between layers (and again on top!) add not just flavor but flair. It’s a dessert that looks indulgent and tastes even better—especially for peanut butter lovers who want something beyond the usual cookies or brownies.
Butterfinger Lush Recipe: Layer-by-Layer Breakdown
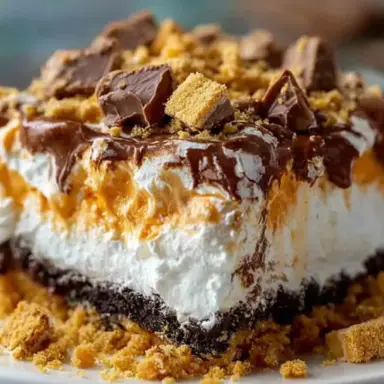
To fully appreciate the beauty of this dessert, you have to understand its structure. Each layer plays a role—together, they create a symphony of creamy, crunchy, and buttery goodness.
Layer 1: The Crust
Start with a buttery graham cracker or Oreo crumb crust. Press it firmly into the base of a 9×13-inch pan and chill it briefly. The crust serves as the stable foundation, offering a slight crunch and rich flavor contrast.
Layer 2: Cream Cheese Filling
Next comes a fluffy blend of cream cheese and powdered sugar, whipped until smooth. This layer is lightly sweetened and adds that classic tangy richness. It’s soft but structured, setting up the lush for its creamy texture.
Layer 3: Peanut Butter Pudding Layer
Here’s where the magic happens. Instant vanilla pudding (or butterscotch, for a deeper flavor) is combined with milk—and sometimes peanut butter—for a rich, silky layer that binds everything together. It echoes the candy’s flavor and adds decadent smoothness.
Layer 4: Whipped Topping & Candy Crunch
Finally, a generous layer of Cool Whip or homemade whipped cream blankets the top, creating a light and airy finish. Sprinkle with crushed Butterfinger bars to crown it all with sweet, salty crunch.
Optional—but recommended—is a drizzle of chocolate syrup or caramel sauce across the top before serving. It adds eye-catching appeal and extra indulgence.
Quick Tip: Chill each layer for 15–30 minutes before adding the next to keep them clean and defined.
Butterfinger Lush Ingredients & Easy Substitutions
The beauty of Butterfinger Lush is its flexibility—you can adjust it to suit your pantry and preferences without sacrificing flavor.
Key Ingredients:
-
Butterfinger candy bars – Full-size or fun-size, chopped or crushed
-
Cream cheese – For richness and structure
-
Instant vanilla pudding mix – Or swap with butterscotch for a deeper flavor
-
Milk – Whole milk works best for thickening the pudding
-
Cool Whip – Or stabilized homemade whipped cream
-
Graham cracker or Oreo crust – Adds a buttery, crunchy base
Substitutions:
-
No Cool Whip? Use stabilized whipped cream made with heavy cream + powdered sugar.
-
Watching sugar? Try sugar-free pudding and light cream cheese.
-
Gluten-free? Use gluten-free graham crackers or sandwich cookies for the crust.
-
Dairy-free? Use vegan cream cheese and coconut whipped topping like So Delicious.
Candy Tip:
Fun-size Butterfingers are easier to crush and scatter, but full-size bars make for chunkier bites and bold texture. Use whatever you have on hand—just make sure you have plenty!
How to Make Butterfinger Lush (Step-by-Step Instructions)
Making Butterfinger Lush is easier than you think—just layer, chill, and enjoy! Follow these five simple steps for sweet success:
Step 1: Make the Crust
Crush graham crackers or Oreos into fine crumbs. Mix with melted butter until the texture resembles wet sand. Press firmly into the bottom of a 9×13-inch baking dish. Chill for at least 15 minutes to set.
Step 2: Prepare the Cream Cheese Layer
Beat softened cream cheese and powdered sugar until smooth and fluffy. Gently fold in a portion of whipped topping. Spread evenly over the chilled crust using an offset spatula.
Step 3: Mix the Pudding Layer
In a bowl, whisk instant vanilla (or butterscotch) pudding mix with cold milk until thickened. For extra indulgence, stir in a few tablespoons of creamy peanut butter. Spread this pudding layer over the cream cheese mixture.
Step 4: Add Final Topping
Top everything with the remaining whipped topping. Scatter crushed Butterfinger pieces generously over the top layer.
Step 5: Chill Before Serving
Cover and refrigerate for at least 4 hours, or overnight for best flavor and structure.
Bold Tip: Let it chill at least 4 hours—this helps the layers set perfectly and makes slicing a breeze!
Butterfinger Lush Tips for Texture, Layering & Presentation
To create the ultimate Butterfinger Lush experience, follow these pro tips:
-
Don’t overmix the pudding—this keeps it silky and smooth
-
Chill between layers to avoid them blending together
-
Use an offset spatula to spread each layer neatly
-
Want picture-perfect slices? Freeze the assembled dessert for 30 minutes before cutting
-
Top with extra crushed Butterfingers right before serving for texture and crunch
These small details go a long way in making your lush dessert not only taste amazing, but look bakery-worthy too.
Butterfinger Dessert Variations to Try
Looking to switch things up? Try these creative spins on the original recipe:
-
Mini Butterfinger Lush Cups: Layer ingredients in individual clear cups or jars—perfect for parties or picnics
-
Butterfinger Cheesecake Lush: Double the cream cheese layer and skip pudding for a richer texture
-
Peanut Butter Lush: Add melted peanut butter between the pudding and whipped topping for extra depth
-
Frozen Butterfinger Lush: Assemble as usual, then freeze until firm—slice like an ice cream cake!
These variations let you tailor the dessert to fit the occasion, whether you want something quick, fancy, or totally indulgent.
How to Store and Freeze Butterfinger Lush
Butterfinger Lush stores beautifully, making it ideal for meal prep or make-ahead gatherings.
-
In the Fridge: Store tightly covered for 3 to 4 days. The layers will hold, and the flavor deepens over time.
-
In the Freezer: Wrap the whole dish (or individual slices) tightly with plastic wrap and foil. Freeze for up to 2 months.
-
To Serve from Frozen: Thaw overnight in the fridge, or for a firmer, icebox-style dessert, serve slightly frozen.
Storage Tip: Avoid leaving it at room temperature too long—this dessert needs to stay chilled to hold its structure!
FAQs About Butterfinger Lush
Can I make Butterfinger Lush ahead of time?
Yes! In fact, it’s even better when made a day in advance. Chilling overnight helps the layers firm up and makes slicing clean and easy.
What’s the best crust to use?
A graham cracker crust is classic, but Oreo crumbs take it up a notch. Both pair beautifully with the creamy and crunchy layers.
Can I use real whipped cream instead of Cool Whip?
Absolutely. Just make sure to stabilize it with powdered sugar or a bit of gelatin so it holds up in the fridge.
Is Butterfinger Lush gluten-free?
It can be! Just use a gluten-free cookie crust, and make sure to double-check that the Butterfinger bars and pudding are certified gluten-free.
How do I keep it from becoming too runny?
Use instant pudding, not cook-and-serve, and be sure to chill each layer before adding the next. The longer it sets in the fridge, the firmer it becomes.
Butterfinger Lush
Equipment
- 9x13 inch baking dish
- Mixing bowls
- Electric mixer or hand whisk
- Spatula
- Measuring cups and spoons
- Rolling pin or food processor (to crush candy/biscuits)
- Plastic wrap or foil for chilling
Ingredients
- 1½ cups graham cracker or Oreo crumbs
- ½ cup unsalted butter melted
- 8 oz cream cheese softened
- 1 cup powdered sugar
- 8 oz whipped topping Cool Whip or homemade
- 2 boxes 3.4 oz each instant vanilla pudding
- 2¾ cups cold milk
- ¾ cup crushed Butterfinger bars plus more for topping
- Optional: 2–3 tbsp creamy peanut butter chocolate or caramel drizzle
Instructions
- Make the Crust: Combine cookie crumbs and melted butter. Press into a 9x13-inch pan and chill for 15 minutes.
- Mix Cream Cheese Layer: Beat cream cheese and powdered sugar until smooth. Fold in half of the whipped topping. Spread over crust.
- Prepare Pudding Layer: Whisk pudding mix with cold milk until thickened. (Add peanut butter if using.) Spread over cream cheese layer.
- Top with Whipped Topping: Gently spread the remaining whipped topping over pudding.
- Finish & Chill: Sprinkle with crushed Butterfingers. Cover and chill for at least 4 hours before serving.
Notes
- Use Oreo crust for a chocolatey twist.
- You can substitute Cool Whip with stabilized homemade whipped cream.
- Best enjoyed within 3–4 days.
- For cleaner slices, freeze for 15–30 minutes before serving.
Nutrition
Conclusion: Make Butterfinger Lush Your New Go-To Dessert
Butterfinger Lush is more than just a dessert—it’s a show-stopping, no-bake treat that brings together the nostalgic crunch of candy bars, layers of creamy sweetness, and that perfect chilled finish. Whether you’re making it for a family gathering, a holiday celebration, or just because your sweet tooth says so, this dessert delivers every time.
It’s easy to customize, great to make ahead, and guaranteed to disappear fast once served. From its rich texture to its eye-catching layers, Butterfinger Lush is the kind of dessert that turns heads and wins hearts.
So go ahead—crush those candy bars, layer it up, and chill your way to dessert bliss. You deserve it!