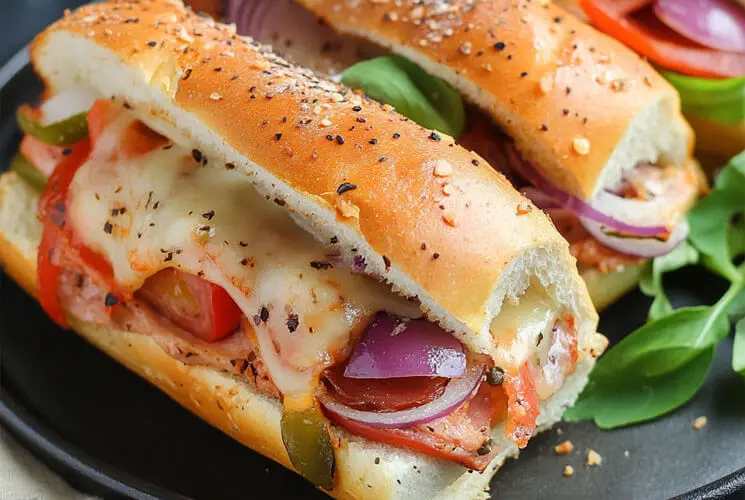
There’s something magical about pulling a hot, cheesy sandwich straight out of the oven — the smell of melted cheese, toasted bread, and savory deli meats filling the kitchen. These baked Italian sub sandwiches are everything you love about deli classics—just hotter, toastier, and way more satisfying.
They’re layered with bold Italian meats, melty cheese, and tangy toppings, then baked until everything melds into one delicious, handheld masterpiece. Whether you’re looking for an effortless weeknight dinner, a cozy weekend lunch, or a crowd-pleasing party dish, baked Italian sub always hit the spot.
What makes them even better? You can customize them endlessly based on your favorite flavors or what’s in the fridge. With just a few pantry staples and a quick bake in the oven, you’ll have a hot, hearty sandwich that rivals anything from a deli — and without leaving your home.
What Exactly Is a Baked Italian Sub Sandwich?
A baked Italian sub sandwich is a warm, oven-toasted version of the classic Italian deli sandwich. It starts with a sturdy roll — usually a hoagie, sub, or ciabatta — packed full of savory Italian meats like salami, pepperoni, and ham, plus melty cheese like provolone or mozzarella.
Unlike cold-cut sandwiches or grinders, the baked version is assembled and then placed in the oven, allowing the cheese to melt, the meat to warm through, and the bread to get perfectly toasty. The result is an irresistible combination of flavors and textures — gooey inside, crisp outside.
In some regions, you might hear them called hoagies (East Coast) or grinders (Midwest), and each area puts its spin on the classic. But no matter the name, baking the sandwich transforms it, giving every bite extra depth, warmth, and comfort.
Ingredients Overview: Building the Perfect Italian Sub
Creating a top-tier baked Italian sub is all about balancing bold flavors, gooey textures, and crisp bites. The heart of great baked Italian sub sandwiches lies in the quality of meats, cheese, and fresh bread you use.
Meats
The signature of any Italian sub is the meat trio:
-
Salami: Spicy or mild, this adds robust flavor and a little chew.
-
Pepperoni: For a zesty, slightly smoky kick.
-
Ham or Capicola: Milder and slightly sweet, great for layering.
Tip: Thin slices work best so the meat heats evenly without overpowering.
Cheeses
Choose melt-friendly cheeses with Italian roots:
-
Provolone: Mild and smooth, perfect for binding flavors.
-
Mozzarella: Creamy with great meltability.
-
Swiss (optional): Adds a nutty twist.
Layering two types? Even better.
Bread
You’ll want something sturdy to hold all that goodness:
-
Hoagie rolls or sub buns: Classic and easy to find.
-
Ciabatta: For a rustic, crunchy exterior.
-
French bread: A good option if making party-size subs.
Tip: Use bakery-fresh rolls — they toast better and hold up to the fillings without falling apart.
Toppings
Add crunch, brightness, and tang:
-
Banana peppers: For tang and a pop of color.
-
Onions (raw or grilled): Add bite and savoriness.
-
Lettuce & tomatoes: Classic cool toppings (usually added after baking).
-
Pickles or olives: Optional, but great for contrast.
Condiments
Balance the rich meats and cheeses with:
-
Italian dressing: Adds zing.
-
Mayo or spicy mustard: For creaminess and depth.
-
Olive oil + vinegar: A more traditional deli touch.
Optional Extras
Want to elevate your sub?
-
Giardiniera (Italian pickled veggies)
-
Black olives
-
Red pepper flakes
-
Fresh basil or arugula
Bold flavors = a memorable sub!
Step-by-Step: How to Make Baked Italian Sub Sandwiches
Here’s how to build the ultimate baked Italian sub sandwiches step by step. Once you try it, you’ll never go back to cold cuts again!
1. Preheat & Prep the Bread
Start by preheating your oven to 375°F (190°C).
Slice your rolls lengthwise, but don’t cut all the way through. You want them to open like a book so the fillings stay inside. Lightly toast the inside of the bread for 3–4 minutes if you want extra crunch.
2. Layer Meats & Cheeses
Start layering your meats on the bottom half of the roll. Go in this order for the best texture:
-
Ham
-
Salami
-
Pepperoni
Then pile on your cheese slices — provolone is a great base, and mozzarella can go on top for that gooey pull.
Pro Tip: Don’t overload — about 3–4 ounces of meat and 2–3 cheese slices per sandwich is perfect.
3. Add Toppings (Before or After Baking?)
Some toppings go in before the bake, others after.
-
Before baking: onions, banana peppers, black olives
-
After baking: lettuce, tomatoes, mayo, dressing (to prevent sogginess)
Bonus Tip: A thin layer of dressing before baking adds flavor — just don’t overdo it.
4. Toasting Technique: Foil Wrap vs. Open-Face
You have two solid options:
-
Foil wrap: Wrap the whole sandwich in foil and bake. Result? Soft, steamed bread with gooey insides.
-
Open-face: Bake uncovered on a tray. Result? Crisp, golden edges and slightly firmer texture.
Pro Tip: For the best of both worlds, bake covered for 10 minutes, then uncover for the last 3–5 minutes.
5. Melt That Cheese
Bake your sandwiches for 12–15 minutes, until the cheese is melted and bubbling.
Want it a little extra golden? Switch to broil for 1–2 minutes at the end — just keep a close eye!
6. Finish with Fresh Toppings & Serve
Once baked, open the sandwiches and add lettuce, tomato slices, or a drizzle of Italian dressing. Then close ’em up and serve warm.
Make-Ahead & Meal Prep Tips
Baked Italian sub sandwiches are ideal for busy weeks and meal prep:
-
Assemble the sandwiches in advance (up to 1 day ahead), minus the lettuce and tomatoes.
-
Wrap in foil and store in the fridge until ready to bake.
-
For parties, prep a full tray and bake all at once for effortless serving.
Reheating tip: Warm in the oven at 325°F for 10–12 minutes. Avoid the microwave — it makes the bread chewy.
These subs are meal prep gold — make extras and enjoy leftovers for lunch the next day!
Customization: Make It Your Own
One of the best things about baked Italian sub? You can totally make them your own:
-
Swap the meats: turkey, roast beef, even rotisserie chicken
-
Go vegetarian: grilled zucchini, bell peppers, mushrooms, and provolone
-
Use bold cheeses: try cheddar, smoked gouda, or pepper jack for a spicy twist
-
Add sauces: pesto, marinara, or garlic aioli for an extra layer of flavor
Whether you’re feeding picky eaters or adventurous foodies, the possibilities are endless!
What to Serve with Baked Italian Sub Sandwiches
A hot, cheesy Italian sub is already a satisfying meal — but pairing it with the right sides can take it to the next level, whether you’re serving lunch, dinner, or party guests.
Classic Sides
-
Kettle chips: Crunchy, salty, and simple
-
Dill pickles: Their tang cuts through the richness of the sub
-
Pasta salad: Something with olives, tomatoes, and a vinaigrette dressing works well
Cozy Comfort Pairings
-
Tomato soup: Dip your sandwich like a grilled cheese
-
Roasted veggies: Zucchini, bell peppers, or eggplant for an Italian twist
Crowd Pleasers for Game Day
-
French fries or waffle fries
-
Coleslaw: Creamy or vinegar-based
-
Mozzarella sticks: Double the cheese, double the fun
Drinks to Serve
-
Lemonade or iced tea for family meals
-
Craft beer or soda for parties or casual dinners
Looking for more ideas? Check out this list of what to serve with baked subs for more inspiration.
Baked Italian Sub Sandwich Variations
Once you’ve mastered the basics, there are so many fun spins you can try on the baked Italian sub. Whether you’re feeding a crowd or switching up the flavor profile, here are some great ideas to inspire your next creation.
Mini Sub Sliders
Build smaller versions of the sandwich using slider buns and bake them together in a casserole dish. Great for parties or kid-friendly meals. Brush the tops with melted garlic butter for extra flavor.
Spicy Italian Sub
Add jalapeños, pepper jack cheese, and a drizzle of sriracha aioli. You can even toss in some crushed red pepper or spicy capicola for heat lovers.
Meatball Melt
Swap the deli meats for Italian-style meatballs, marinara sauce, and mozzarella. It’s like your favorite meatball sub, baked to perfection.
Veggie Version
Layer roasted zucchini, bell peppers, onions, and mushrooms with melty provolone. Add a smear of pesto for a bold, herbaceous kick.
Party Tray Style
Make one large Italian sub on a loaf of French bread, then cut it into mini portions for serving at potlucks, game nights, or birthday gatherings.
Bonus Twist: Crescent Ring
Roll up meats and cheese in crescent dough, form a ring, and bake until golden. Slice like a pizza — perfect for parties and appetizers.
Don’t be afraid to experiment! The baked sub is a blank canvas for your cravings.
How to Store and Reheat Baked Italian Sub the Right Way
Got leftovers? Here’s how to store and enjoy them without losing that melty, toasty magic.
Storage
-
Wrap cooled subs in foil or store in an airtight container
-
Refrigerate for up to 3 days
-
Keep cold toppings (lettuce, tomatoes) separate and add fresh after reheating
Reheating
-
Oven is best: 350°F for 10–12 minutes wrapped in foil keeps the bread soft and cheese gooey
-
Air fryer: 5–6 minutes at 350°F works great too
-
Avoid the microwave if possible — it makes the bread rubbery
Freezer-Friendly?
Yes — assemble the sandwich without fresh veggies, wrap tightly in foil and plastic wrap, and freeze for up to 1 month. Thaw overnight in the fridge before baking.
Mistakes to Avoid When Making Baked Italian Sub
Here are a few common pitfalls and how to avoid them for the perfect baked Italian sub every time:
-
Overstuffing the roll: Too much filling makes it hard to bake evenly and leads to a soggy mess.
-
Too much dressing pre-bake: A light drizzle is great, but overdoing it will soak the bread.
-
Skipping the toasting step: A quick pre-toast keeps the bottom from getting soggy and adds structure.
-
Imbalanced ratios: Make sure there’s enough cheese to bind the meats and toppings without overpowering them.
A little prep makes a big difference!
FAQs About Baked Italian Sub Sandwiches
Can I use regular sandwich bread instead of sub rolls?
You can, but it’s not ideal. Soft sandwich bread may fall apart or become soggy. Thick artisan bread or ciabatta are better substitutes if you don’t have sub rolls.
What are the best meats for an Italian sub?
The classic combo includes:
-
Salami
-
Capicola
-
Ham
-
Pepperoni
You can use any or all, and mix in turkey or roast beef if desired. For more on cured meat options, check out this guide to classic Italian deli meats.
Can I make these sandwiches vegetarian?
Absolutely! Go with roasted or grilled vegetables like bell peppers, onions, zucchini, mushrooms, and spinach. Use provolone, mozzarella, or even vegan cheese, and add condiments like spicy mustard or garlic aioli for flavor.
How do I keep baked subs from getting soggy?
A few tricks:
-
Toast the bread lightly before assembling
-
Don’t overdo condiments before baking
-
Add watery toppings like tomatoes and lettuce after baking
-
Wrap in foil only if you prefer soft bread — otherwise go uncovered for crispiness
For more guidance, see this toasting technique in the oven.
Are baked Italian sub good for a party?
They’re perfect for parties. You can:
-
Assemble and wrap them ahead of time
-
Bake a big batch all at once
-
Slice into smaller servings for easy sharing
They’re warm, melty, and always a crowd favorite.
Baked Italian Sub Sandwiches Recipe
Equipment
- Baking sheet
- Aluminum foil or parchment paper
- Sharp knife
- Cutting board
- Oven
Ingredients
- 4 hoagie or sub rolls sliced open but not through
- 8 slices provolone cheese
- 8 slices salami
- 8 slices pepperoni
- 8 slices ham or capicola
- 1/2 cup banana peppers drained
- 1/4 cup thinly sliced red onions
- 1/2 cup shredded lettuce optional, added after baking
- 1 tomato thinly sliced (optional, added after baking)
- 4 tbsp Italian dressing mayo, or spicy mustard
- Olive oil optional, for brushing
- Red pepper flakes or black olives optional toppings
Instructions
- Preheat oven to 375°F (190°C).
- Slice the sub rolls lengthwise, keeping one side intact.
- Layer meats on the bottom half of each roll: 2 slices each of ham, salami, and pepperoni.
- Add 2 slices of provolone on top of the meat.
- Add banana peppers and red onion slices over the cheese.
- If using dressing inside, drizzle lightly before baking (optional).
- Wrap subs in foil (for softer texture) or leave open on a baking tray for crispy tops.
- Bake for 12–15 minutes, until cheese is melted and the bread is toasted.
- Unwrap and add fresh toppings: lettuce, tomato slices, and extra dressing as desired.
- Serve warm and enjoy immediately!
Notes
- Make Ahead: Assemble subs (without lettuce/tomato) and refrigerate for up to 24 hours before baking.
- Vegetarian Option: Substitute meats with roasted vegetables and extra cheese.
- Serving Tip: Slice large subs into halves or thirds for party trays.
- Spicy Variation: Add jalapeños, pepper jack cheese, or sriracha aioli.
- Reheat Tip: Best reheated in the oven at 350°F for 10 minutes.
Nutrition