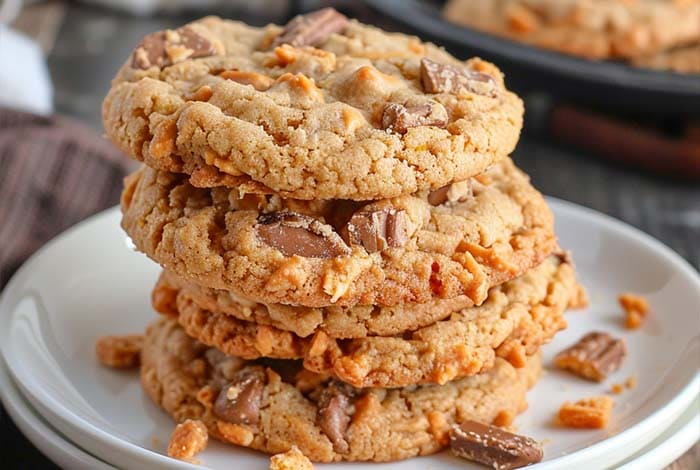
Peanut Butter Butterfinger Cookies are a delightful fusion of creamy peanut butter and the iconic crunch of Butterfinger candy bars, creating a cookie that’s both comforting and exciting. This unique blend marries the smooth, rich taste of peanut butter with the crispety, crunchety, peanut-buttery pleasure of Butterfinger, resulting in a dessert that appeals to both classic cookie lovers and those seeking a twist on traditional flavors.
The Butterfinger candy bar, with its long history dating back to 1923, has been a staple in American confectionery for nearly a century. Known for its distinctive layer of crunchy peanut butter candy coated in milk chocolate, Butterfinger has found its way into a variety of desserts, from ice cream to cakes and now, cookies. Its popularity in desserts stems from its ability to add texture and a unique flavor that complements a wide range of sweet treats.
The Perfect Ingredients
Importance of Quality Peanut Butter
The choice of peanut butter is crucial in achieving the perfect Peanut Butter Butterfinger Cookie. Opting for a high-quality, creamy peanut butter ensures that the cookies have a rich and smooth texture, while also providing a deep, roasted peanut flavor that pairs beautifully with the sweet crunch of Butterfinger bits.
Choosing the Right Butterfinger Product
For the Butterfinger component, it’s essential to use the right form of the candy. While Butterfinger bars can be chopped into pieces, using Butterfinger baking bits can save time and ensure uniformity in size, leading to an even distribution throughout the cookie dough. This consistency allows every bite to have the perfect balance of cookie, peanut butter, and Butterfinger.
Alternative Ingredients for Dietary Restrictions
For those with dietary restrictions, there are several alternatives that can be used without compromising the deliciousness of the cookies:
- Gluten-Free Flour: A 1:1 gluten-free baking flour can replace all-purpose flour for those with gluten sensitivities.
- Vegan Butter and Egg Substitutes: Vegan butter and flax eggs (a mixture of ground flaxseed and water) can be used to make these cookies vegan-friendly.
- Natural Sweeteners: For a reduced sugar option, natural sweeteners like coconut sugar can substitute for white and brown sugars, though this may slightly alter the flavor profile.
By carefully selecting the ingredients and considering dietary needs, Peanut Butter Butterfinger Cookies can be a versatile and inclusive treat that everyone can enjoy.
Step-by-Step Baking Guide
Preparing Your Kitchen
Before you start, ensure your kitchen is ready for baking. This means having all your ingredients measured and at room temperature, which is crucial for the butter and eggs. Preheat your oven to the recommended temperature, usually around 350°F (175°C), and line your baking sheets with parchment paper or silicone baking mats for easy removal and cleanup.
Mixing the Dough: Tips for the Perfect Consistency
- Creaming Butter and Sugars: Start by creaming together the butter with granulated and brown sugars until the mixture is light and fluffy. This process incorporates air into the dough, contributing to a lighter texture in the finished cookies.
- Adding Peanut Butter and Eggs: Add the peanut butter to the creamed mixture, ensuring it’s well integrated. Then, mix in the egg and vanilla extract, combining them thoroughly but avoiding overmixing, which can lead to dense cookies.
- Dry Ingredients: Whisk together the flour, baking soda, and salt in a separate bowl. Gradually add this to the wet ingredients, mixing until just combined. Overworking the dough at this stage can develop the gluten in the flour, making the cookies tough.
- Incorporating Butterfinger Pieces: Fold in the Butterfinger pieces gently to avoid crushing them too much, ensuring they’re evenly distributed throughout the dough.
Shaping and Baking: Achieving the Perfect Chewiness and Crunch
- Shaping: Using a cookie scoop or spoon, form the dough into balls and place them on the prepared baking sheets, spaced about 2 inches apart to allow for spreading.
- Baking: Bake in the preheated oven until the edges are golden but the centers are still soft, about 10-12 minutes. The key to perfect chewiness and crunch is not to overbake them.
- Cooling: Allow the cookies to cool on the baking sheet for a few minutes before transferring them to a wire rack. This helps them set without becoming too hard.
FAQs
Can I use natural peanut butter?
- It’s best to use commercial peanut butter for this recipe, as natural peanut butter’s oil separation can affect the texture and consistency of your cookies.
How do I prevent the cookies from spreading too much?
- Chill your dough for at least 30 minutes before baking. This helps solidify the fat in the cookies, reducing spreading. Also, ensure your baking soda is fresh, as expired leaveners can cause cookies to spread improperly.
Can these cookies be made gluten-free?
- Yes, simply substitute the all-purpose flour with a gluten-free flour blend designed for baking. Make sure it’s a 1:1 substitution blend for the best results.
Best way to store these cookies for freshness?
- Store the cooled cookies in an airtight container at room temperature. They should keep well for up to a week. For longer storage, you can freeze the baked cookies for up to 3 months, thawing them at room temperature when ready to enjoy.
Advanced Baking Tips
For those looking to perfect their cookie game, consider these advanced tips:
- Adjusting Bake Times: Slightly underbaking the cookies will result in a chewier texture, while a minute or two longer in the oven will offer a crunchier bite.
- Freezing and Thawing Dough: Cookie dough can be frozen for up to 3 months, allowing for fresh-baked cookies anytime. Remember to add a couple of extra minutes to the baking time when baking from frozen.
Decorating and Serving Ideas
Presentation can make a big difference:
- Drizzle melted chocolate over the cooled cookies for an extra touch of sweetness.
- Serve alongside a cold glass of milk or a cup of coffee for the perfect snack or dessert.
Healthier Alternatives
For those mindful of their health, consider these swaps:
- Use almond flour for a gluten-free option.
- Substitute some of the sugar with a natural sweetener like honey or maple syrup.
- For more healthy baking swaps, the “Healthy baking swaps by the American Heart Association” offers great alternatives.
Peanut Butter Butterfinger Cookies are not just a treat; they’re a journey into the heart of baking bliss. With the right ingredients, a bit of patience, and a dash of creativity, you can bring this delightful combination of flavors to life in your kitchen. Happy baking!
Peanut Butter Butterfinger Cookies Recipe
Equipment
- Mixing bowls
- Electric mixer or whisk
- Measuring cups and spoons
- Baking sheets
- Parchment paper or silicone baking mats
- Cookie scoop (optional)
- Wire cooling rack
Ingredients
- ¾ cup 170g unsalted butter, softened
- ½ cup 100g granulated sugar
- ½ cup 100g packed brown sugar
- 1 cup 250g creamy peanut butter (not natural)
- 1 large egg
- 1½ teaspoons vanilla extract
- 1½ cups 190g all-purpose flour
- ½ teaspoon baking soda
- ¼ teaspoon salt
- 1½ cups about 200g Butterfinger pieces, roughly chopped
Instructions
- Prep: Preheat your oven to 350°F (175°C). Line baking sheets with parchment paper or silicone mats.
- Cream Butter and Sugars: In a large bowl, use an electric mixer to cream together the butter, granulated sugar, and brown sugar until light and fluffy.
- Add Wet Ingredients: Mix in the peanut butter, egg, and vanilla until well combined.
- Combine Dry Ingredients: In a separate bowl, whisk together the flour, baking soda, and salt. Gradually add to the wet ingredients, mixing until just combined.
- Fold in Butterfinger: Gently fold in the Butterfinger pieces until evenly distributed.
- Shape Cookies: Use a cookie scoop or spoon to form dough balls and place them on the prepared baking sheets, spacing them about 2 inches apart.
- Bake: Bake for 10-12 minutes, or until the edges are golden but the centers are still soft.
- Cool: Allow cookies to cool on the baking sheet for 5 minutes before transferring to a wire rack to cool completely.
Notes
- Chilling the Dough: For thicker cookies, chill the dough for at least 30 minutes before baking. This helps prevent the cookies from spreading too much.
- Storage: Store cookies in an airtight container at room temperature for up to a week or freeze for up to 3 months.
- Natural Peanut Butter: It's recommended to use commercial creamy peanut butter for this recipe, as natural peanut butter can affect the texture of the cookies.