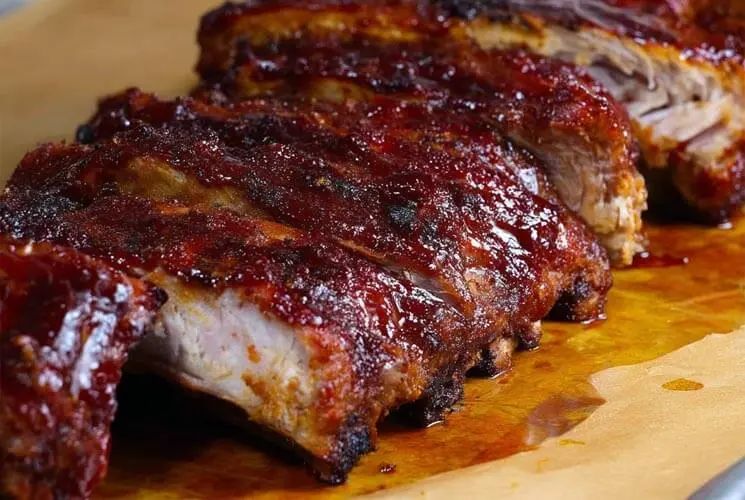
When you think of mouthwatering BBQ ribs, a smoky grill might be the first thing that comes to mind. But guess what? You don’t need a grill to enjoy fall-off-the-bone, finger-licking ribs! Oven-baked BBQ ribs are a total game-changer, offering all the smoky, saucy goodness without any complicated outdoor setup. Whether you’re braving a rainy day or just craving ribs in the middle of winter, baking them in the oven guarantees delicious results right from your cozy kitchen.
The magic of oven baking lies in the balance between convenience and flavor. A low, slow roast lets the meat become incredibly tender while locking in all the rich, savory spices. Plus, it gives you complete control over every step — no worries about flare-ups, uneven heat, or unpredictable weather. By the time they’re finished and glazed with your favorite BBQ sauce, you’ll be reaching for napkins (and seconds!).
Why Bake Ribs Instead of Grilling?
Grilling ribs has its charm, but baking them in the oven might just become your new favorite method. Oven-baking offers unbeatable tenderness, allowing the ribs to slowly cook to perfection without the risk of drying out. It’s a hands-off process, making it perfect for busy days when you still want to serve something spectacular.
Another major win? Baking is weather-proof. No need to stand outside in the sweltering heat, the rain, or the snow just to satisfy a BBQ craving. Instead, your oven creates a steady, controlled environment where the ribs can roast low and slow, soaking up all the seasoning and flavor you packed into them.
Tip: Baking ribs also lets the dry rub and sauce meld beautifully into the meat, creating a deeper, richer taste that sometimes even grilling can’t match. It’s BBQ magic with almost zero stress!
Types of Ribs You Can Use
Not all ribs are created equal, and choosing the right type can make a big difference in your final dish. Let’s break it down:
-
Baby Back Ribs: These are the most popular choice for oven baking. They’re smaller, leaner, and incredibly tender when cooked slowly. Baby back ribs have a slight curve and a milder flavor, making them perfect for soaking up all that sweet and smoky BBQ sauce.
-
Spare Ribs: Larger and meatier, spare ribs come from the belly area of the pig. They have a bit more fat, which means more flavor and juiciness when cooked properly. They take a little longer to bake but reward you with extra richness.
-
St. Louis Style Ribs: Think of these as trimmed spare ribs — flatter, more uniform, and easier to handle. They have a great balance of meat and fat, making them a top pick for competition-style BBQ ribs baked at home.
Choosing the right ribs for baking really comes down to personal preference. Want something quick and tender? Baby backs are your friend. Craving meatier, more robust flavor? Go for spare ribs or St. Louis style. No wrong answers here — just delicious ones!
Essential Ingredients for Perfect Oven Baked Ribs
You don’t need a laundry list of ingredients to make unforgettable oven-baked ribs — just a few key players:
-
Ribs: Baby back, spare, or St. Louis style — fresh and well-trimmed.
-
Dry Rub Essentials: A winning blend usually includes paprika (smoky or sweet), brown sugar for caramelization, garlic powder, onion powder, black pepper, salt, and a hint of cayenne if you like a little heat.
-
BBQ Sauce: Whether you whip up a batch at home or grab a trusty bottle from the store, choose a sauce you love. Look for ones labeled “hickory smoked,” “sweet and spicy,” or “honey BBQ” for extra flavor punch.
High-quality ingredients, even in their simplicity, make all the difference. The better the basics, the better the ribs! Don’t skimp on fresh spices and a good BBQ sauce — they’re the secret weapons behind every memorable bite.
How to Prep Ribs for Baking
Proper prep sets the stage for ribs that are juicy, tender, and loaded with flavor. Here’s what you need to do:
First, remove the membrane — that tough, papery skin on the back of the ribs. Leaving it on can make the ribs chewy. To remove it, slide a knife under one corner, grab it with a paper towel (for better grip), and peel it off in one go if possible.
Next, trim excess fat. While some fat is essential for flavor, trimming the thicker portions ensures an even cook and prevents greasy ribs.
Pat the ribs completely dry with paper towels. This is crucial because it helps the dry rub adhere better and promotes proper caramelization during baking.
Pro Tip: After seasoning with the dry rub, let the ribs rest at room temperature for at least 30 minutes before baking. This resting time allows the flavors to penetrate deeper into the meat, setting you up for ultra-flavorful ribs from the first bite to the last.
A little extra care here goes a long way in delivering mouthwatering results that taste like they’ve been slow-smoked for hours.
The Secret to a Flavorful Dry Rub
A flavorful dry rub is the heart and soul of any great rib recipe. It’s where all that crave-worthy seasoning magic begins!
Start with a solid base: paprika (for color and a gentle smoky note) and brown sugar (for caramelization and sweetness). Add in garlic powder, onion powder, kosher salt, and black pepper to build a savory backbone.
Balance is key. You want a beautiful blend of sweet, smoky, savory, and spicy. For more heat, toss in some cayenne pepper or crushed red pepper flakes. Prefer it milder? Stick to a simple sweet-smoky combo without the spice.
You can also personalize your rub with extras like cumin (for earthiness) or mustard powder (for a zesty kick).
Tip: Don’t be shy when applying the rub — coat the ribs generously on both sides for maximum flavor payoff. Your future self will thank you when you’re digging into the juiciest, most flavorful ribs ever!
Step-by-Step: How to Bake BBQ Ribs in the Oven
Ready to make ribs that melt in your mouth? Here’s your foolproof game plan:
1: Preheat and Prep.
Preheat your oven to 275°F. Line a baking tray with aluminum foil for easy cleanup. If you have a wire rack, place it on top of the tray — it helps the ribs cook evenly, but it’s optional.
2: Apply the Dry Rub.
Generously coat both sides of the ribs with your dry rub. Make sure to press it in with your hands so the seasoning really sticks.
3: Wrap Tightly in Foil.
Wrap the ribs snugly in foil — almost like you’re tucking them in for a long nap. Sealing them well traps moisture and creates a steamy environment that makes the meat ultra-tender.
4: Bake Low and Slow.
Place the wrapped ribs on your prepared tray and bake for about 2.5 to 3 hours. Low and slow is the secret to tender, juicy ribs that fall right off the bone.
5: Sauce and Caramelize.
Once baked, carefully unwrap the ribs (watch out for steam!). Brush a thick layer of your favorite BBQ sauce all over the ribs. For that irresistible sticky, caramelized finish, pop them under the broiler for about 3–5 minutes — just until the sauce bubbles and lightly chars. Keep a close eye to avoid burning!
Pro Tip: For extra flavor, layer on a second coat of sauce halfway through broiling. More sauce = more goodness.
How Long to Bake Ribs at Different Temperatures
While 275°F is the gold standard for melt-in-your-mouth ribs, you do have options depending on your schedule:
-
275°F (preferred): Bake for 2.5 to 3 hours. This slow bake allows the meat fibers to break down beautifully, resulting in juicy, tender ribs.
Advertisement -
300°F: Bake for 2 to 2.5 hours. Speeds things up a little without sacrificing too much tenderness.
-
350°F: Bake for 1.5 to 2 hours. This is the fastest option but may slightly compromise on how fall-off-the-bone the ribs feel.
Tip: Always check tenderness, not just the clock! A knife or fork should glide through the meat easily when they’re ready.
Best BBQ Sauces for Oven Baked Ribs
The right sauce can take your ribs from great to unforgettable. Here’s what to consider:
-
Sweet and Smoky: Perfect for that classic backyard BBQ flavor. Look for sauces that blend brown sugar, molasses, and a hint of smoke.
-
Spicy: Love a little heat? Grab a chipotle or habanero BBQ sauce for a fiery kick that balances beautifully with the rich meat.
-
Vinegar-Based (Carolina Style): If you prefer something tangier and lighter, a vinegar-based sauce is a refreshing contrast to the rib’s richness.
Want to make your own? Combine ketchup, apple cider vinegar, brown sugar, Worcestershire sauce, and your favorite spices for a quick and delicious homemade BBQ sauce.
Pro Tip: Warm your sauce slightly before brushing it onto the ribs — it spreads more easily and soaks into the meat better!
How to Get That Perfect Caramelized Finish
Broiling is where the magic happens! After baking, a quick broil caramelizes the sugars in the BBQ sauce, giving your ribs that sticky, slightly charred glaze everyone loves.
Watch them like a hawk — broilers work fast, and you don’t want burnt ribs after all your hard work.
Pro Tip: Brush on a second layer of BBQ sauce halfway through broiling for an even thicker, more luscious coating. The double-sauce trick adds depth of flavor and creates a stunning, glossy finish.
What to Serve with Oven Baked BBQ Ribs
Complete your BBQ feast with these delicious sides:
-
Coleslaw: The cool, creamy crunch balances the richness of the ribs.
-
Baked Beans: Smoky, hearty beans are a must for any BBQ plate.
-
Cornbread: Sweet, buttery cornbread is perfect for soaking up extra sauce.
-
Mac and Cheese: Because you can never have too much comfort food!
Beverage Pairings:
Chill a crisp beer (like a pilsner or pale ale), sip a glass of zinfandel, or go non-alcoholic with a refreshing lemonade or sweet tea.
Mix and match your sides and drinks — there’s no wrong way to build the perfect rib dinner!
How to Store and Reheat Leftover Ribs
If you somehow have leftovers (lucky you!), here’s how to keep them delicious:
Storage:
Place ribs in an airtight container and refrigerate for up to 4 days. For longer storage, freeze them tightly wrapped in foil and placed in a freezer bag — they’ll keep for about 2 months.
Reheating:
-
Oven: Wrap ribs in foil, place on a baking sheet, and heat at 300°F for 20–30 minutes until warmed through.
-
Microwave: Not ideal for texture, but doable. Cover with a damp paper towel and heat in short bursts to avoid drying them out.
Pro Tip: Sprinkle a little water or broth over the ribs before reheating to help maintain moisture!
FAQs About Oven Baked BBQ Ribs
What is the best temperature to cook ribs in the oven?
The sweet spot is 275°F for ultra-tender, juicy ribs. It allows the connective tissue to break down without drying the meat.
Should ribs be covered when baking?
Yes! Wrapping ribs tightly in foil traps moisture and creates a steamy environment, leading to that fall-off-the-bone texture.
How do you keep ribs moist in the oven?
Bake low and slow, keep them covered, and don’t skip the resting period after baking. Moisture is key!
Can I bake ribs without aluminum foil?
You can, but they may dry out more easily. Without foil, consider adding a shallow pan of water in the oven to keep the air moist.
Is it better to boil ribs before baking?
Boiling can strip ribs of their natural flavor. It’s better to skip boiling and let the slow baking process tenderize them naturally.
How do you tell when ribs are done in the oven?
The meat should pull back from the bones slightly, and a fork should easily slide into the meat. Internal temp should be around 190–203°F for ultimate tenderness.
Final Thoughts: Why You’ll Love This Oven Baked BBQ Ribs Recipe
If you’re craving BBQ but don’t have a smoker or grill, these oven-baked ribs are your new best friend. They’re ridiculously easy to prepare, filled with bold flavors, and juicy enough to make your taste buds dance. Plus, with the simple broiling step, you still get that irresistible sticky-sweet caramelization that screams summer BBQ vibes.
Give this recipe a try, and you’ll feel like a BBQ pitmaster right from your kitchen — no fancy equipment required! Warning: once you master these ribs, your friends and family might start asking you to host every cookout from now on.
Oven Baked BBQ Ribs Recipe
Equipment
- Baking sheet
- Aluminum foil
- Wire rack (optional)
- Mixing bowl (for dry rub)
- Pastry brush (for BBQ sauce)
- Tongs
Ingredients
- 2 –3 pounds baby back ribs or spare ribs or St. Louis style
- 2 tablespoons paprika sweet or smoked
- 2 tablespoons brown sugar
- 1 tablespoon garlic powder
- 1 tablespoon onion powder
- 1 teaspoon black pepper
- 1 teaspoon kosher salt
- ½ teaspoon cayenne pepper optional for heat
- 1½ cups BBQ sauce homemade or store-bought
Instructions
- Preheat oven to 275°F (135°C). Line a baking sheet with foil and place a wire rack on top if using.
- Prepare ribs by removing the silver skin membrane from the back and trimming any excess fat. Pat dry with paper towels.
- Mix dry rub ingredients in a bowl.
- Season ribs generously with the dry rub, pressing the seasoning into the meat on both sides.
- Wrap ribs tightly in foil and place on the prepared baking sheet.
- Bake ribs for 2.5–3 hours, until very tender.
- Carefully unwrap ribs and discard excess juices. Brush a generous layer of BBQ sauce over the ribs.
- Broil ribs on high for 3–5 minutes, watching closely, until the sauce is caramelized and bubbling.
- Optional: Brush on a second layer of sauce and broil briefly again for extra stickiness.
- Slice and serve with your favorite sides!
Notes
- Rest after baking: Let ribs sit for 5 minutes before slicing for the juiciest results.
- Double-wrap for extra moisture: If you’re worried about dryness, use a second layer of foil.
- Customize your spice level: Adjust the cayenne pepper to taste or skip it altogether for milder ribs.
- Homemade BBQ sauce tip: Combine ketchup, brown sugar, apple cider vinegar, and Worcestershire sauce for a quick DIY sauce!
- Storage: Store leftovers in an airtight container in the fridge for up to 4 days or freeze for up to 2 months.
Nutrition
Can’t wait to make these